Adding a Full-Size Washer/Dryer to an Excess 14
One of the many nice things about the owner’s layout of the Excess 14 is it provides for a full-sized (euro) combo washer/dryer. While Excess provided the ability to have the washing machine aboard, getting it installed was a bit of a puzzle.
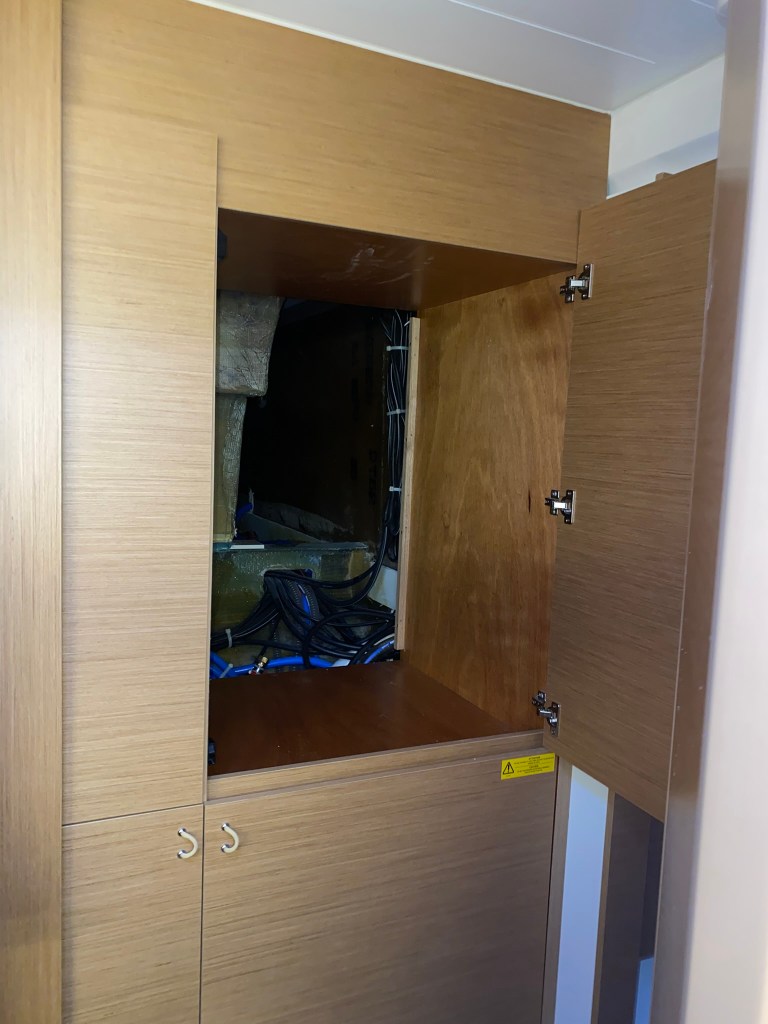
In the owners cabin (starboard hull), just forward of the stairway is a closet, that normally has a hanger rod. In this photo, I’ve removed the back panel to expose the supply line, and drain. This great access way between the saloon bench and the forward exterior lockers gets closed off when we install the washer, and this is not something you’ll want to remove, easily. It’s a good time to do other work that needs this access
If you have the pre-wired and plumbed option, the installation isn’t overly complex. If you don’t have the power outlet, tap to the cold water, and through-hull for the discharge, those are extra steps.
To recap, the steps involve
- Confirm you have the pre-wiring/plumbing for power, water and discharge
- Find a standard sized euro machine that will fit
- Prep cabinet
- Protect the passageway into the hull, and levitation into the cabinet
- Get the supplies
- Remove the front and rear parts of the washer to fit it into the hull
- Assemble a crew of 3 people to get it into the hull
- Prep the hull and move the machine into the hull
- Re-assemble the removed parts
- Install and wash some clothes
Tools Needed
There wasn’t too much needed, and nothing special:
- Torx drivers for many of the panels screws
- Philips and flat blade screwdrivers
- Knife for scribing the wood
- Drill and ~13mm bit for the holes to secure the washing machine
- Several boxes to raise the washing machine to the aprox. height of the shelf
- A cart was super helpful to put the boxes on, then wheel the machine back and forth as you’re reassembling it, and getting it ready to go in place
- (3) humans for getting it into the hull, (2) humans for getting into the cabinet.
Supplies Needed
- (1) 90° hose sized fitting for the back of the washing machine, with rubber washer
- (4-6) 20-25cm stainless hose clamps
- (1) 13mm barb coupling to connect the drain hose to the pre-plumbed drain line
- (4) bolts (diameter of the feet of your washing machine), 6-7cm long to go through the shelf, through spacers, and into the bottom of the machine
- (4) shelf support brackets to reinforce the shelf
- (~16) 15mm screws to attach the shelf brackets, without going through the shelf.
- Cable ties
- Adjustable wrenches for the plumbing connections
- Liquid locking fluid for the connections. I prefer the liquid over Teflon tape as it’s like locktite, but forms a liquid seal as well.
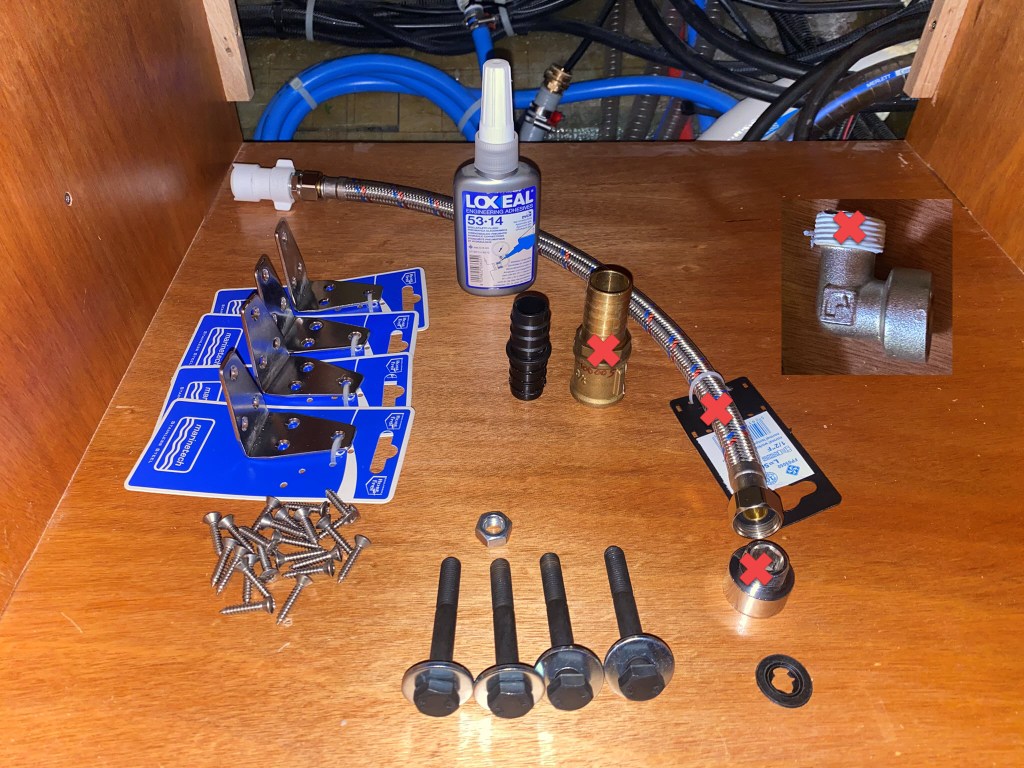
In the picture above, I was going to use a braided hose line but decided to use the blue water supply line to go from the pre-supplied valve to the back of the 90° adapter on the back of the machine. I chose against teflon tape, and used the Loxeal, or an equivalent.
Confirm You Have Pre-Wiring/Plumbing
In the lower section fo the cabinet, you should see something similar to below. You’ll need to remove the shelf, which is on clip-in brackets.
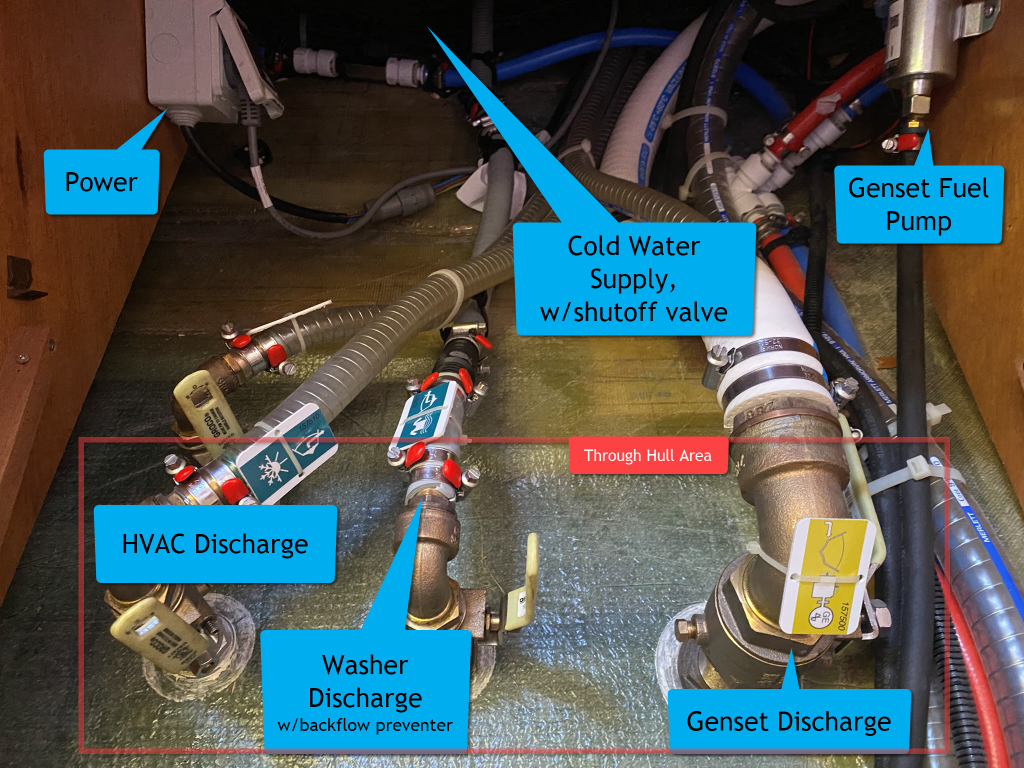
Picture after install. Pre-install will have a coil for the water supply line, including the valve, and the backflow preventer.
We were pre-plumbed for HVAC, Washing Machine and a Genset. If you don’t have the pre-install, note the area designated for the Through Hulls. This area is solid fiberglass. There’s no balsa core that gets exposed when you drill holes in your floating home. While there are techniques to drill through a balsa core, Beneteau/Excess have provided all the places you’ll need around the boat.
Note, there’s a fuel pump for your genset tucked in this spot between the filter under the starboard bed, next to the fuel tank, and the genset.
Find a Standard Size (Euro) Washer/Dryer
You’ll likely want the most efficient machine you can find. This involves power and water. If you get a washer/dryer combo, which I highly recommend, note the dryer will not only be less efficient with power, it may use a LOT of water. Similar to your heat pump-based HVAC systems, many use water to dry your clothes.
For comparison, we got the LG D4R7009TSSB Washer/Dryer. Note, this is a Greek version (when in Rome), so you may not be able to find this exact model in your region. Side note, we can’t read the labels, but the connected app is in English.
| Feature | Spec |
|---|---|
| Washing Only Cycle | |
| Capacity (kg) | 9kg |
| Energy Efficiency Class | A |
| Energy consumption per 100 cycles | 45kwh |
| Eco Mode Full / Half / Quarter (kWh) | 0.67 / 0.43 / 0.26 |
| Time (minutes) – Full / Half / Quarter | 228 / 174 / 142 (efficiency takes time) |
| Water Consumption Per Cycle | 50 liters – and this is a great model |
| Wash & Drying Cycle | |
| Capacity (kg) | 6kg – yes, you need to reduce a full load |
| Energy Efficiency Class | D – apparently the EU is resetting this to A, as you can’t get a machine better than D, as of April 2025 |
| Energy consumption per 100 cycles | 308 kWh |
| Energy Consumption wash + dry Full / Half | 3,821 / 1.962 (kWh) |
| Water Consumption Per Cycle | 90 liters (almost half standard water storage) |
| Duration full / half load | 455 / 275 minutes |
Find a Great Deal, Not a Cheap Brand
Scar tip: find a great deal, but don’t buy a cheap machine. Consider the effort to install / remove to service / find parts or worse, a tech that will come to your boat.
Look for Energy Star awards, there are many, and you should be able to find a machine that’s at least as good as above.
In the spring of 2025, in Cyprus, we got the above LG for 790€, including VAT. I’ve seen the same model for over 1,200€, and I’ve seen other off brands at 500€. Don’t make a price decision you’ll regret. Especially if you’re saving the money to install yourself.
Machine Sizing
Excess provided an exact sized space, almost. What we found was, 61.5cm W, 84cm H, 55cm D (inside lip), 58cm to door. This assumes you keep the back panel, which you do not need, and likely do not want. The cabinet is so tight, you’ll want the airflow. My suggestion is do not think twice about the depth and go with a full depth machine. The “counter” style machines are more compact, more expensive, less volume, and you might save the back panel, that you’ll need to cut holes in, and you’ll never see.
See the Prep the Cabinet section for some more details if you don’t see 85cm in height, and how to transport the machine past the shelf lip.
Europe or US Sized Machines
Hull Yeah! is a Europe / 230v configured boat. I’m assuming US configured boats have the same dimensions. Manufactures make Euro sized machines in the states, with 120v power, so you shouldn’t have a problem finding a euro sized machine.
| Euro Standard Size | 85cm H x 60cm W, 50-60cm D |
| US Standard Sizes | 39″/99cm H, 27″/68cm W, and 32-34/81.cm-86.4cm |
Prep the Cabinet
This is where I spent the most time, and I hope to save you your precious time, or worse, drilling holes in the wrong place.
- Remove the cabinet back panel with some small torx screws
- Remove the two square pieces of wood that support the back panel (you don’t need the panel, you’ll need the depth and space to vent the machine.
- I used these two pieces of wood to slide the machine into the cabinet.
- Remove the lower notched shelf where the through hulls are. If you remove the plastic shelf clips, it’s easier to get the shelf out
- Remove both the upper and lower doors
- Remove the door hardware, hinges and latches, as you’ll need every mm to fit the machine in.
Positioning
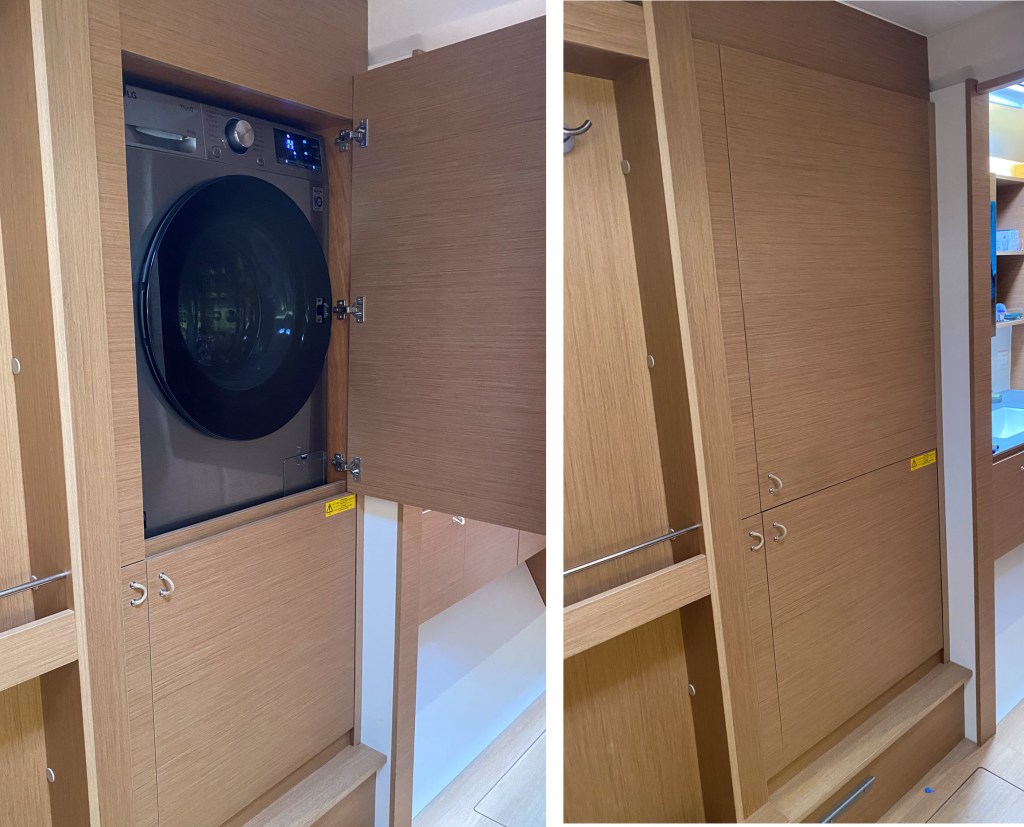
I debated a lot whether I wanted to put the door back on. While I found a nice Excess Grey colored machine, I like the clean look of it closed up. You’ll need to account for the washing machine door, and you may have an access panel at the bottom that needs to clear the shelf lip. You also need to leave room for the hinges as they won’t fit between the machine and the cabinet – yes it’s that tight.
As noted above, I didn’t worry about the back panel, so I set the machine far enough back to clear everything, which provides for the door to go back on. While the liquid tray is a bit high, it came out far enough to pour in the liquid. Although I did have to move the magnet latch down a few inches as it rubbed the tray.
Conflicting Door Openings
The LG machine I found opens to the left, while the cabinet opens to the right. At first, I thought this was going to be a problem, but the washing machine door opens far enough to not make this awkward.
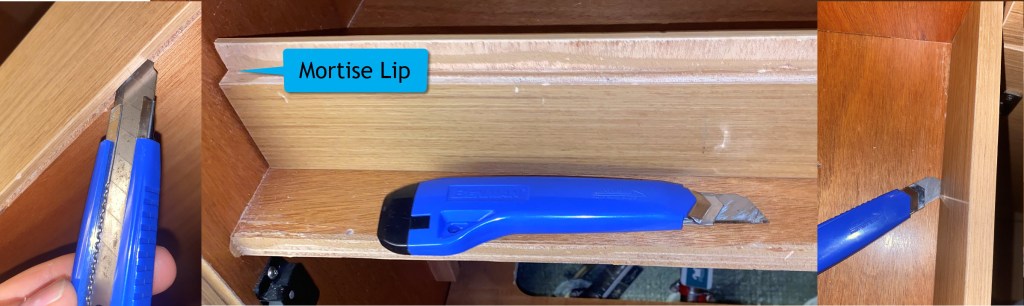
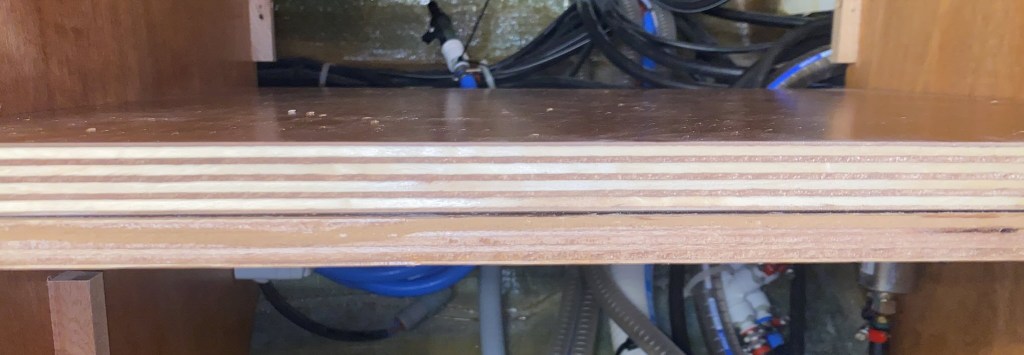
Removing the Shelf Lip
The lip must be removed to slide the machine in. You’ll want to save it as the lip as it’s the cosmetic edging to the shelf and covers the feet. It also fills the gap between the upper/lower doors, giving a nice clean look.
While there are screws from the bottom it’s also glued in. Take a good sharp knife and wedge it in the joining between the lip and the shelf. You’ll need to do this from the bottom (vertical), and from the top (horizontal). After scribing it several times, estimating the depth, you’ll feel it come loose.
Removing the Extra Shelf
On our hull, there was a second 2cm shelf screwed to the built-in slightly thinner shelf. The lower shelf is tabbed into the sides giving it plenty of support. The washing machine is held up by its feet on the sides, so you don’t need strong support in the middle of the shelf.
Looking under the shelf, you’ll likely see several screws. Remove them all. The topper shelf can now be removed by sliding it back a bit, with the back panel removed.
While it’s nice to have the reinforcement, there wasn’t enough room to fit the extra 2cm.
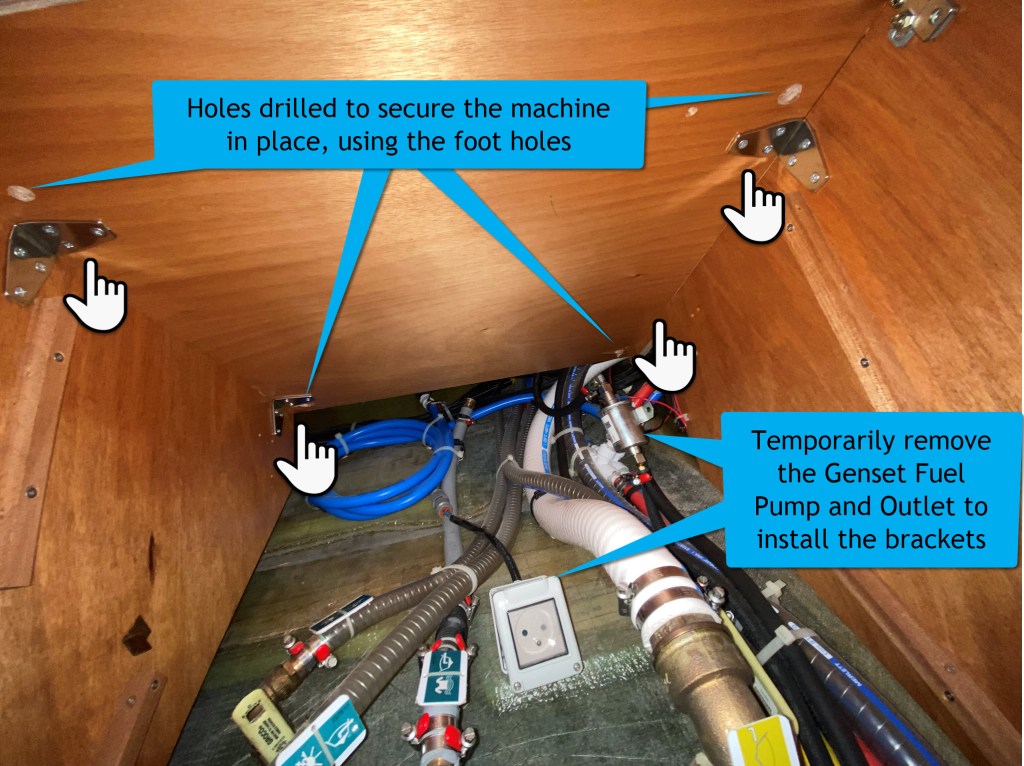
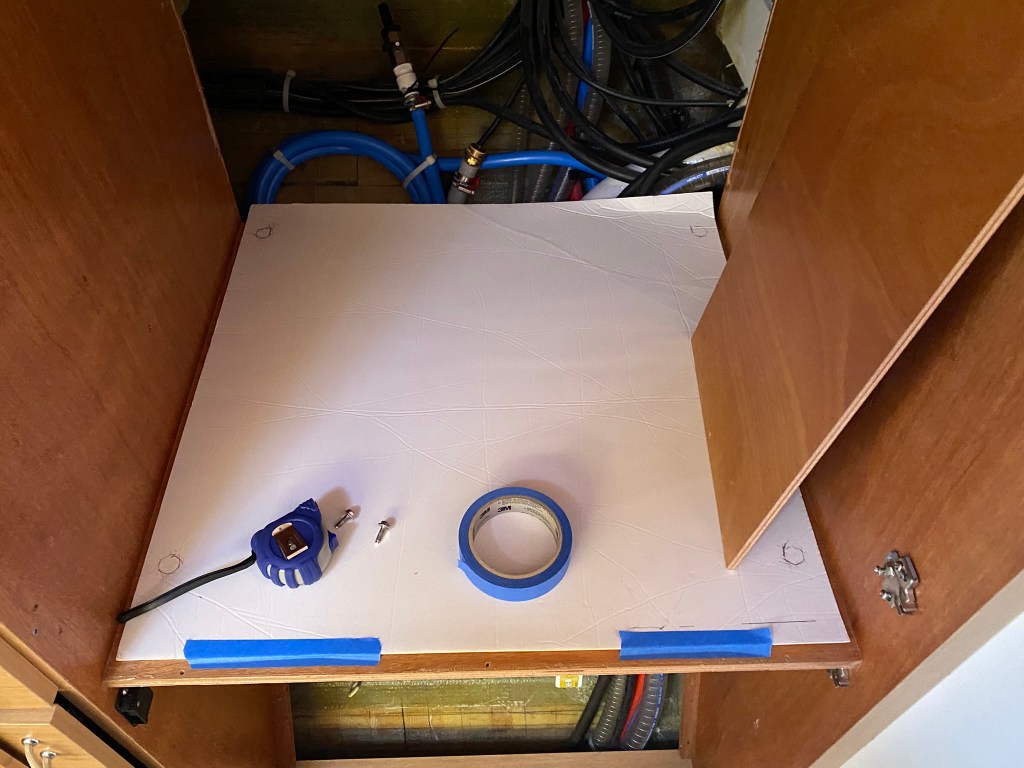
I added stainless steel brackets near each foot. The picture shows the holes drilled that will secure the machine. I removed the 4 feet, bought 6mm long bolts and large washers to bolt the machine in place. I used some washers and nuts to be spacers between the shelf and the bottom of the machine. It’s solidly in place, and not moving.
Reinforcing the Shelf
I purchased some stainless steel brackets that I’ve mounted below the shelf. You can also screw the provided toper shelf below the framed in shelf, then use the brackets to reinforce the whole thing. With the outlet and genset fuel pump in place, I didn’t have the room. I wound up temporarily removing both to put in the brackets, so I could have screwed the 2cm shelf back in, but opted not to.
Prepping the Supply and Drain Line
The Euro machines only have cold water supplies, and that’s how Excess pre-plumbs the setup. If you need hot water, you’ll be able to tap in, but I’d be surprised as I’m told all Euro machines are cold-only.
For the supply line, you’ll likely want a 90° bend from the back of the washing machine, so the supply line isn’t pulling down, just waiting to break off. I choose not to use the machine provided hose. On our pre-plumbed setup, there was plenty of blue water line. I cut it back, putting the inline valve back in place. I like being able to shutoff the supply to the machine, reducing chances of a pressured leak.
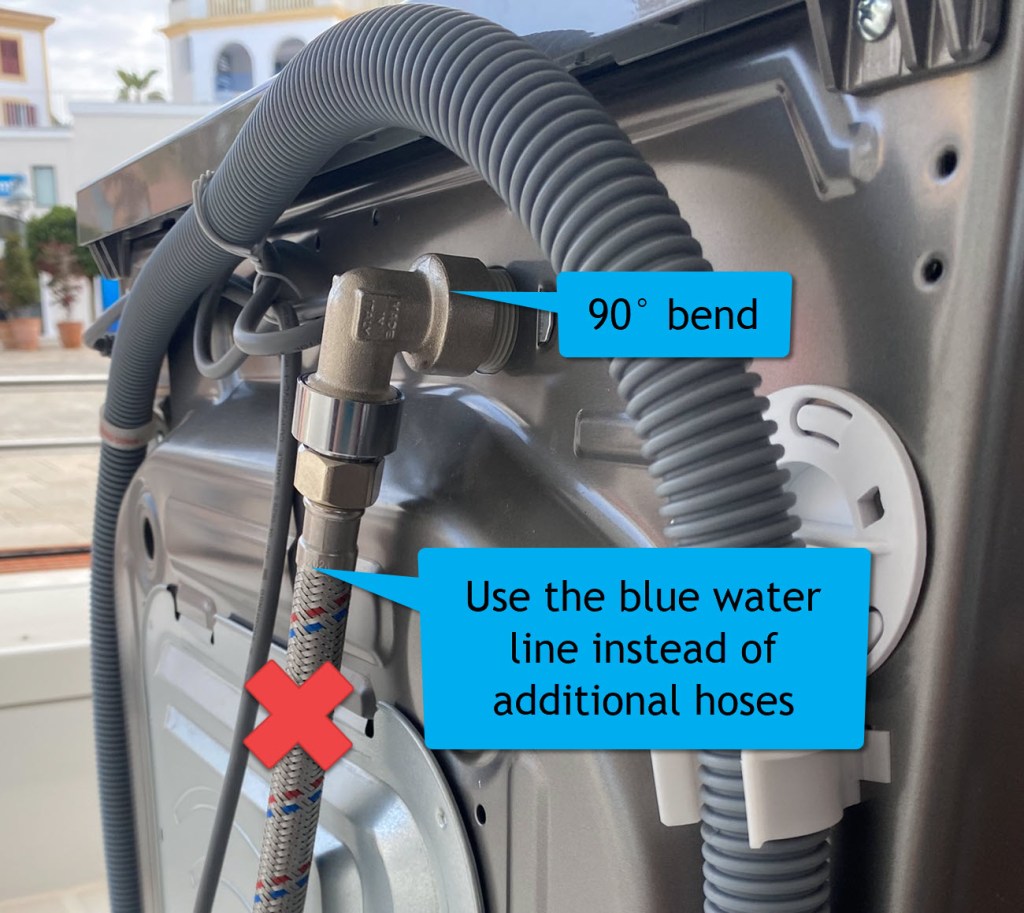
I then used the provided quick connects to reconnect the supply to the 90, and left it disconnected for now. See install steps below.
The drain line is long enough. You’ll just need a 3/4″ double barb and 4 hose clamps (2 on each side), to secure the drain to the provided hose.
The power line is super easy. It will just slide in the shelf, dangle down the back, and you can plug it right in.
Getting the Washing Machine into the Hull, and Ready to Install
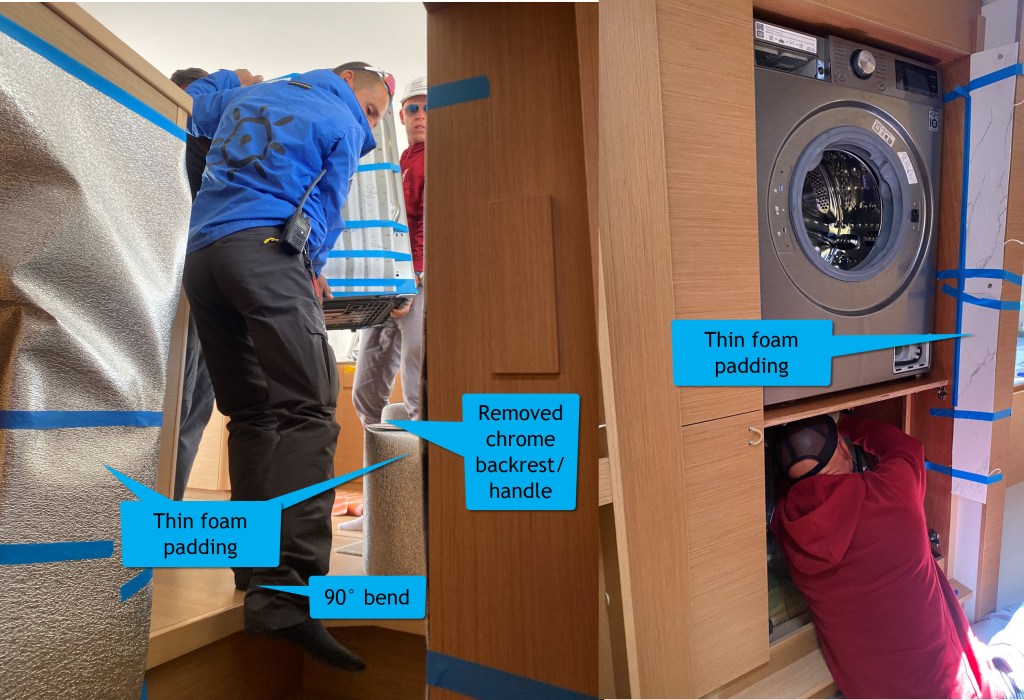
Nothing on a boat is easy. The dimensions of the machine and the steps into the starboard hull weren’t enough. The machine is quite heavy and awkward to maneuver. To avoid squeezing it in, damaging the interior of the boat, I chose to disassemble the machine.
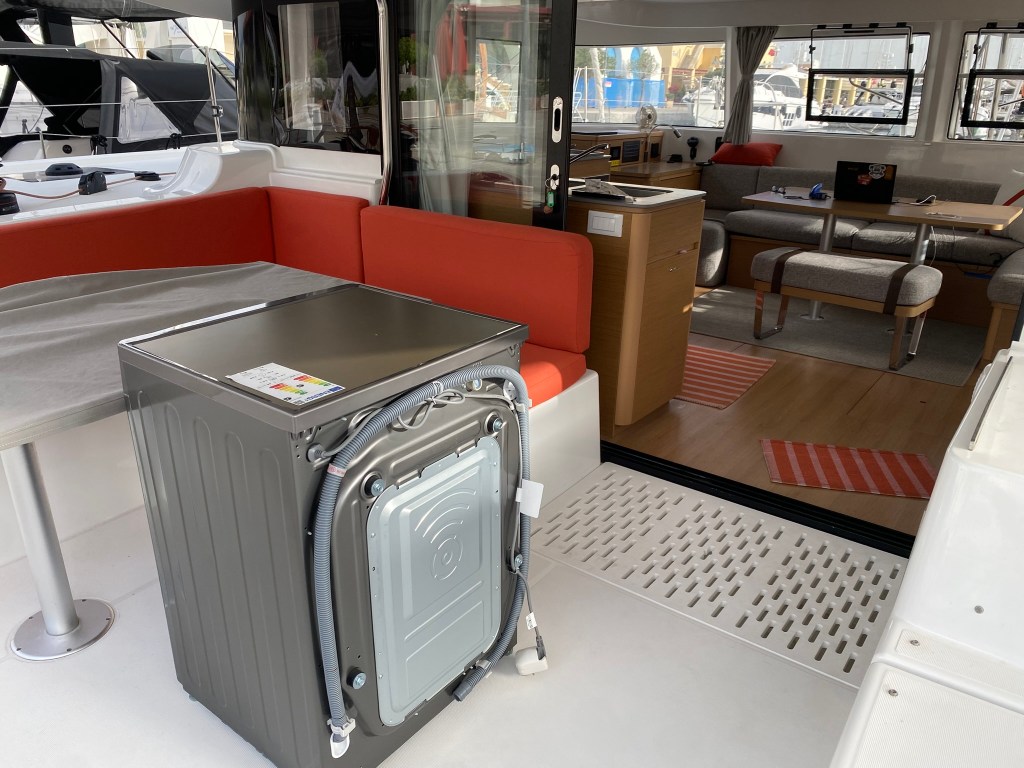
In addition to prepping the machine, I took the extra time to protect the full path into the hull. I even put the plywood backing at the bottom of the stairs, in front of the desk in case gravity took over. A little prep will save the regrets of dings you’ll see for years.
- Remove the washing machine front door
- Remove the back panel, as that 1cm makes a difference
- Remove the transport locking screws
- Remove the top cover, not for height, but it’s the deepest part, and it’s how you access the front panel
- On the LG machine, I removed the top control panel.
- Remove the chrome handle on the seat that goes into the starboard hull
- Install padding, such as windshield sunscreens, or something that will protect the wood.
- Wrap the sharp edges of the machine with tape or other padding.
To simplify re-assembly, either put the screws back in, or tape them to each panel you remove.
I staged all these parts in the closet, so it was ready for re-assembly.
I put boxes on a small cart to sit the Washer on, just in front of the cabinet. This will help you prep it, then slide it into place. We were so busy; I forgot to take a picture of the box/cart setup.
Reassembling
Once it’s in the hull, put everything back on, except the washing door, as that can be done later, and it’s just less to deal with.
Be sure to use a rubber washer on the supply lines, and pipe thread each connection to assure the lines don’t leak. Once you push this in place, you do not want to be messing with it. I also ran 2 quick cycles to clear any pipe thread that might have gotten on the clothes.
Securing the Washer
The last thing we want is a heavy thing falling 90cm into the hull. To assure it stays in place, I’ve removed the four leveling feet, and created a template to drill slightly larger holes for installation. The larger holes gave some wiggle room. Be sure to leave enough setback to clear the machine door, which is also about what you’ll need to clear the hinges.
If you don’t use the extra shelf, you’ll need 7cm bolts. If you’re in Europe, you’ll have fun finding Imperial threads but just keep searching for a good hardware store.
Screw them from the bottom into the base of the washing machine, with some good wide washers to keep from digging into the wood. I added some spacers (larger nuts) between the bottom of the washing machine, above the shelf. You won’t need “levelers” as the shelf is flat.
<I’ll add a picture of the bolts when I get back to the boat>
The Final Setup
All in all, it wasn’t very complex. It was the prep, planning and willingness to take the extra time to partially disassemble the machine, find padding and prep the hull. That, and running to the store, second guessing all the pieces for fittings. Hopefully this will help you take on the project, or help your installer figure out how the Excess 14 can fit a full-sized euro washer/dryer combo.
I’ll post some consumption numbers once we get our new solar, batteries and battery monitoring system installed.
