Excess 14 Maintenance and Monitoring
After a few months of preparation, and two months of active sailing, we’ve settled into the regular maintenance and monitoring of an Excess 14. For the seasoned, these may be obvious, for the new owners, like us, there are some gotchas I wish I knew about earlier. Robin, another Excess 14 owner had suggested a list of things to watch for, such as a chaffing Dynema rudder control line.
So, here’s a compiled list of items to watch out for that I’ll update as we learn of new items, or better resolutions.
Rigging
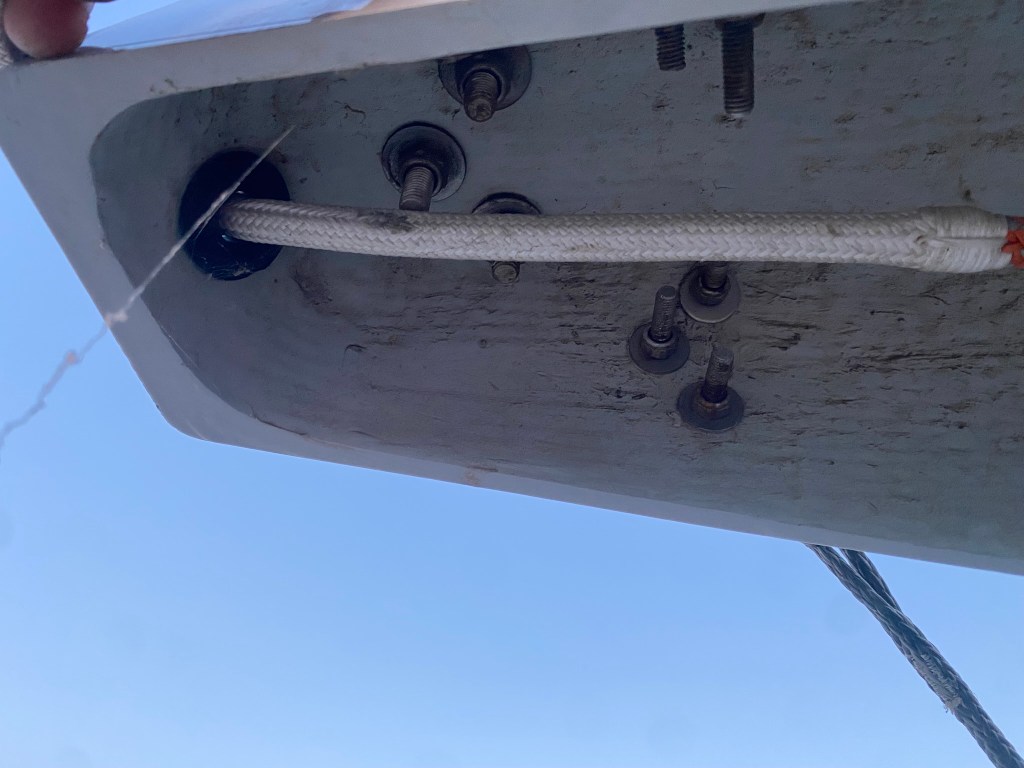
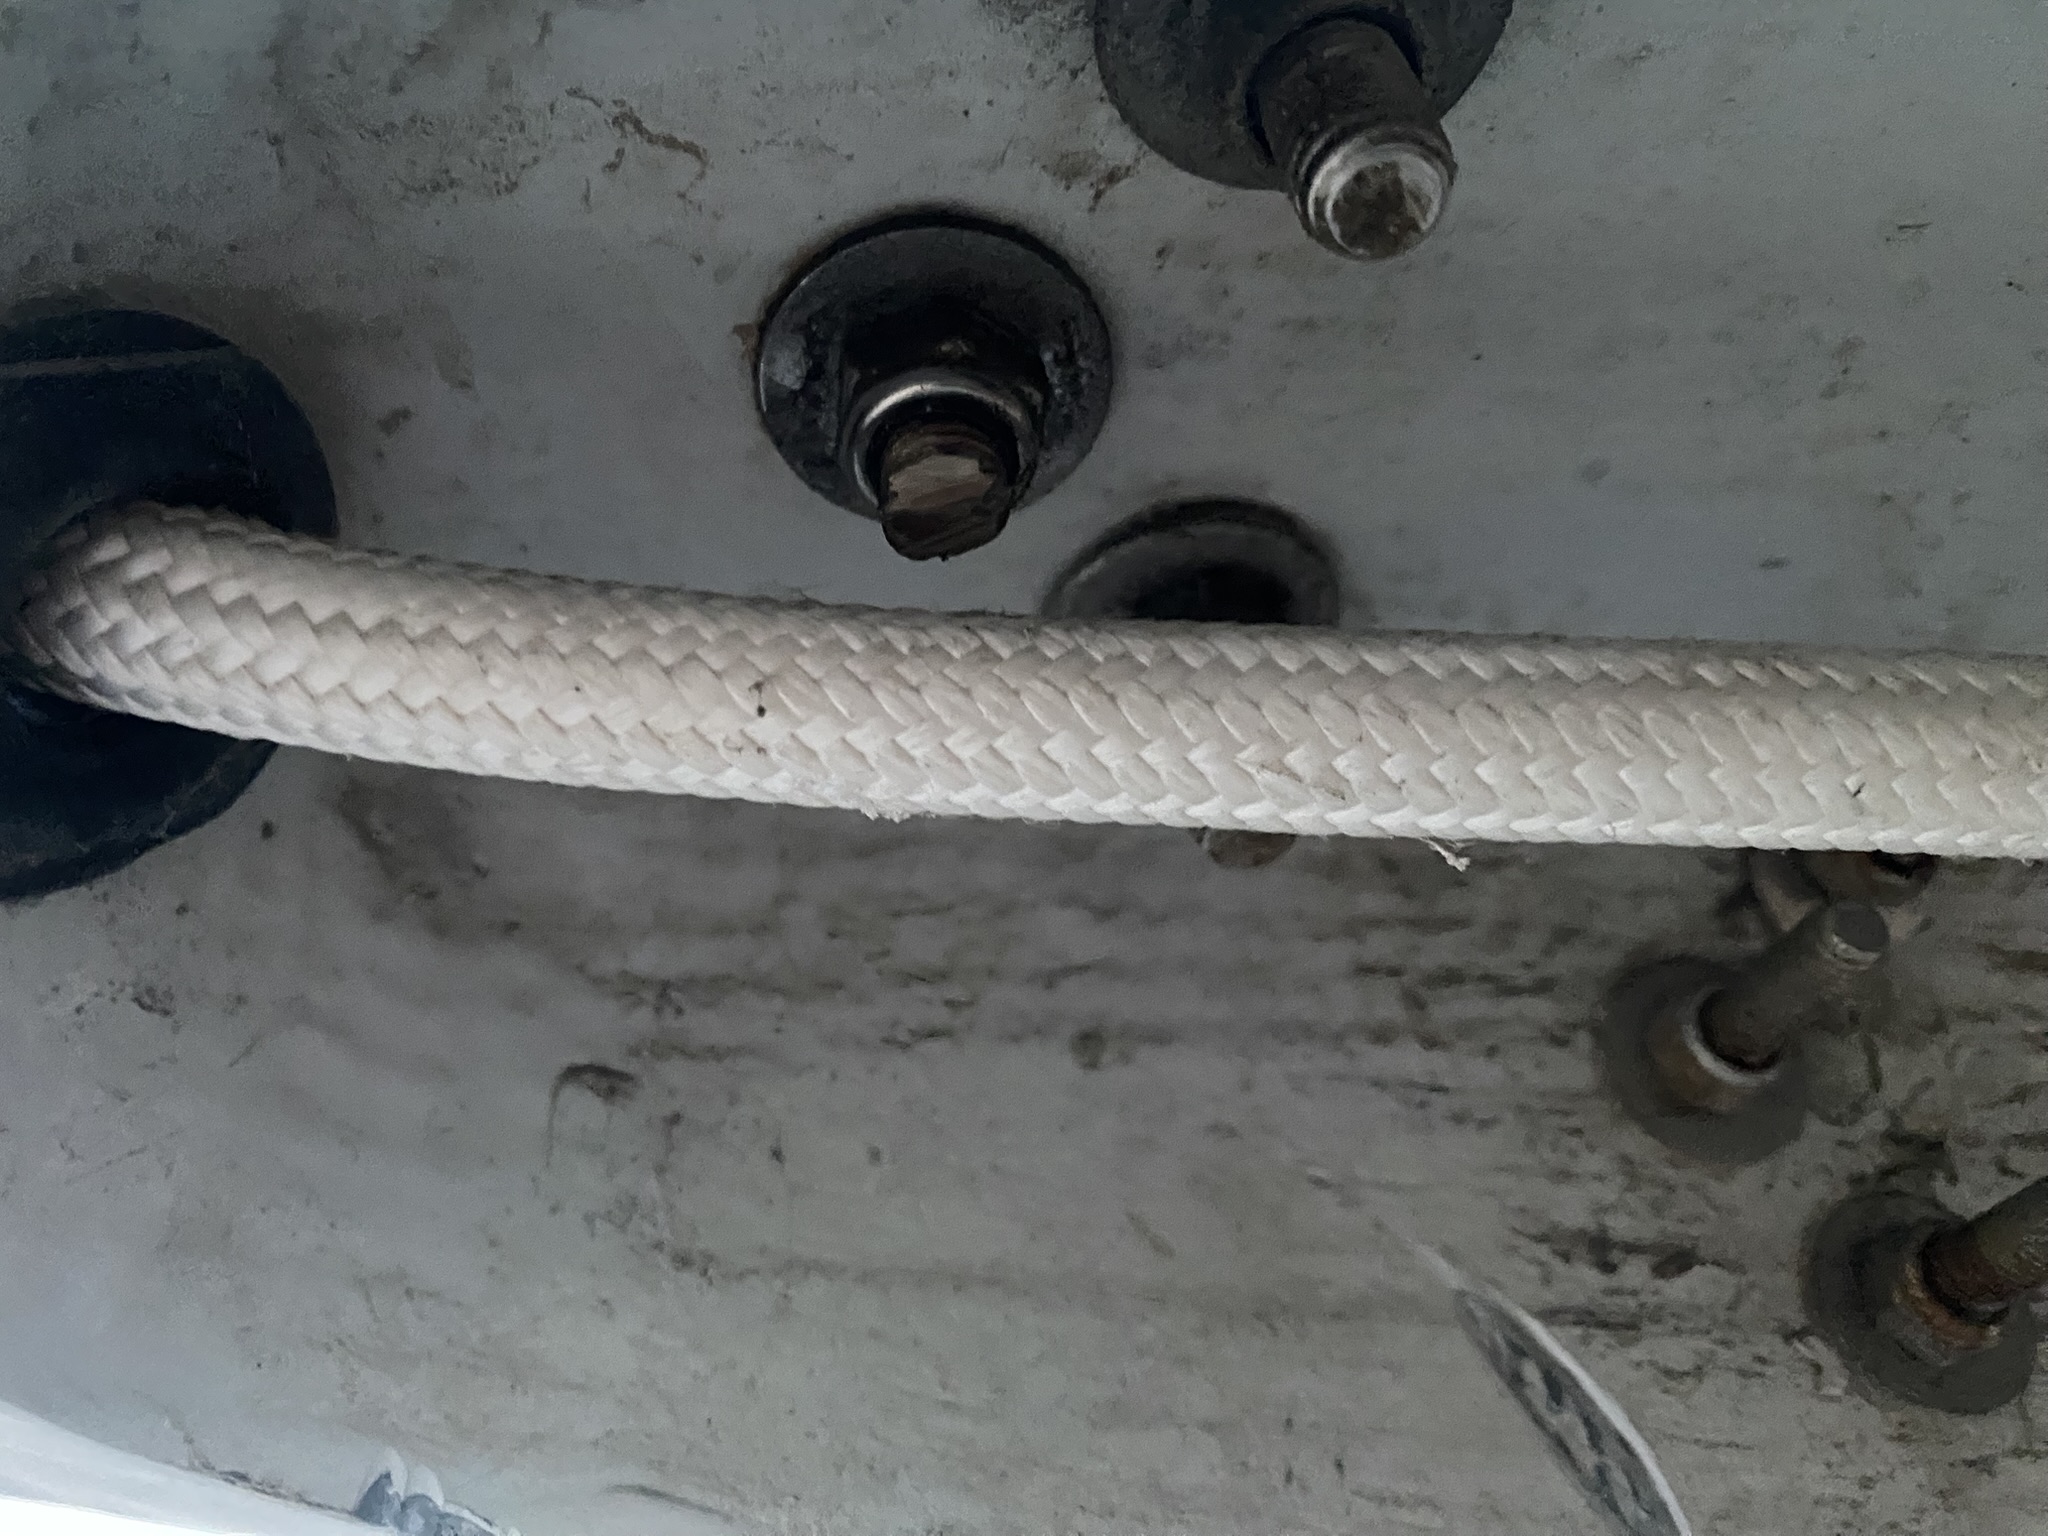
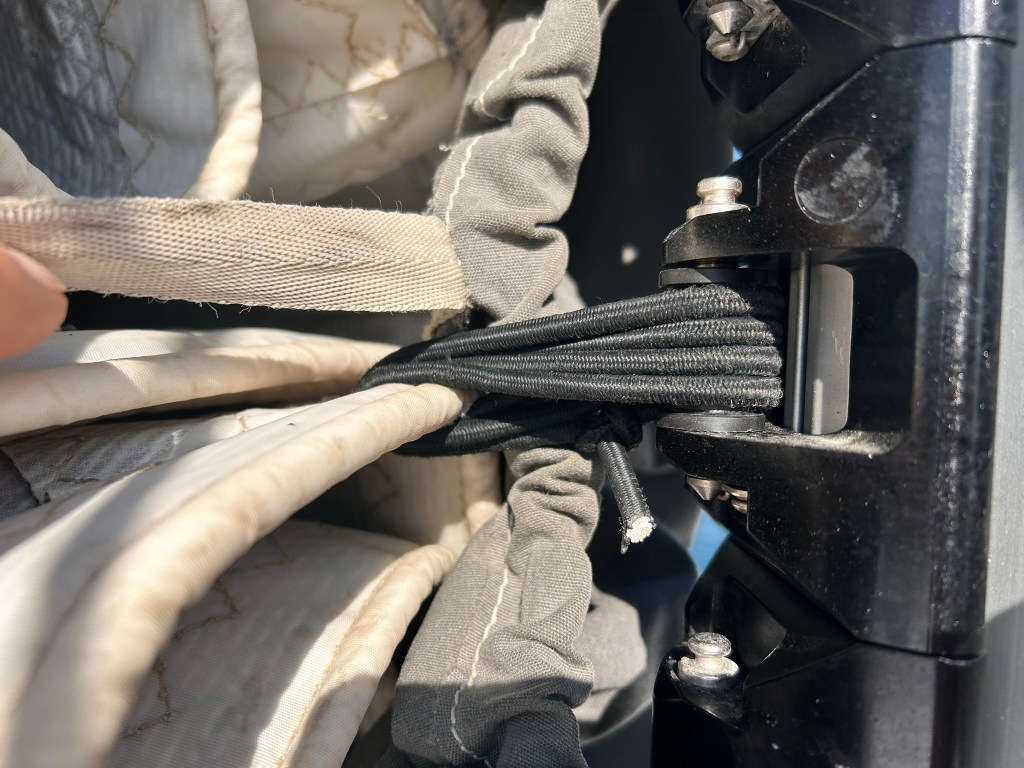
Bowsprit Tack Line
The hardware holding the tack line on the bow sprit may protrude further then you wished. On ours, the bolt was starting to create wear on the tack line, under the bowsprit, which we only noticed while on the hard.
With your dink, float under the bowsprit, and confirm the bolt doesn’t protrude. If it does, a cutoff wheel/grinder can shorten the bolt.
| Before | After |
|---|---|
 |  |
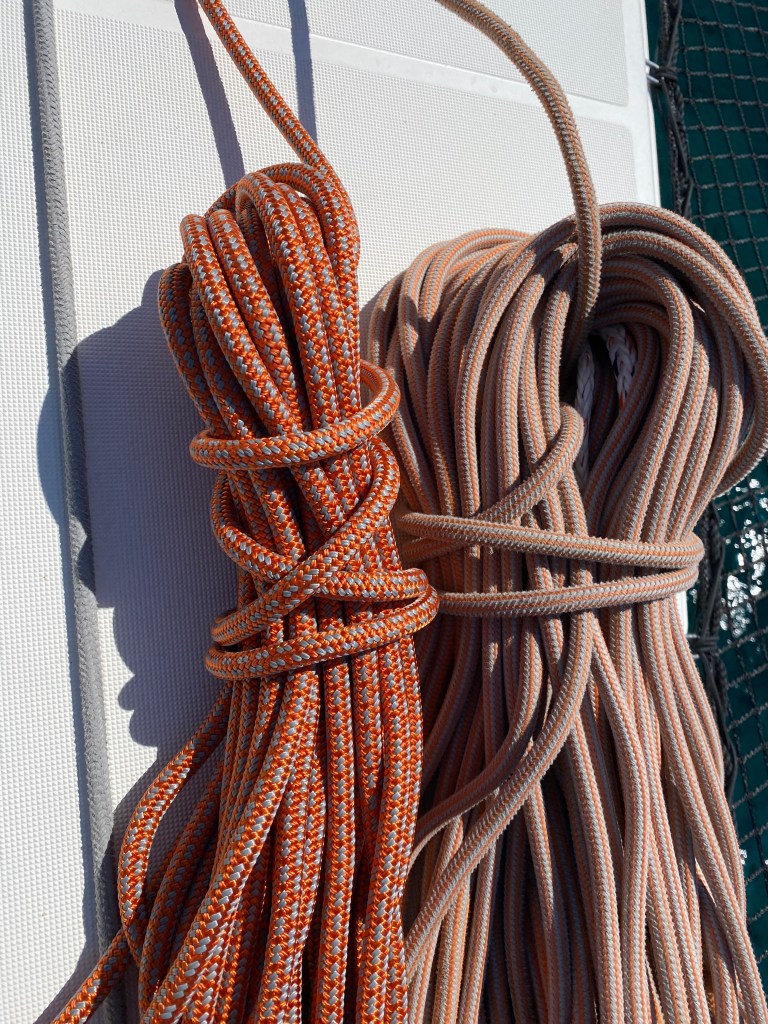
Dyneema Lines for the Bowsprit
The lines can become loose. They should be tension to 200kg without load to support the vertical pressure of a code0, gennaker or spinnaker.
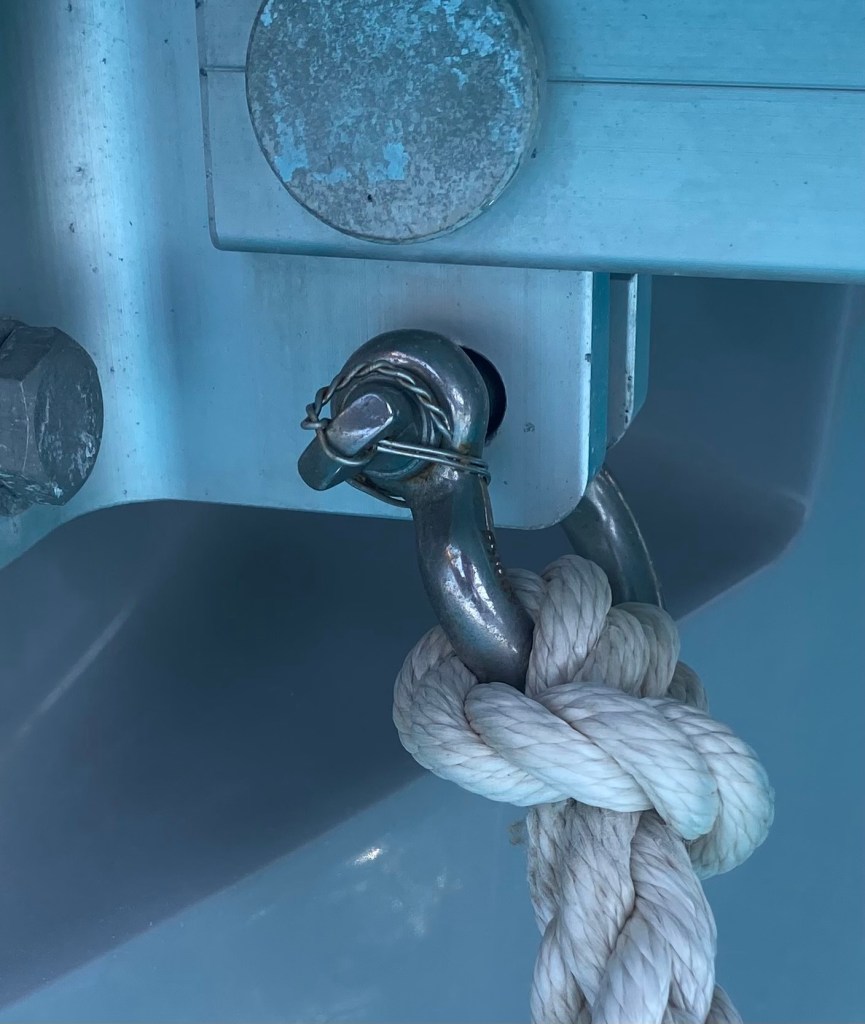
Bridle Splicing and Connection
If not monitoring the bridle can come undone. Confirm the splicing at the hull and end are in good shape.
Confirm you have safety wire, not plastic cable ties, securing the pins in the shackles.
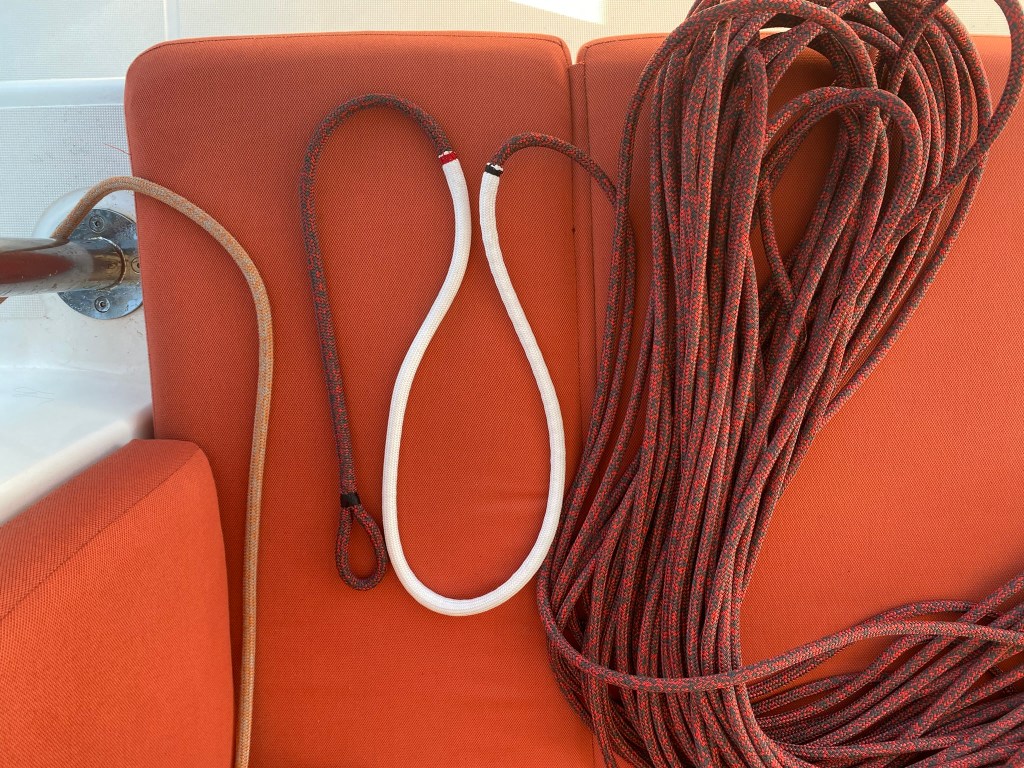
Reef Lines
A lot of load gets put on a small section at the tack and clew. The movement of the sail will draw the reef lines back and forth across the clew ring, potentially causing a blow out of the line, and the boom will be swinging back and forth on your coach roof. We lost our reef 1, as the secondary Dyneema sheath wasn’t actually on the clew.
Monitor the lines at the tack and clew. Possibly add a 300cm secondary sheath where the sheet goes through the clew ring.
Reef Line Size
The original reefing lines may be under spec’d and may break.
We currently have 12mm lines, and while Reef 1 broke, we suspect that was due to the secondary clue sheath not being aligned. Confirm you have 12mm reef lines, and consider replacing with Dyneema Core with Dyneema sheaths.
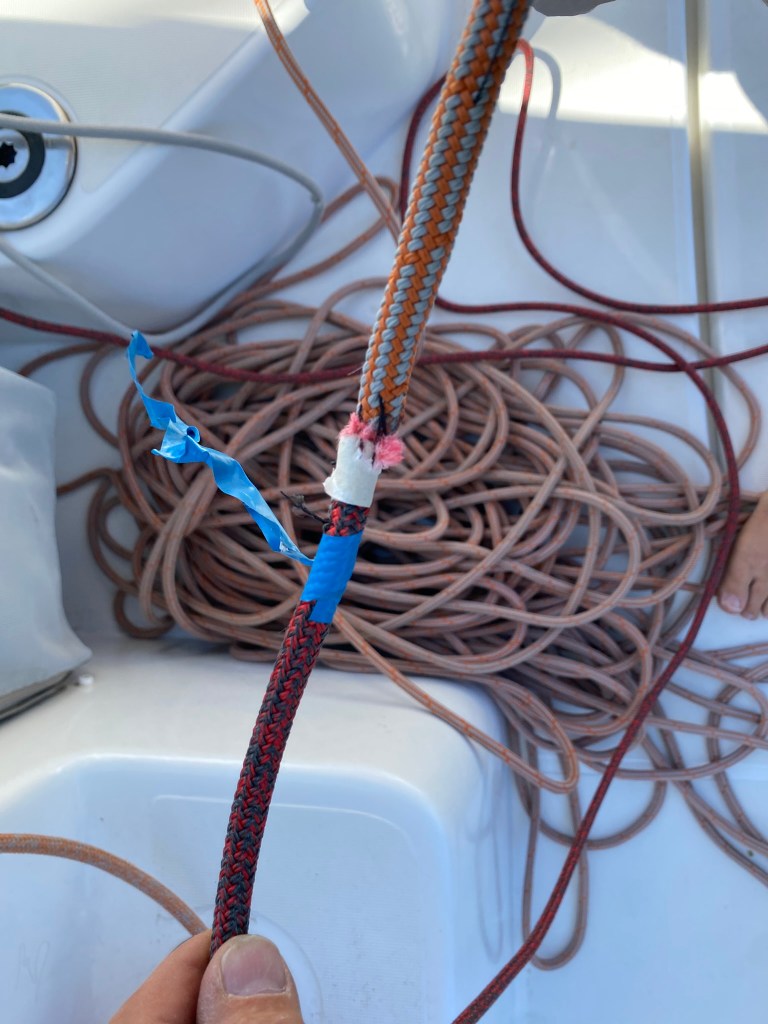
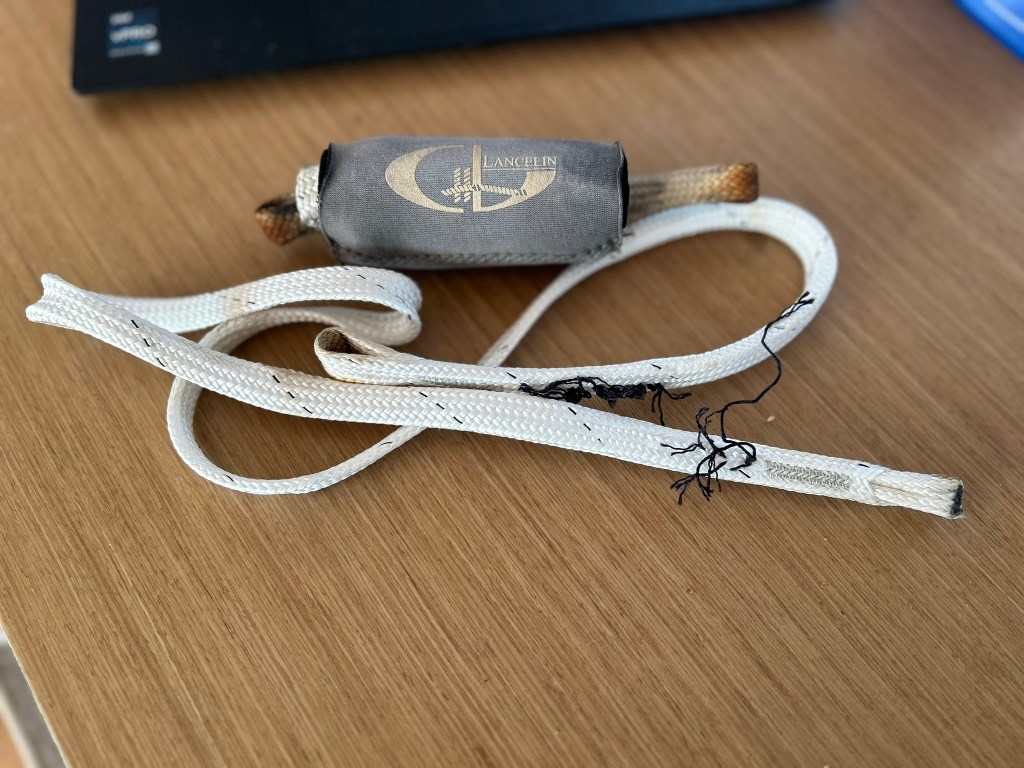
Halyards at the Clutch
Raising the Halyards to the same point each time puts a lot of strain on a concentrated space under the clutch. Watch for a blown sheath.
Similar to the clew of the reef lines, a secondary sheath at the clutch can extend the life of your halyard. Below is the aftermath of a blown sheath under the clutch. It took a moment to realize the core was still ok, and we can pull on the winch to open the clutch wide enough to put the blown sheath through, and lower the main.
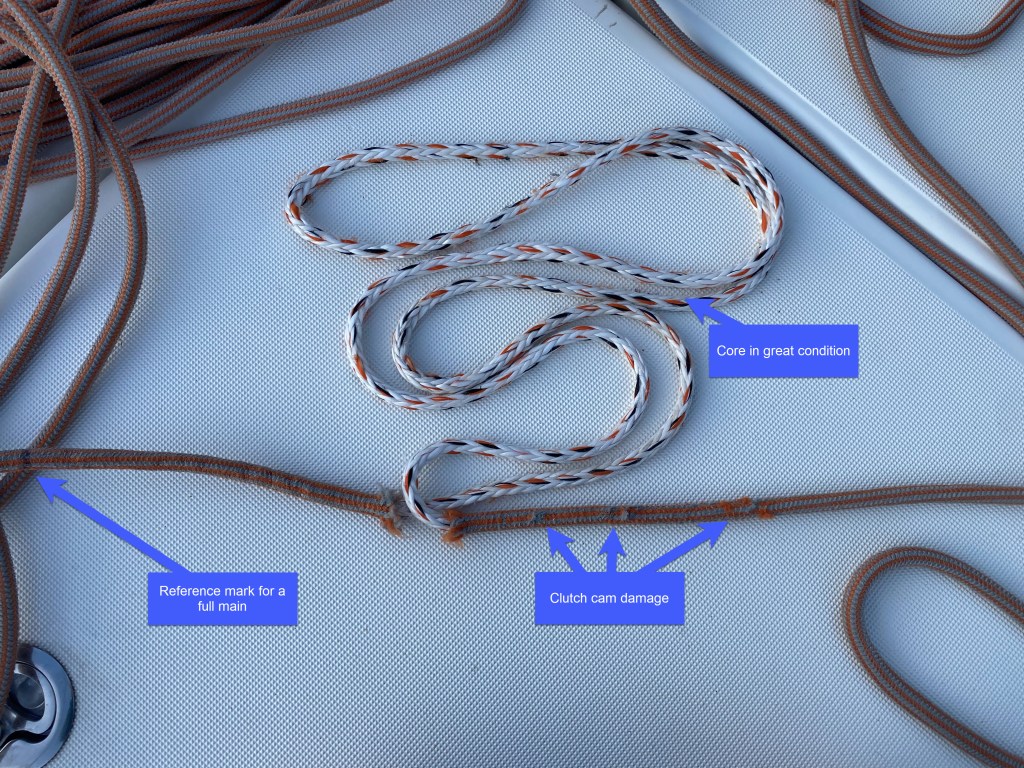
We suspect this was due to a combination of UV damage, and opening the clutch without releasing the tension, and loading the clutch to quickly. See Clutch Releasing for more info.
Here’s an image of lines that have been on the boat, and a line that was stored below, and not yet used. The code- Halyard on the right was recently washed.
We replaced the main halyard with 10mm Marlow D2 Grand Prix 78, which has a Dyneema core, and 50/50 Technora / Polyester cover to provide even greater performance in clutches, jammer and around winches.
Creating the splice/loop was quite the chore as the sheathing is so stiff, it was very difficult to get fids into the line.
Here’s the new halyard, ready to go with a sheath for the top sheave, the installed new halyard, and finally, out with the old, in with the new.
Since Dyneema is weakened by ~50% with a knot, I did the extra work to splice it, and install it by removing the pin, sheaves, washers and the cotter pin. I followed this Doublebraid Splice video from Marlow

The two most difficult parts were:
- Not dropping anything, as you bounce around quite a bit at the top of a 70’/22m mast. In my case, I didn’t drop anything, but with the washer in my mouth, I was struggling with the cotter pin, and got distracted to install the washer. Luckily I had a set of cotter pins and re-installed the washer and a 2nd cotter pin. It’s a much stronger and cleaner install than the bowline knot I found.
- having to hang from the halyard, as I removed the sheave for the topping lift, and still reach the mounting points. Most bosuns chairs have longer straps to not crunch you in the seat. I had to shift to being suspended by the D-Rings of the chair, instead of the straps, and loop the topping lift over the top of the mast to be a backup, even if it wasn’t on the sheaves.
Main Halyard Block
The Halyard block doesn’t spin, which will keep the lines straight, assuming they are straight to begin with. You never know when they may become twisted. Before every raise, separate the fixed point of the 2:1 Halyard from the end that goes up and into the mast. If they go straight up, you’re good to go.
Clutch Releasing
As a best practice, before opening the clutch, be sure to pull the tension off the clutch with the winch. You’ll notice the spinlock clutches will release their grip if pulled just tight enough. Then the clutch opens with no additional wear on the sheath.
Likewise, when releasing the line from the winch, onto the clutch, do it slowly. The cam of the clutch will seat into the line, gripping it. But, if you release the line quickly onto the clutch, it will cause more wear as the teeth of the cam grip the sheating.
See above as we tore the sheath on our stock halyard, and installed a new Marlow D2 halyard.
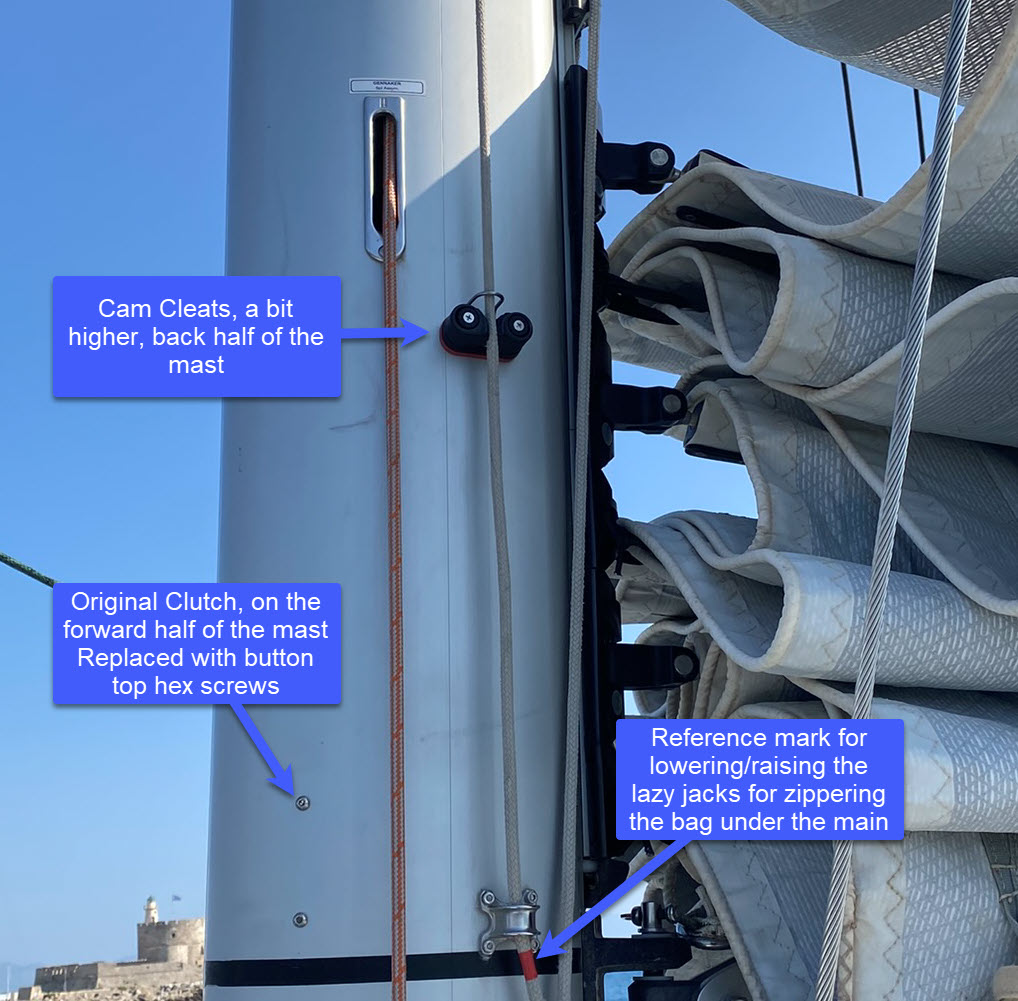
Lazy Jack Clutches
If you have one of the original hulls, your topping lift clutches may be on the forward half of the mast. It doesn’t take much to have a jib sheet catch the clutch lever and feed it to the kraken. Newer hulls have the clutch on the back half of the mast. We opted to use Harken Cam Cleats.
Main Sheet Bunjies
These are 5mm bunjie cords. They stretch a little inconsistently across the main, likely based on which reefs you use often, or leaving the luff tension loose can cause the lower to wear more frequently.
Mainsheet Chafes on Screws Inside the Boom
As the sheet goes into the boom, confirm there’s no chafing from the bolts holding the sheet, beyond the main sheet fuse.
Flat Winder Line
The Flat Winder may make a crunching sound. The traveler sheet gets tighter over time and is 30cm too short. Excess may replace it with the same line, resulting in the same problem.
Deck Organizers
The original Antal deck organizers weren’t able to handle the loads. Some have reported them blowing out, we experienced worn sheaves and had them replaced before a blowout.
Keep an eye on them, clean with fresh water, and talk with your dealer about the factory swap to Spinlock deck organizers.
After the main organizers were replaced, we noticed the Jib organizers between the clutches and the winches had worn sheaves. The factory replaced these with the same Antal organizers. Spinlock makes a taller version to account for the vertical rise from the organizers to the winches, so something to consider when the warranty runs out.
Boom
Mainsheet Fuse
This is primarliy intended to an accidently jybe to prevent damage. We had the main sheet fuse blow when traveling upwind, in 25kts. We didn’t have a gust, so we just assume it had worn. When it blows, it will extend from the boom shackle to the block. They’re just stitched webbing, so just visualy inspect, and have some spares.

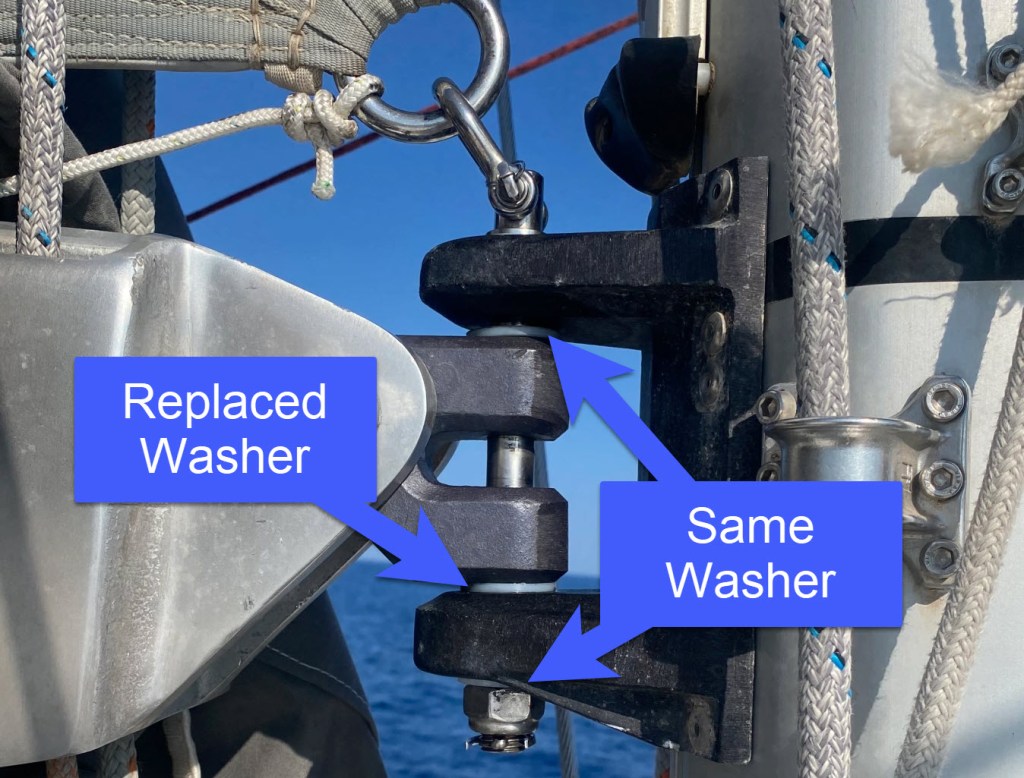
Gooseneck Washer
The washer at the base of the gooseneck can wear, like cartilage between your bones.
Monitor and replace. It’s not an easy replacement. I may write this up. The other thing to do is secure the boom to the port side when not flying to avoid the back-and-forth sway. This also reduces the tension you might put on topping lift if you try and stop the swing with vertical pressure.
I wasn’t able to find the exact 16mm washer with as wide a surface area as the stock ones. I did find these on Amazon. I took the washer at the bottom locking nut, moved that below the gooseneck, and put the new washer under the locking nut. I’ve only seen wear on the washer under the gooseneck.
Getting this all done was quite the exercise, which I’ll write up another day…
Main Sheet Strops
These can wear from the blocks. We’ve rotated these to extend the life by not having one spot get all the chaffing from the blocks.
Dinghy Davits
The triple blocks can wear, as there’s a lot of movement in a confined place, and if the dinghy is accidently raised too much, it can damage the blocks.
The lines will twist from using the winch to raise the dinghy. This will cause the lines to twist between the blocks causing more tension. This additional tension will blow out the side block on the davit. Which is not very good in the first place.
Davit Clutches
The clutches can pop open. Or you may mistakenly grab them instead of the traveler (ask me how I know). Make sure they’re pushed tight, with a safety knot after the block to capture
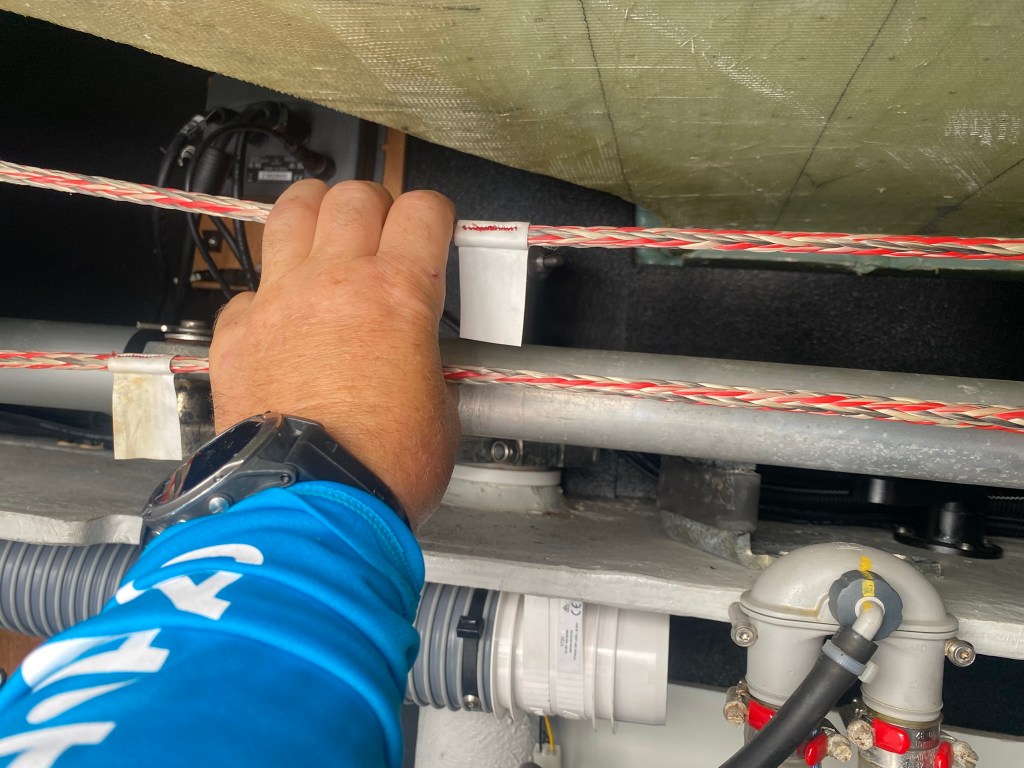
Rudder Control Line Chaffing
The Dyneema control lines don’t actually travel that much, and with a lot of pressure in a small section of the line, with no sheathing, they can develop wear at the blocks. I’ve also noticed the blocks have some wear on the edges that could be causing the chaffing.
Monitor them, and if more wear develops, ask your rep for a spare.
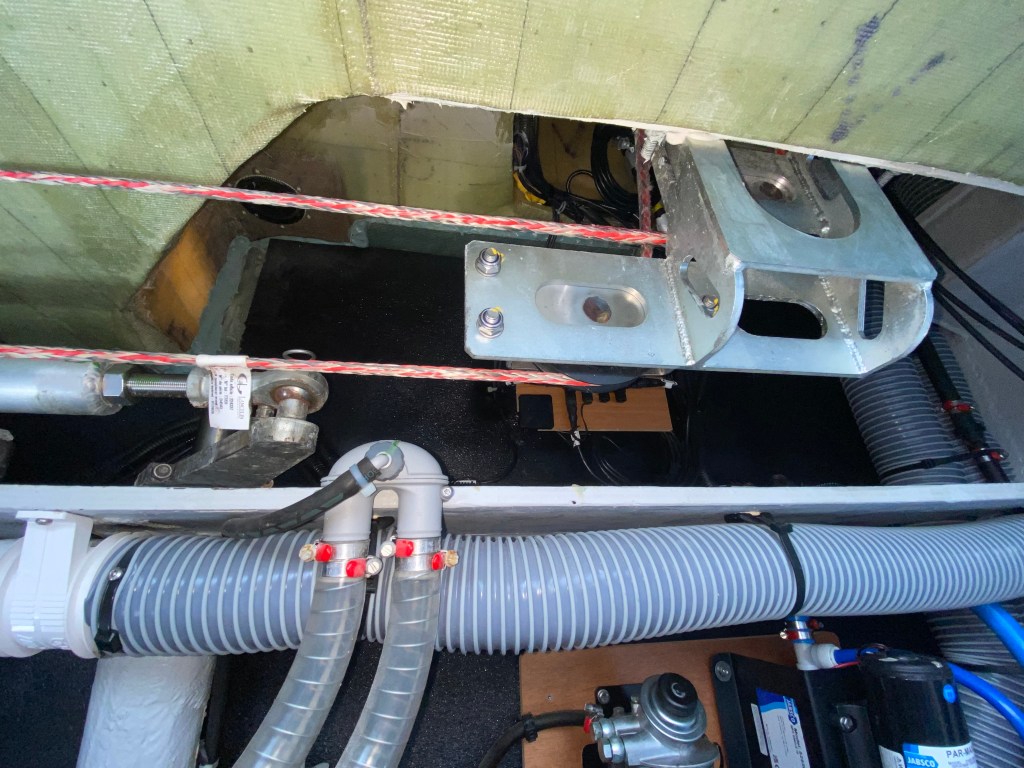
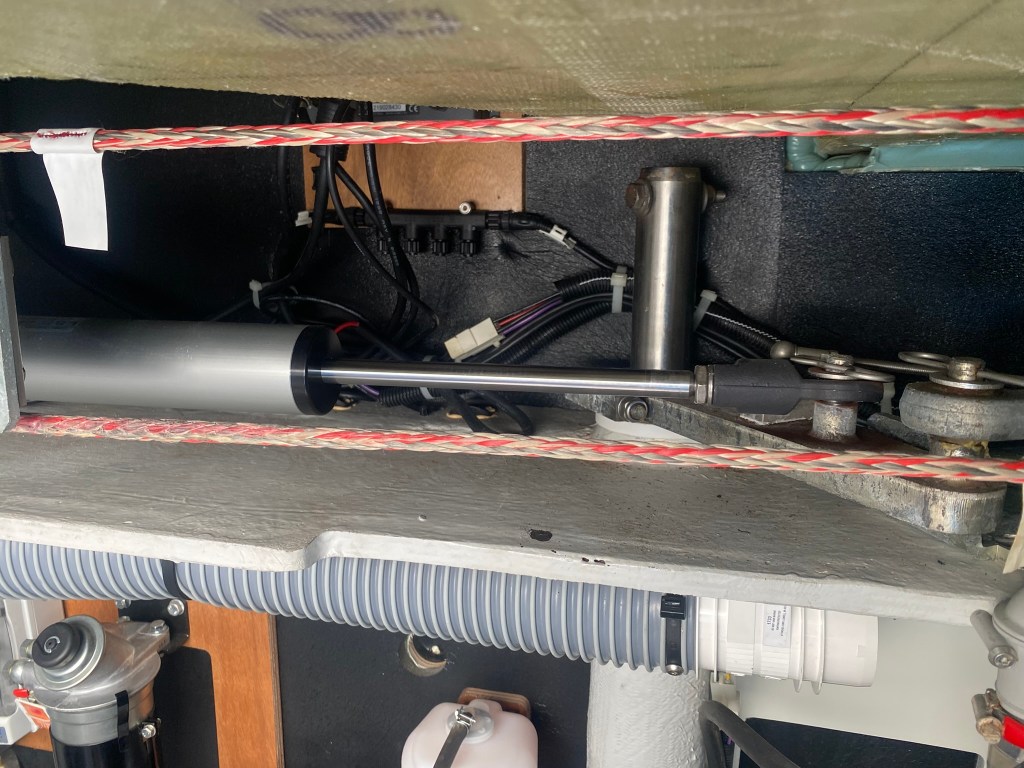
Rudder Control Line Tensioning
Tensioning is done through the Port engine. Other Excess owners have said recommended tension was 45 kg (+/- 5 kg). However, without a tensioner, or a home port, it’s hard to measure. After two months of constant sailing, I’ve noticed ours has become more slack. I used a deflection method to test the tension, and adjusted to limit the deflection, while still maintaining a solid feel in the wheel.
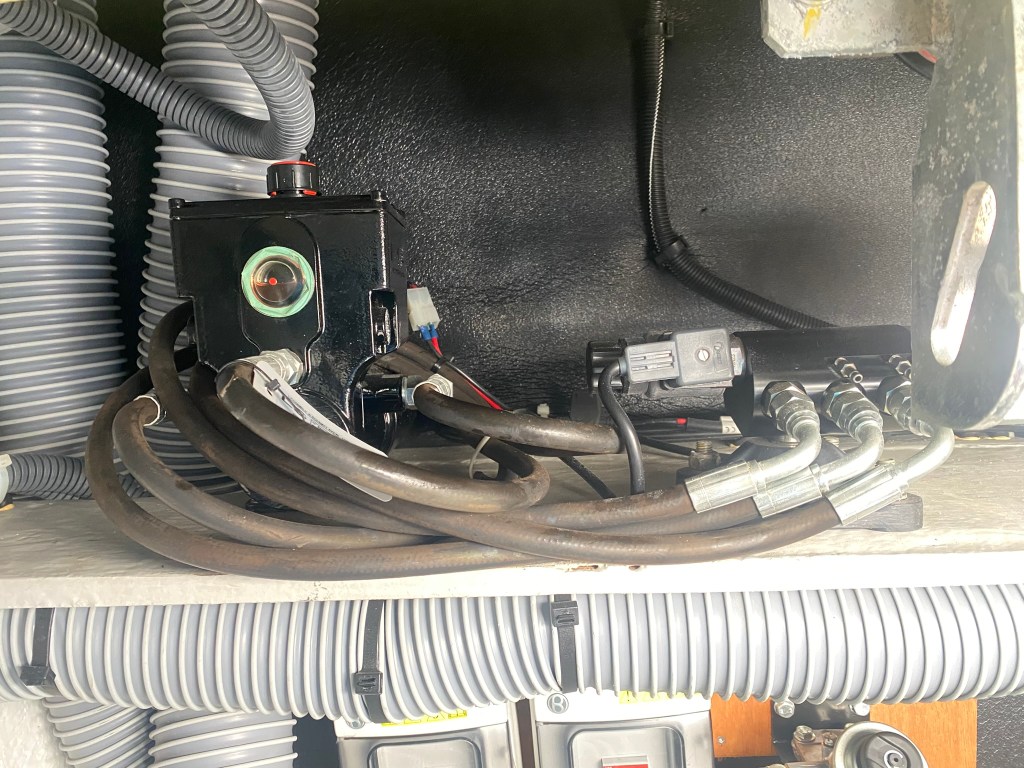
While you’re there, checking the hydraulics for leaks, loose connections, pins or worn joints is goodness. Losing an autopilot is the best way to appreciate how much it simplifies dual or single handling a boat.
Ground Tackle
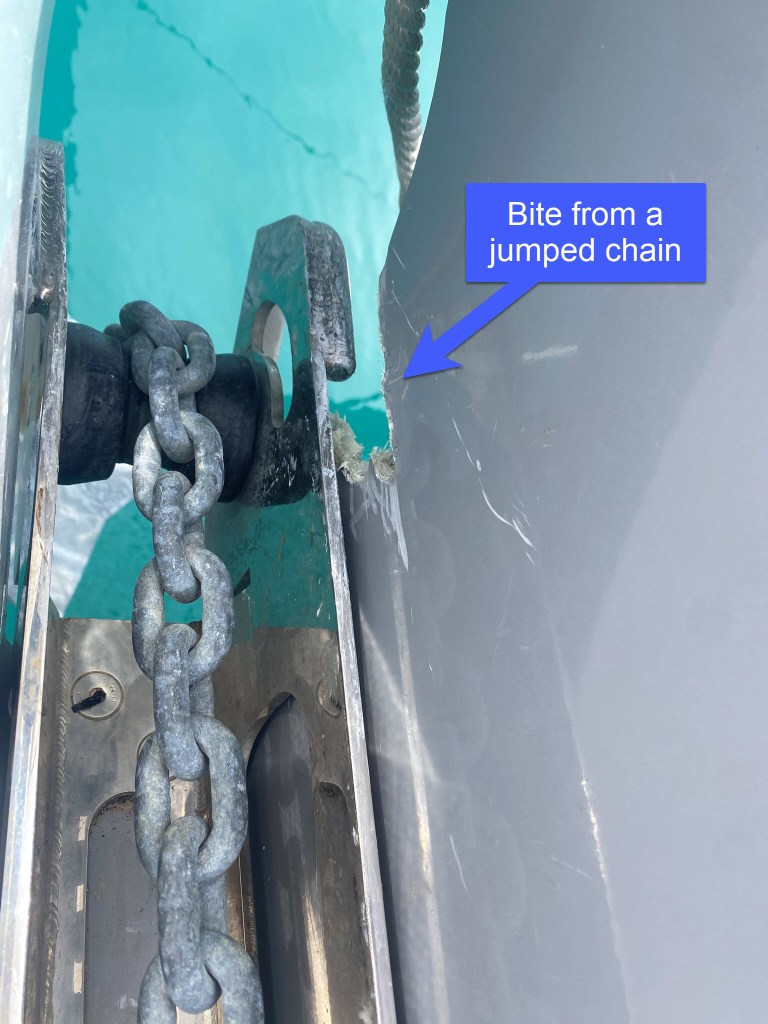
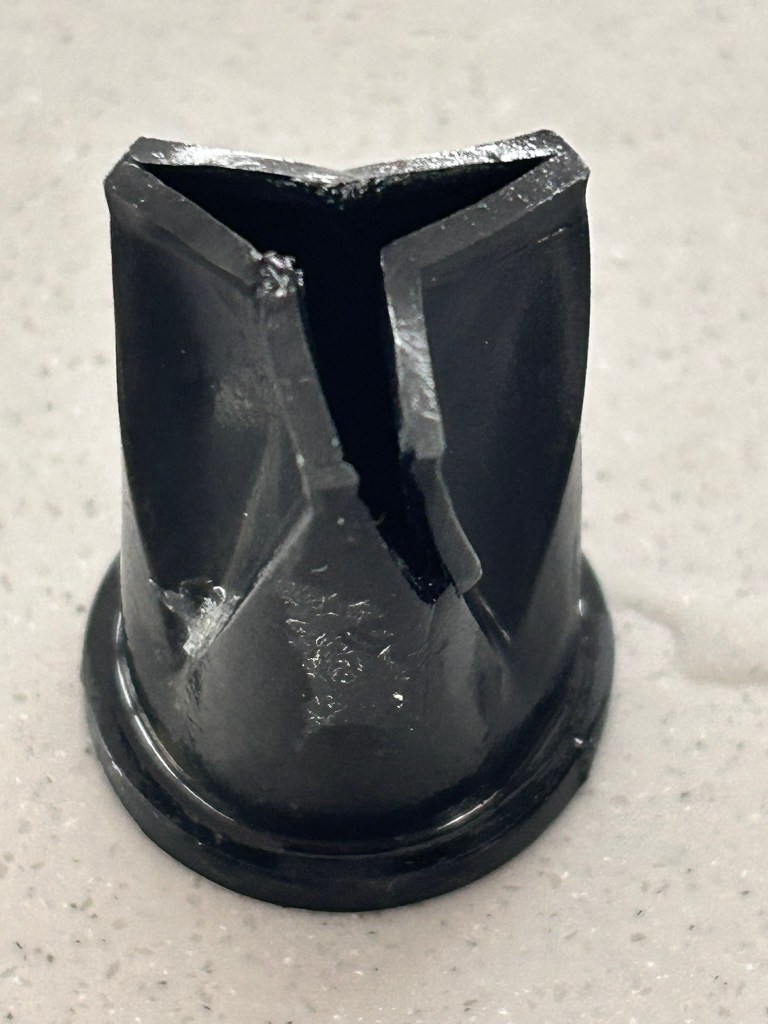
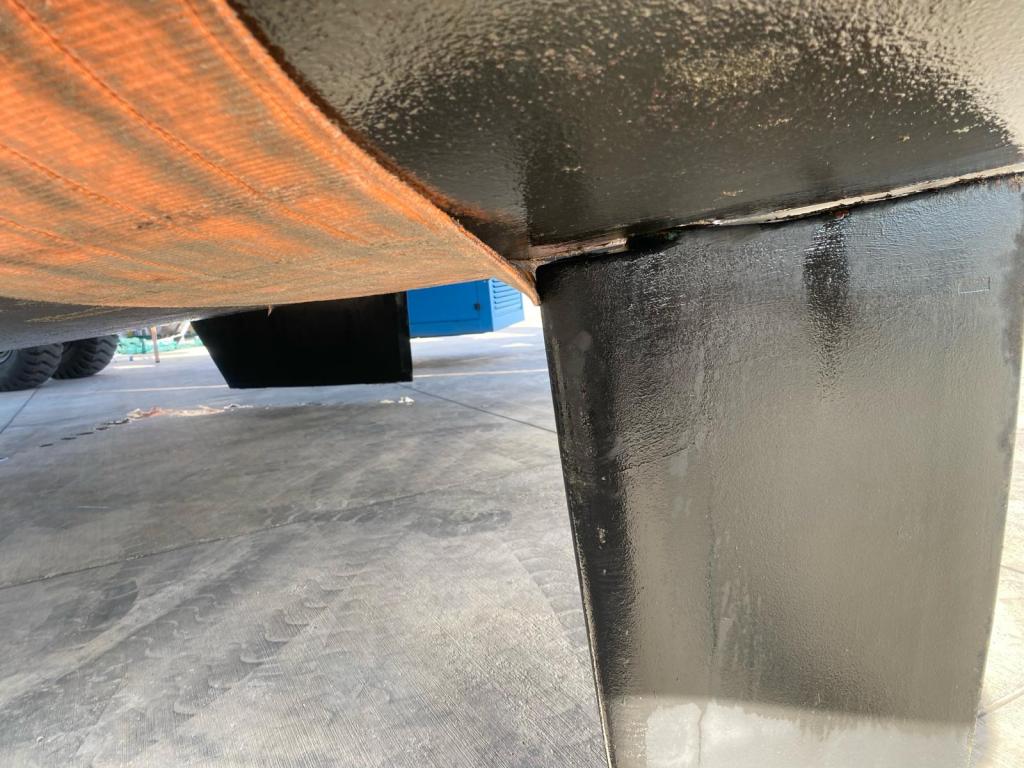
Bow Roller Chain Guard
Our Excess 14 had damage to the longeron, from a bow roller without a chainguard. While anchoring, before getting the bridal on, it’s not that difficult to have the chain jump out under windy conditions. Excess repaired the longeron and replaced the bow roller with a version with a chain guard.

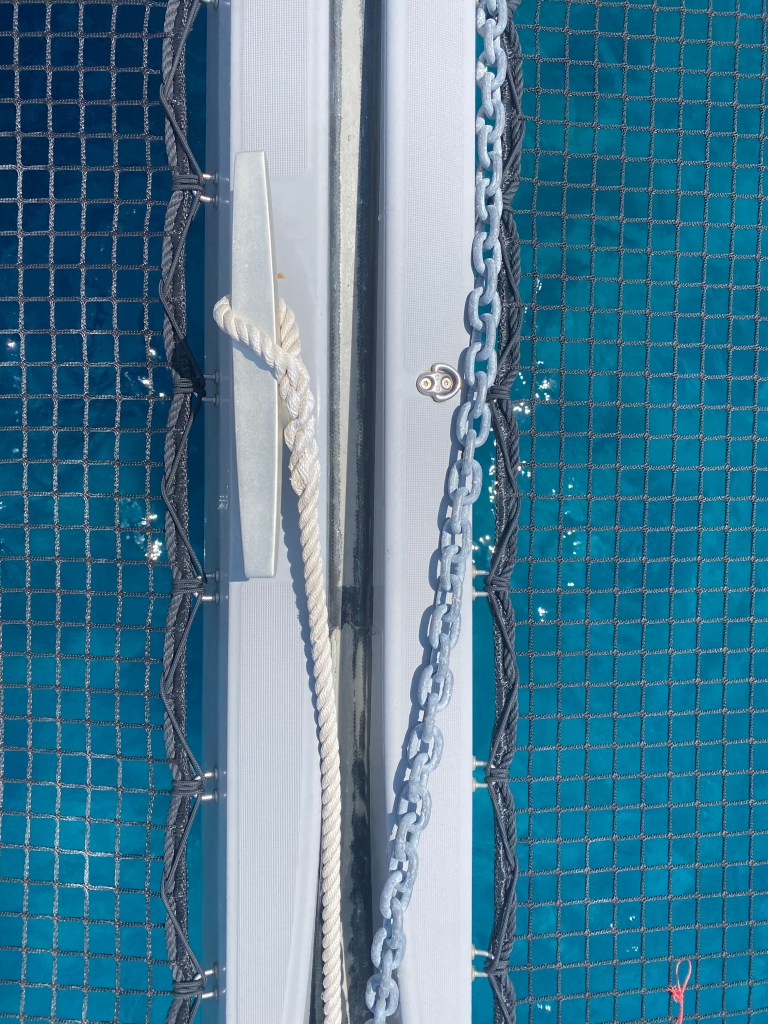
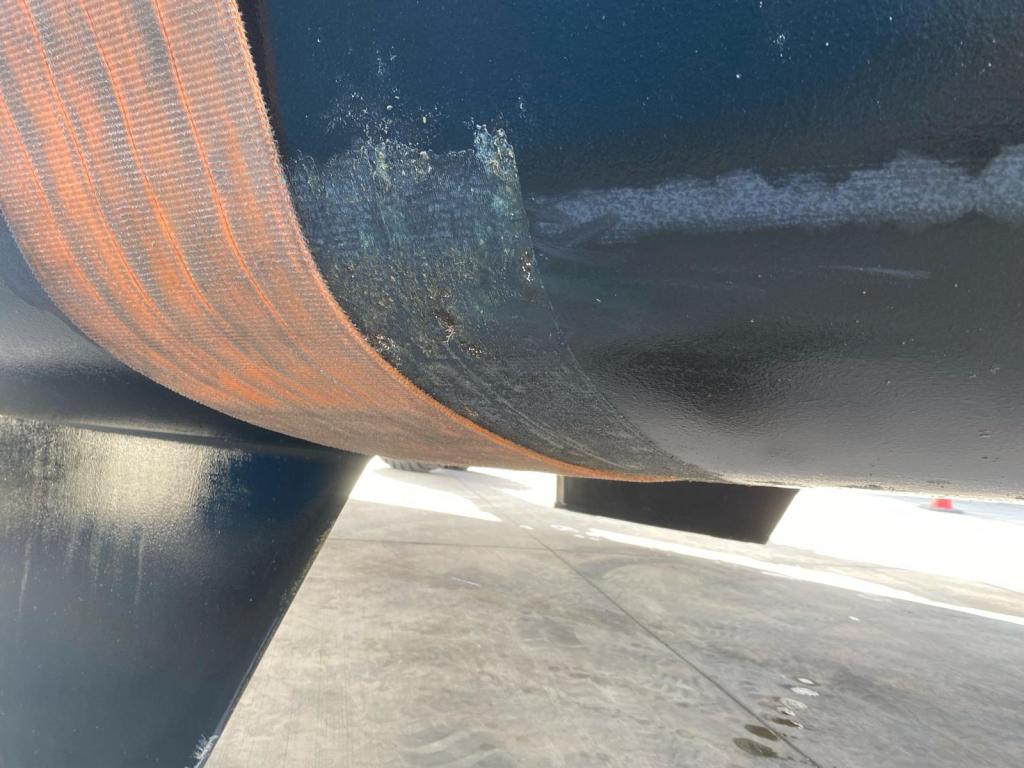
Longeron Chain Guard
Another popular issue is protecting the longeron from the chain. One of the Excess 11 owners found a vendor to provide a very fancy custom fitted stainless steel channel. I’ve been experimenting with some dirt bike protective tape. The color pattern wore off, but the underlying tape is holding up.
Water Systems
Joker Valve
This is the “backflow” preventer for the stuff you want to leave the toilet. If you’re finding “stuff” come back into the toilet, it’s likely a failed joker valve. Depending on which head you have, you can find these online or at some local marinas.
Toilet Lines
The toilet lines have a reduction as it goes vertical into the tanks, and can clog, yuck! These can be cleared through a few means:
- Replacing the lines – which expensive, and you can’t remove the upper section
- Push a wire brush on a flexible rod into the lines. This worked really well.
- Power washing: many power washers have drain cleaning attachments. Combined with the wire brush, this was the only way we were able to fully clear the lines.
The long term fix is to switch to fresh water as urine and salt water will build up over time. When using sea water, flushing the toilet longer, to clear urine from the line into the tank will extend the need to clean the lines. Others claim spraying vinegar in the toilet for each #1, will neutralize.
After having to clear block lines, with far more calcium than I would have imagined, we are switching to fresh water.
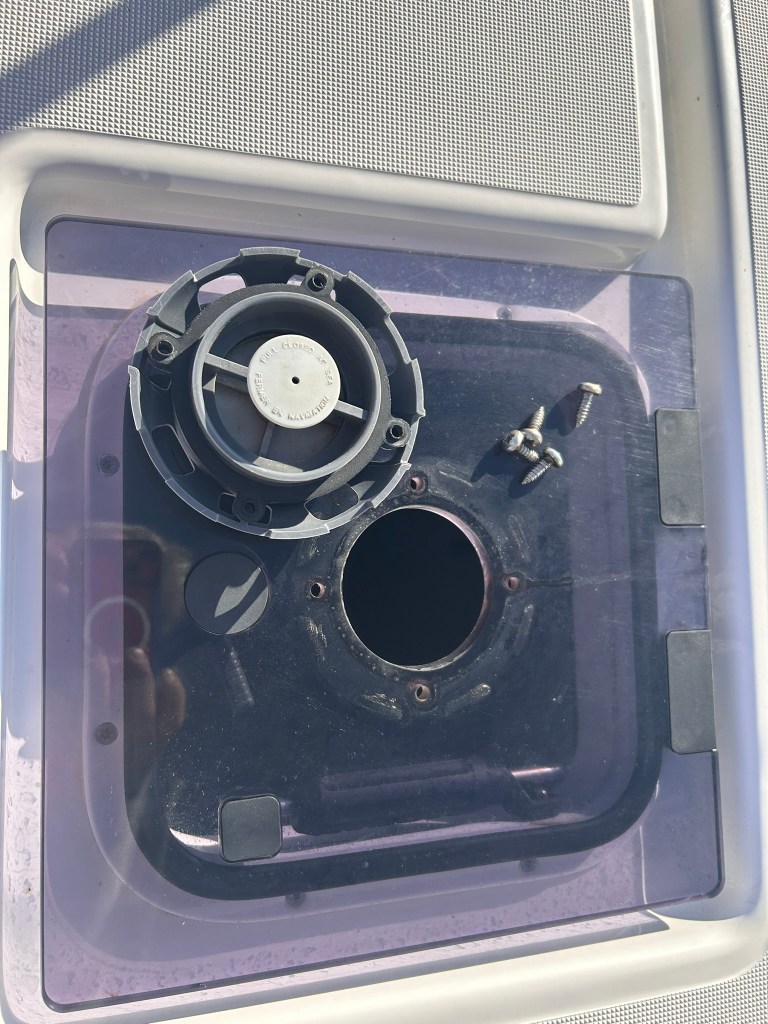
Hatches
The hatches may leak from one of a few places. We’ve seen different leaks based on rain or rough crossings.
- Vents: In rough seas, the vents may need to be closed to prevent water ingress
- Rubber Seals: For both the larger and small hatches, the rubber seal should be set in the track, and the ends should be glued together. If the glue has separated, in a pinch, just push them tight together and close the hatch. After a crossing, when they’re dry, you can remove and glue with rubber cement.
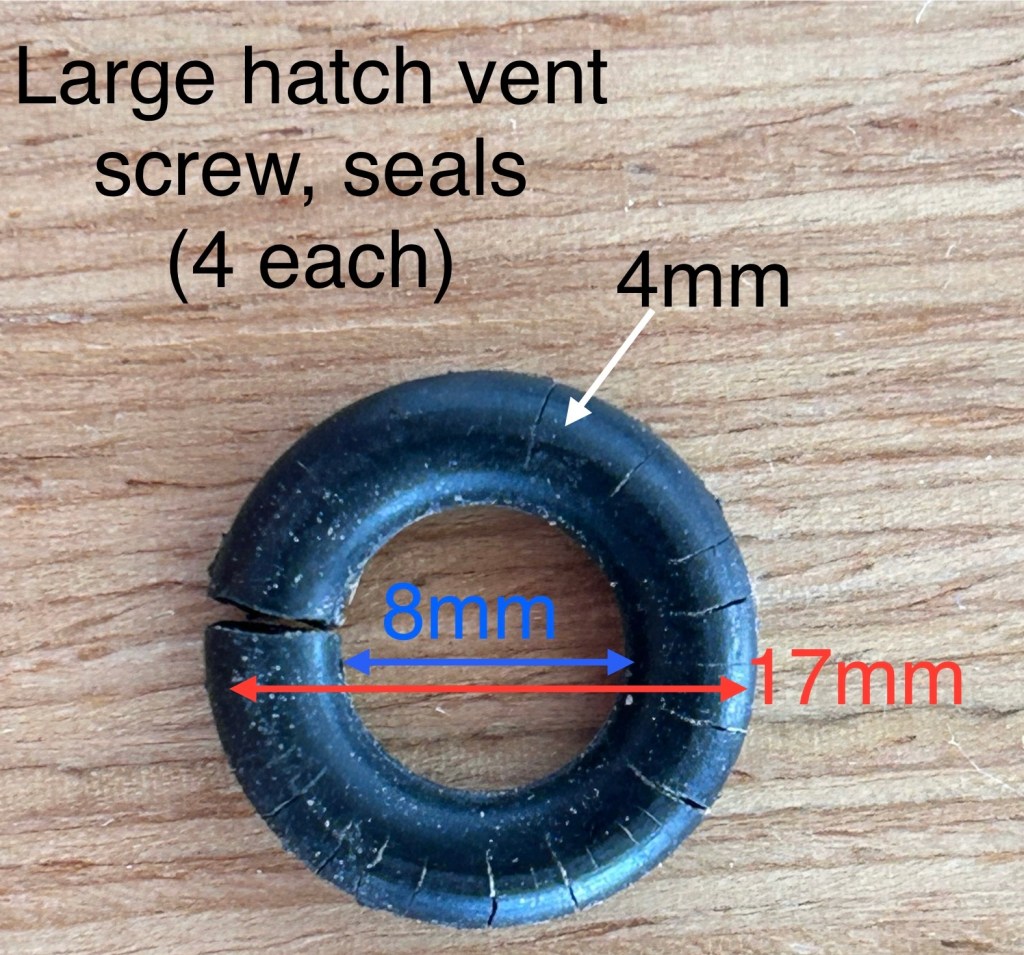
- O-Rings: on the larger hatches, there are (4) O-Rings that will dry, crack and open. (Amazon link)
- Small hatch screws: We haven’t yet seen the small hatch vent screws leak. These have a seal that’s part of the vent cover. You could probably get some liquid gasket to re-seal these.
(Excess 11) Barber Hauler Blocks Under Spec’d
Monitor for bending and breaking. If a problem, contact your rep to replace. Although Excess has been sending the same block types
Deck Washing
Water may enter the bilge
Some have reported excessive water in their bilge after washing. It’s not clear where it’s happening, and if it’s an 11 specific issue as we haven’t seen this on our 14.
Anchor Remote, Chain Counter Accuracy and Functioning
This is worthy of a blog post but have a backup plan in case the chain counter at the helm doesn’t work. Paint or screwed in chain length markers, with some sort of plan if the remote chain counter stops working or the windlass stops working.
If the chain counter wasn’t configured properly (like ours), the default gypsy length is set to 10cm. With a 10mm ISO Chain, the correct setting is 36.0cm. Which makes 60m of chain appear as 20m. Yeah, we now have ~140m of chain, as we wanted to extend what we thought was 20m to 100m. The extra chain has already come in handy…
Auto Pilot (Garmin)
We’ve found the autopilot can get wonky at times. When on Wind-Hold, it can turn up, or not hold a heading while under sail. Doing a recalibration, where it does the 15 turns back and forth, or the circle to find north has solved it for us. Of course, 15 turns or a 360 is under motor.
Air Conditioning Seawater Filters
At the top of the through-hull valves is a basket for pre-filtering. We haven’t seen much beyond a bit of grass. But, I suspect we’ve had some junk clog the inlet causing the unit to stop working. Shutting the unit(s) off will stop the seawater pump, and let whatever was stuck to the hull float away. To clean the basket, just close the valve, remove the basket by opening the cover at the top of the valve. A bit of water will flow out to the bilge as the water above the valve proves water flows down.
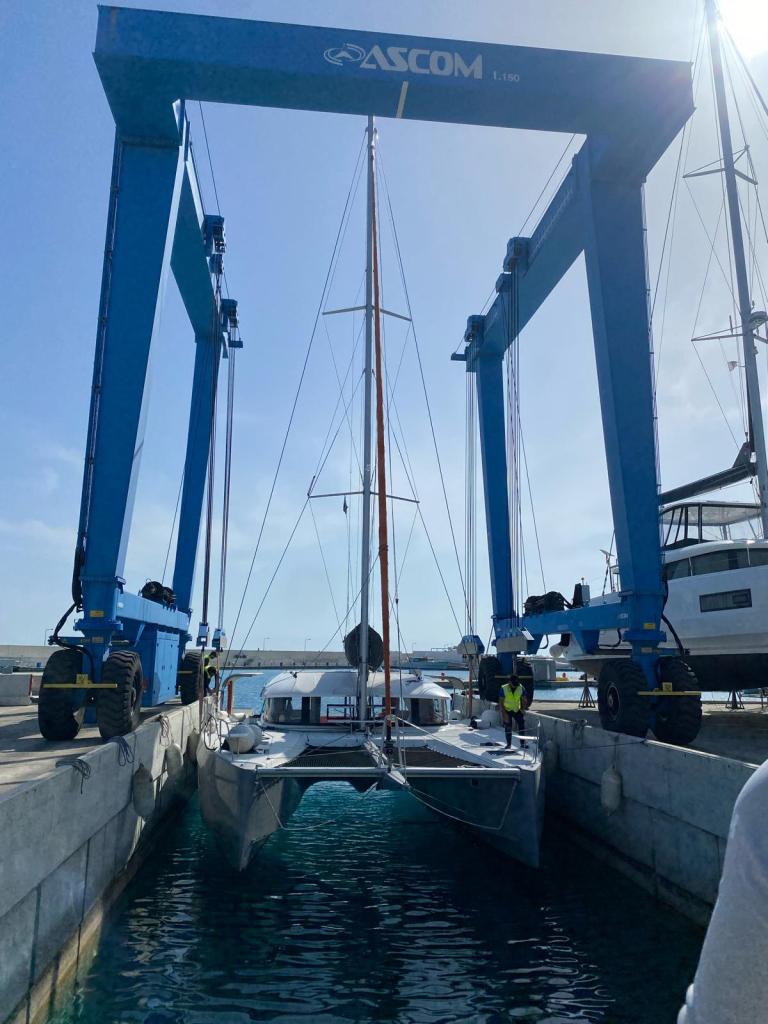
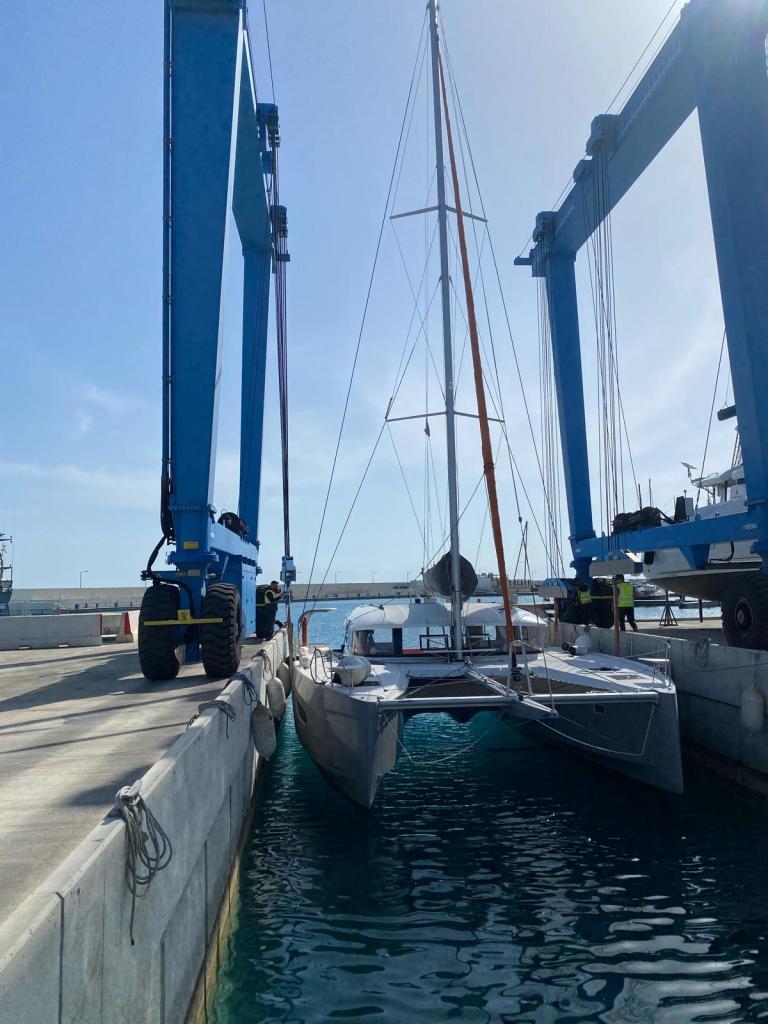
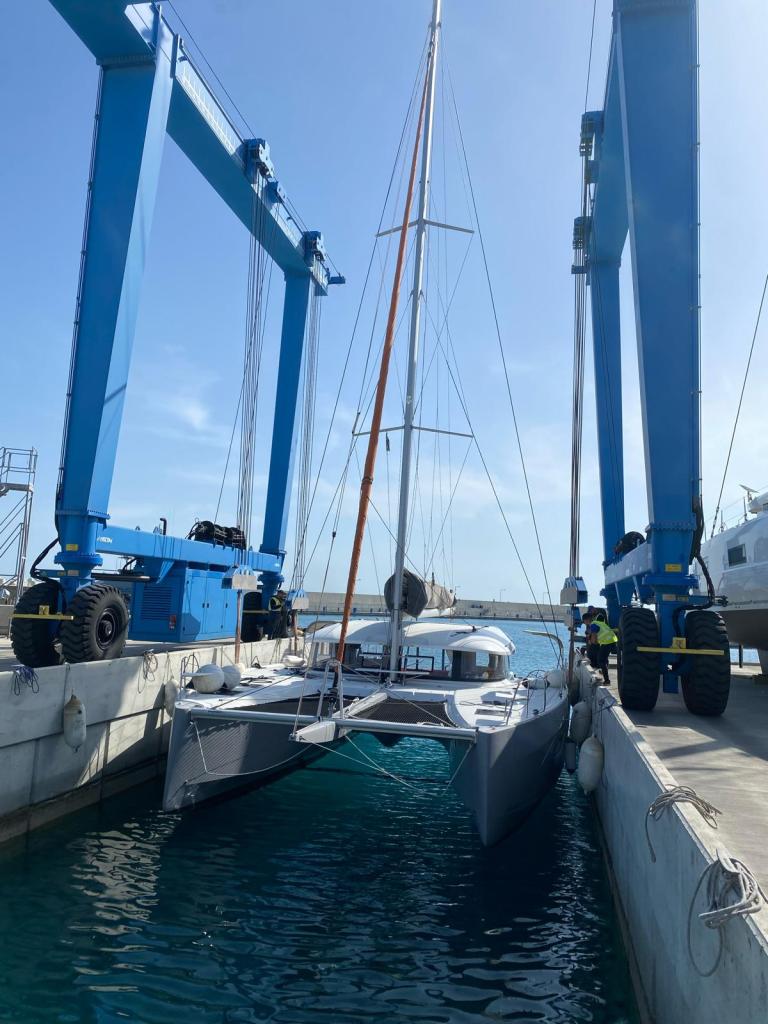
Getting Lifted
The Excess 14 has very wide hips, and she does not lie.
When looking to get hauled out, don’t underestimate how wide she is. You’ll need at least 8m, and that’s just barely enough to squeeze in flat padding alongside the hulls. You may have a problem fitting into a lift, as many aren’t wide enough.
To protect the anti-fouling paint, ask to have blankets or something to protect from rubbing from the rubber or canvas like straps that will remove your beautiful new, or older anti-fouling paint.
Lastly, double check the rear lifting strap as it may be too close or even hindering on the rudders. Either dive to confirm, or confirm the rudders turn smoothly, and aren’t bound by the straps..
Below, the blanket was only added to protect the gelcoat, the wear on the antifouling paint, and the tight fit in the Ayia Nappa Marina in Cyprus.
That’s a good start. I’ll update with any more suggestions as they come along.
Thanks to all the great Excess 14 owners for their lively discussions, and the great service from Easy Sails (our Excess dealer), and the Beneteau Group for standing by their brand.
