Sailing a 14m catamaran involves managing all the systems that support an off-grid, open water adventure. Whether you’re sailing occasional weekend excursions or sailing abroad for several months, power management and monitoring are critical to support your needs and anxiety level.
Some questions to consider:
- Has the boat been powered and fully charged when you arrive for the weekend adventure?
- Can you check remotely whether the batteries are charged for the evening’s showers and dinner?
- How much energy did you consume overnight, and how much solar are you capturing during the day?
- If you have a GenSet, how much do you want to manage when it comes on and goes off?
- If you’re going out for a day’s adventure, will the sun meet the needs, or would it be nice if the boat would auto-start/stop the GenSet to a pre-determined SOC while you’re gone?
- If you’re running the air conditioning overnight, would it be nice to run on batteries through the inverter and have the GenSet recover to a nightly SOC, then shut off?
Excess catamarans come with a Schieber AC/DC management system. It manages manual switching between shore power, batteries, the inverter, and the optional generator. It also monitors the battery and fluid levels for fuel and fresh water. The battery and fluid levels are placed on the NEMA network for viewing on the Schieber control panel and the chart plotter. The overall integration is a reasonable baseline.
However, if you’re planning to enhance the factory-provided systems, from batteries to solar panels, you’ll find the Victron systems more integrated with additional features, including:
- More granular and accurate details on Water and Fuel monitoring
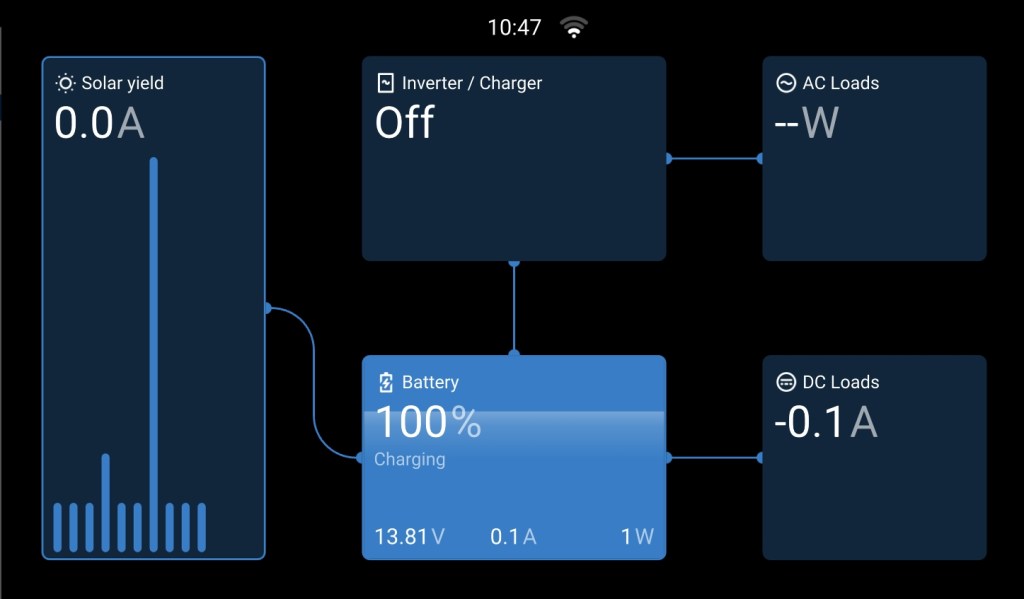
- Information about charging, AC, DC, and Inverter loads
- Generator Auto-start/stop capabilities with day/evening SOC profiles
- Solar and MPPT monitoring
- Remote monitoring and management from your phone or laptop
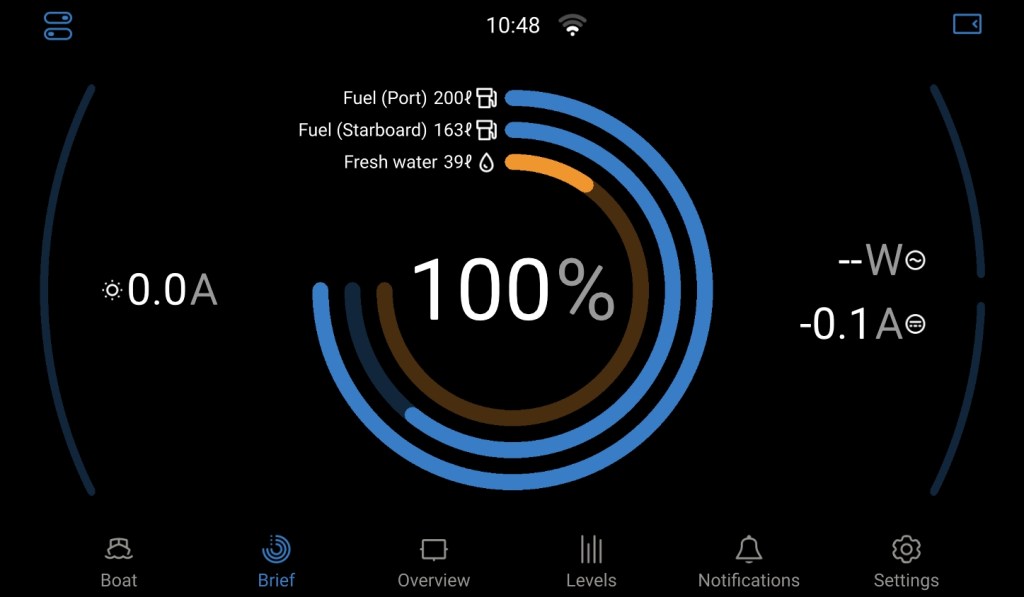
- Visual summary of critical systems without having to scroll through different screens
While the Schieber system is a reasonable baseline, adding a more complete Victron system will dramatically simplify and enhance your energy management, including remote monitoring and management.
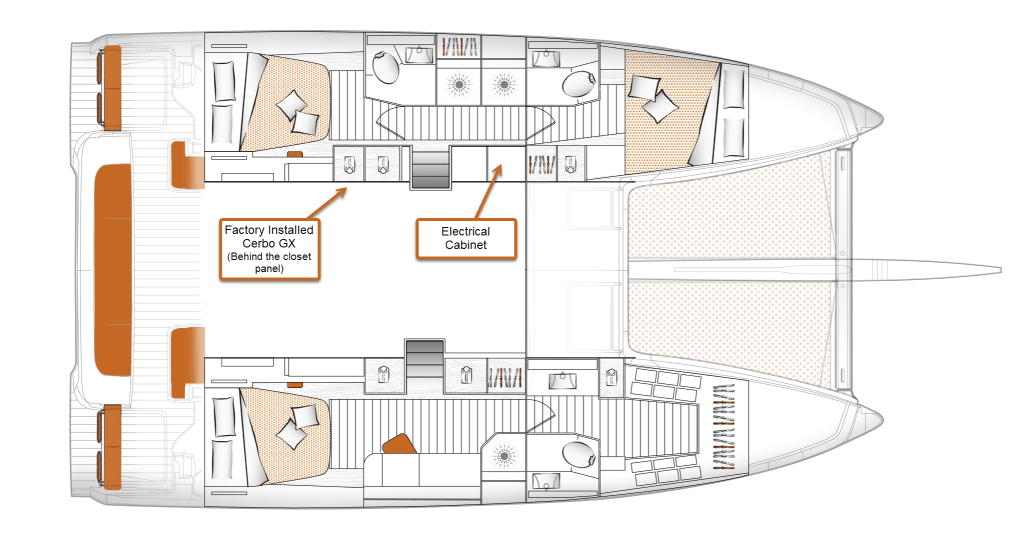
If you have factory-provided Victron Lithium batteries, you already have a Cerbo-GX hidden behind the port aft cabin closet.
In this article, I’ll cover:
- Installing a Victron Cerbo-GX as the heart of the monitoring system
- Adding a Victron-GX Touch 50/70 display, including replacing the Schieber display
- Moving water and fuel monitoring to the Victron Cerbo-GX
- GenSet configuration for auto-start/stop charging
- Remote management from a phone or computer on the boat or abroad
- Impact on the Excess Warranty
The ToGet List
To complete the steps, you’ll need the Victron gear of your choice. You’ll need the standard assortment of wiring, cable ties, labels, and standard tools. Some additional items that will need a bit of lead time from your local store or online ordering include:
- Victron Cerbo-GX connectors (the factory-installed Cerbo-GX most likely is missing the connectors)
- Flame Retardant Split Wire Loom Tubing
- Marine Grade Electrical Heat Shrink Connectors
- Ratcheting Crimping Tool For Heat Shrink Connectors
- GenSet Timer Relays
- DIN Rail or a DIN cabinet for the GenSet relays
Installing or Relocating the Cerbo-GX
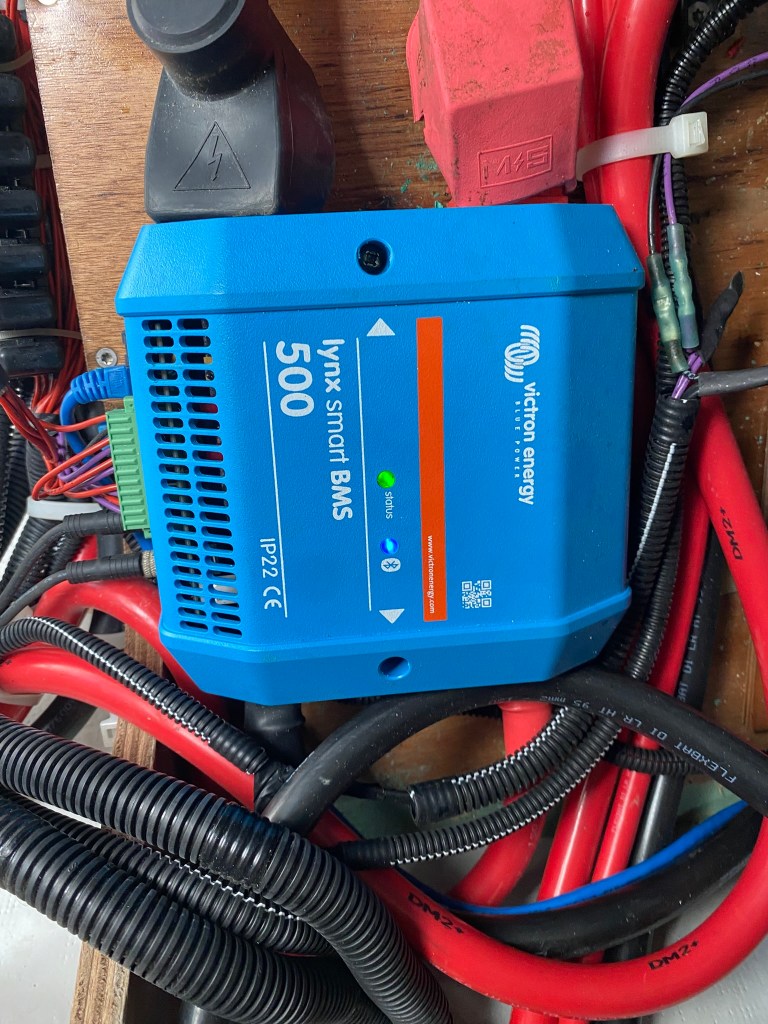
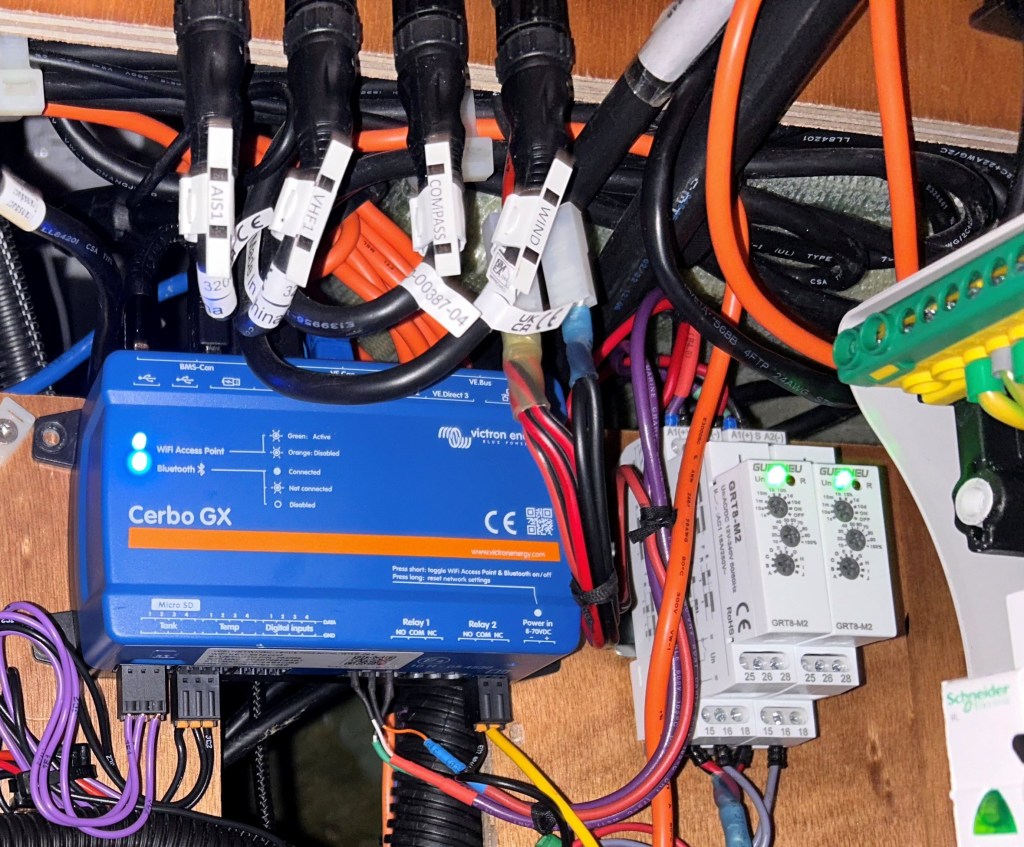
The Cerbo-GX is the heart of the Victron monitoring system. It takes input from various Victron devices, including the Battery Management System (BMS), Victron Inverter, Solar MPPTs, and other sensors, such as water and fuel. The Cerbo-GX doesn’t just summarize these on the display; instead, it integrates all the inputs and outputs to create a self-managing system.
If you had a Victron Lithium battery option delivered from the factory, you already have a Cerbo-GX. It’s likely hidden behind the closet panel in the port aft cabin.
Adding a Victron-GX Touch 50 or 70 will display information on a touchscreen and allow browser access from local or remote locations. While some commissioning vendors would add the Cerbo-GX display, in addition to the Scheiber display, you’ll quickly see that everything that can be done with the Scheiber system can be accomplished with the Victron system, and more. Rather than adding the Victron system, requiring the monitoring and management of two systems, this article explains how to completely replace the Scheiber system.
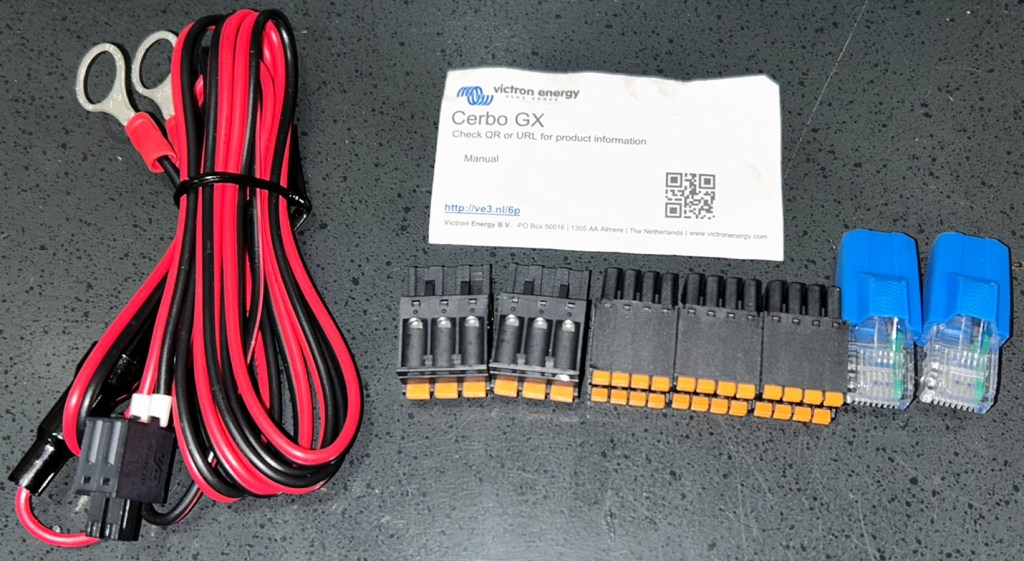
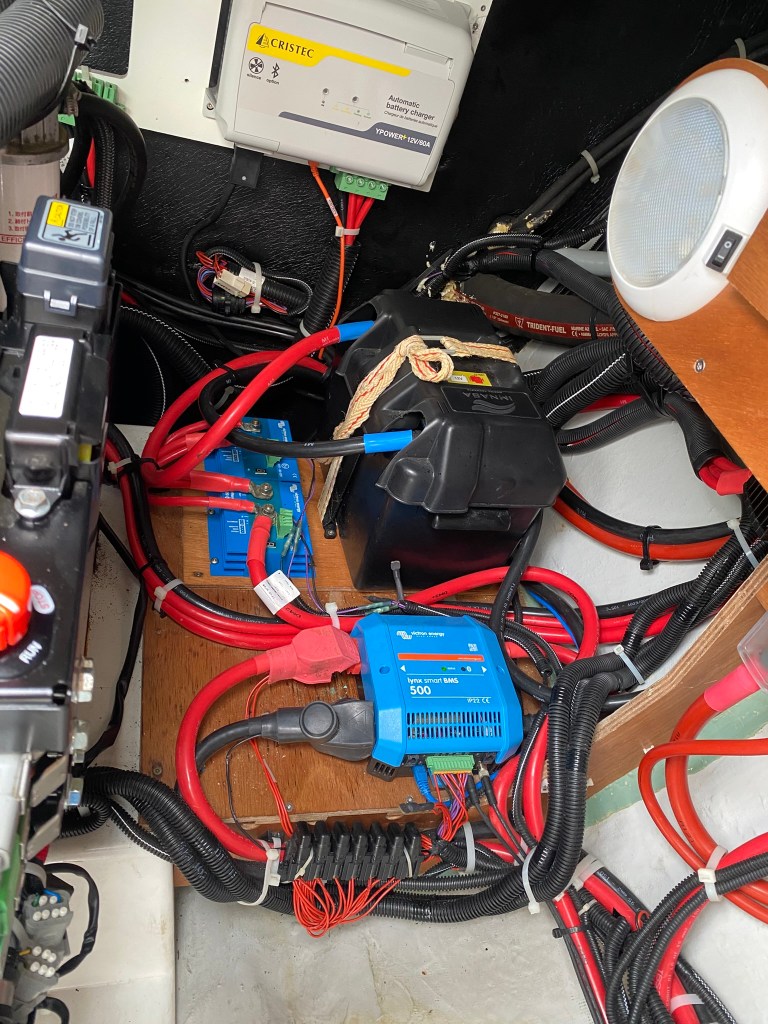
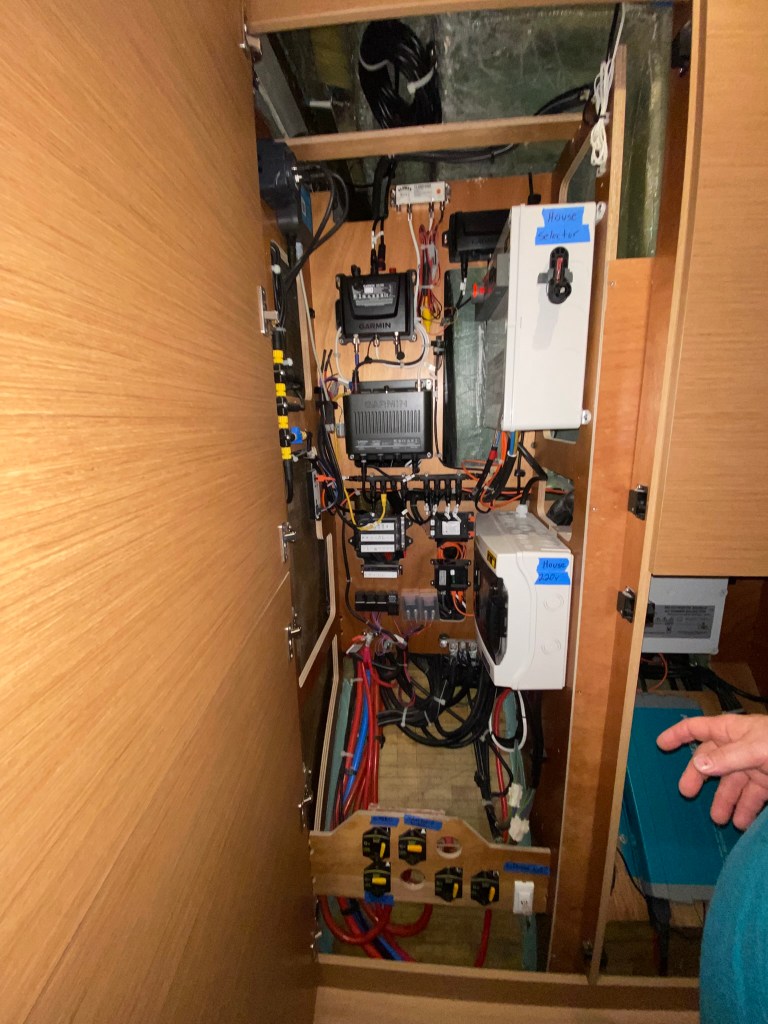
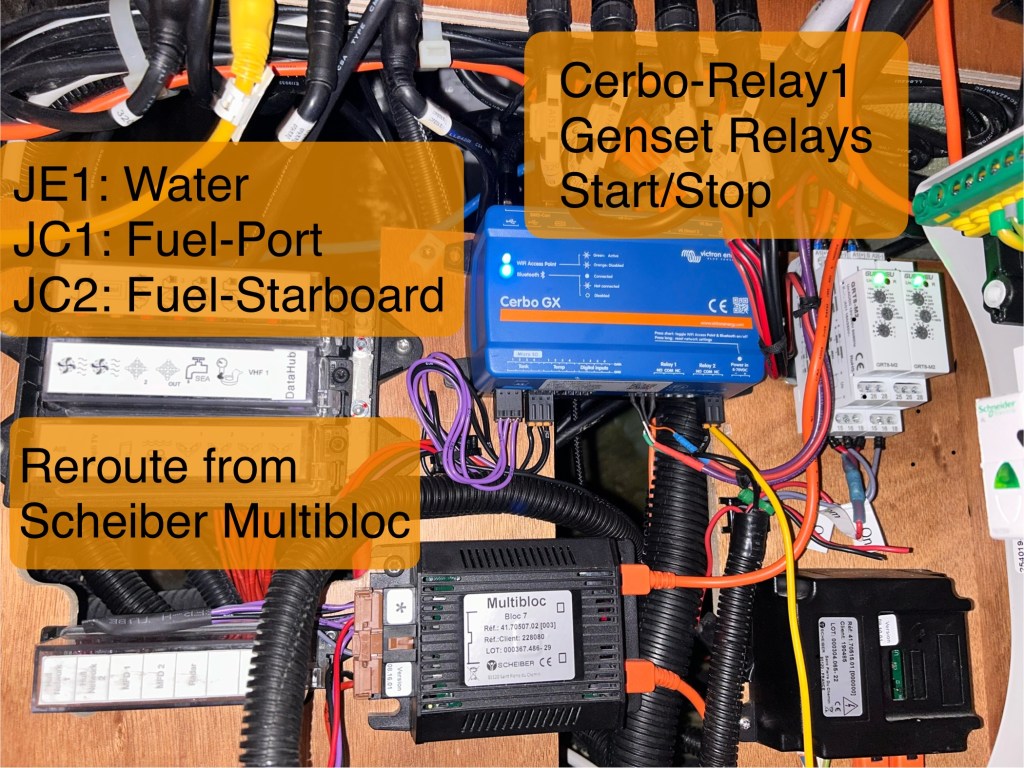
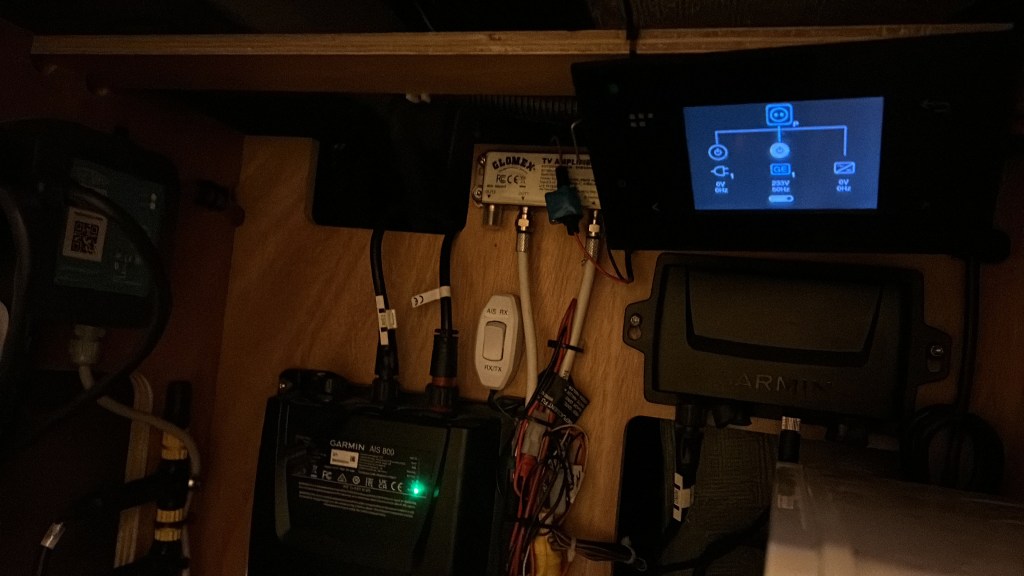
The Excess 14 centralizes most electrical systems in the port electrical cabinet, making it the proper place for the Cerbo-GX. If you have an existing Victron Lithium battery system, remove the rear closet panel in the aft berth. You’ll find the Cerbo-GX connected via an Ethernet cable, power, and a NEMA connection. Unfortunately, you’ll also notice the relay and sensor connectors likely aren’t provided. The factory typically doesn’t install the connectors on the Cerbo-GX, making them hard to acquire, since Victron doesn’t offer them as an orderable part. While I’ve found these connectors on Amazon, I was able to get Victron support to send them to me at no charge. It’s in Victron’s interest to keep customers happy, since you’re likely to purchase additional Victron gear. Reach out and be persistent. (Victron Energy: Support)
After a few emails to their customer support team, I received this little care package. All I needed were the black connectors, but they sent them all, which was a nice bonus.
The Ethernet wire runs from the BMS system, which may be mounted in the port engine compartment or under the port-aft bed.
While you could extend the Ethernet cable, it’s not that big a change to replace the cable with one long enough to eliminate an Ethernet female/female coupling. It does mean you’ll need to run the cable through the firewall, so pick the effort that meets your goals. If you extend the Ethernet cable with an Ethernet Coupler, I’d suggest sealing it with a piece of heat shrink to reduce the chance it can get unplugged.
Power can be found in the electrical cabinet, and I’d also suggest placing it on one of the spare fuse blocks available.
The required NEMA connection is also available in the cabinet, so you can remove the dangling NEMA, power, and Ethernet cables behind the closet.
[TODO: update with an image from the port electrical cabinet]
Note: I forgot to take a picture of the Cerbo-GX hidden behind the cabinet panel. If you’re reading this and have the hidden Cerbo-GX, please contact me to send me a photo to add here.
Adding a Victron Display
Victron provides two display sizes. The Victron-GX Touch 50 and 70. If replacing the Schieber panel, the hole size is just a little wider and a little shorter from top to bottom.
You could 3D print an adapter to cover the width, or purchase the Touch 70 and simply enlarge the hole. I currently have the Touch 50 and am contemplating whether to replace it with the Touch 70 or take the time to design and print an adapter.
Connecting the display involves connecting the HDMI and USB cables. Note, there’s a specific USB connection for the display, and the Cerbo-GX will need to be rebooted after the display is connected. Rebooting can be done with the display if it were working. Or, remove the power connector on the bottom right.

Switching to Victron Inverters and the Scheiber System
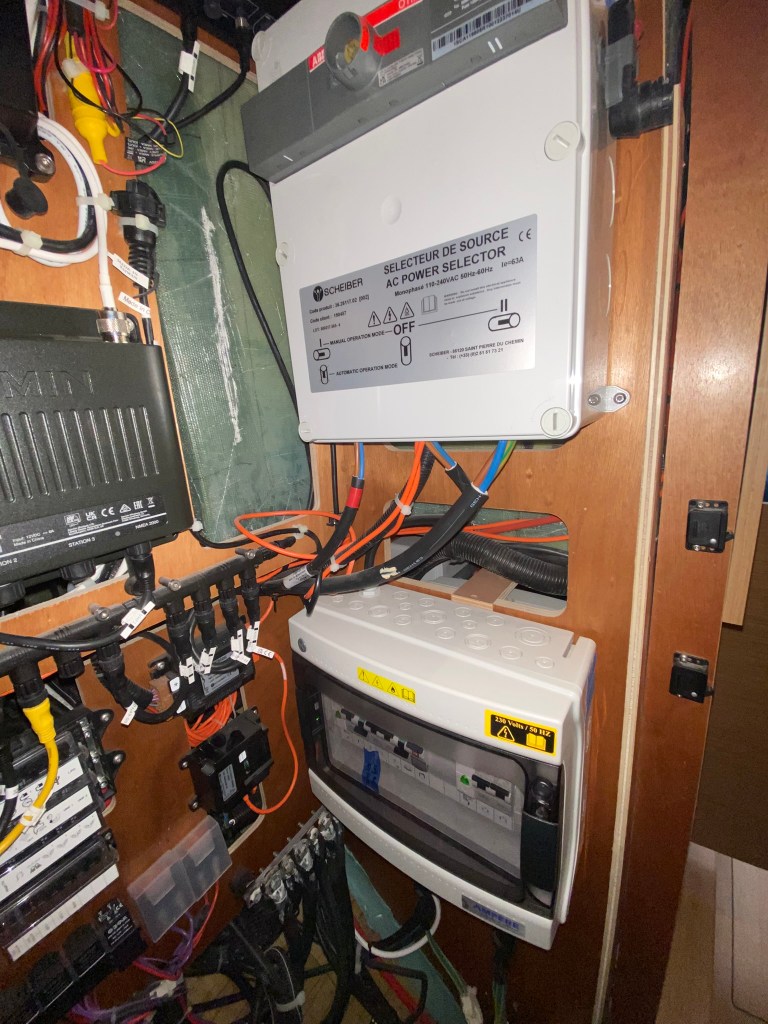
One of the primary capabilities of the Schieber Navicolor and controller(s) is switching between shore power, batteries, the inverter, or a genset. The switching is manually initiated from the panel and mechanically switched in the larger Scheiber panel(s) with the rotating switch.

If you’re switching to a Victron Inverter like the Victron Quatro, there’s no longer any need for the Schieber system, as the inverter handles the switching automatically.
Unlike the Scheiber controller and Mastervolt inverter system, the Victron Quatro has no downtime when switching between sources. Devices like Starlink, which may be connected to AC power, will reset and take several minutes to come back online. An oven or microwave will also reset, adding a bit of annoyance.
When the boat is commissioned with air conditioning, a second switching controller takes up additional space in the right cabinet. Removing the Scheiber system will free up this needed space, reducing the system’s complexity, as the Victron Inverter seamlessly incorporates all switching without interruption. Depending on where you mount and whether you choose a 3kw or 5kw inverter, that space can be pretty handy. It’s also fair to say centralizing switching on the Victron Inverter adds some risk, as the Schieber mechanical panel can be manually changed. Choosing two smaller inverters for redundancy or configuring additional fault switching is touched upon here: Hull Yeah Solar and Energy System Updates
Once the Mastervolt inverter is removed from the system, the Schieber system can be entirely replaced with Victron components, providing a more seamless, integrated system with greater capabilities.
Where to place the inverter is another option to consider. The default is to keep the inverter as close to the batteries as possible, since DC cabling is lossy and requires larger cables for longer runs.
Typical options include the engine compartment, under the aft port bed, or the port electrical cabinet. Below is a breakdown of the pros and cons of each.
| Location | Pros | Cons |
| Engine Compartment | – Close to the batteries – Easily accessible | – Heat and salty air |
| Under the aft port bed | – Cooler than the engine compartment – Climate-controlled | – May not have enough space depending on the size/quantity of batteries – Accessibility |
| Port Electrical Cabinet | – Accessibility – Close to the AC systems | – 5m 4/0 (120mm2) DC cables (5m) – May not fit two smaller/redundant inverters |
I tossed this discussion to the All Things Marine Electrical Facebook Group, which touched on all the points.
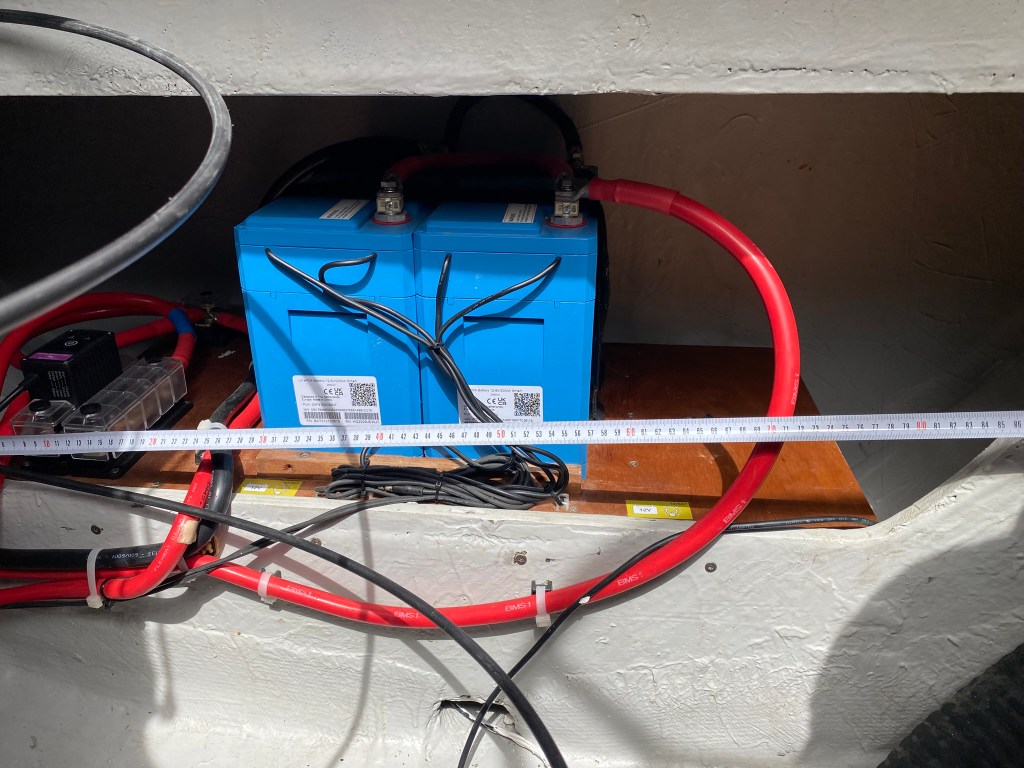
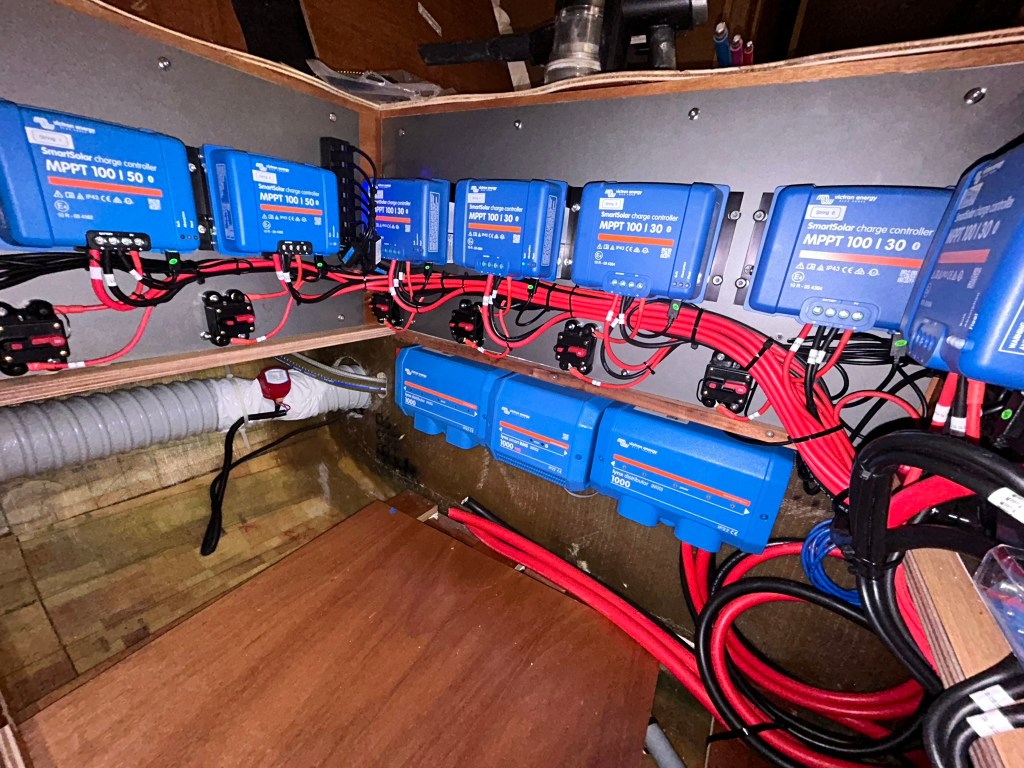
For our configuration, I chose the port electrical cabinet. With four 300Ah batteries, 7 MMPTs, two Victron Distributors, and the BMS, there wasn’t room to mount the Inverter under the bed. And for the reasons above, I chose against the engine compartment. Once the Mastervolt Inverter and the Scheiber mechanical panel for the air-conditioning were removed, a single 5kw Quatro fits snugly in place.
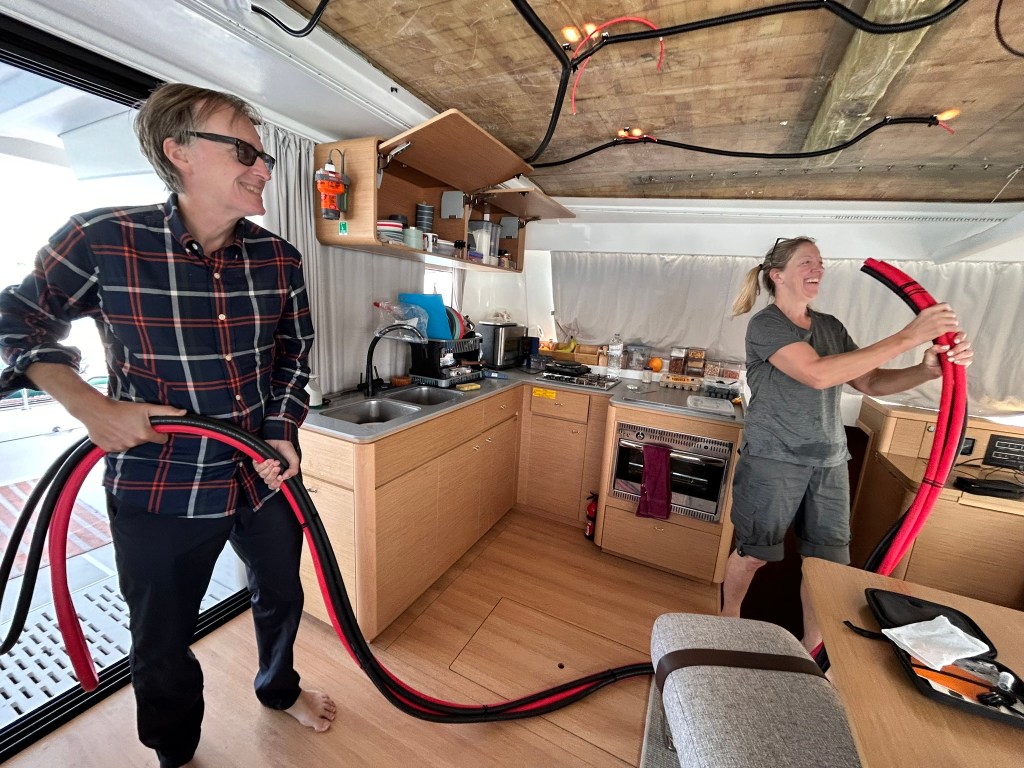
We ran two sets of 5-meter 120 mm2 (4/0 AWG) cables to the electrical closet. Running the wires was pretty easy as we ran them just below the floor, through the cabinets, and under the stairs. We added a piece of wood to support the cables across the gap under the stairs, but otherwise it was easy, considering the size of the four 120 mm2 cables.
I considered running the cables up along the top section of the hull, just below the saloon floor, but that would have added length. The cable run along the floor was exactly 5m, and the cables didn’t sit in the bilge where they could get wet. Keeping the length to 5m ensured there was no noticeable loss and that we remained well within the 5 kW consumption range.
Moving Water and Fuel Monitoring
An Excess 14 has at least one water tank and two fuel tanks under each stern bed. The sensors are routed to the Block7 controller in the port electrical cabinet. Excess does a great job of labeling the wires, making it easy to reroute the monitoring to the Cerbo-GX tank sensors.

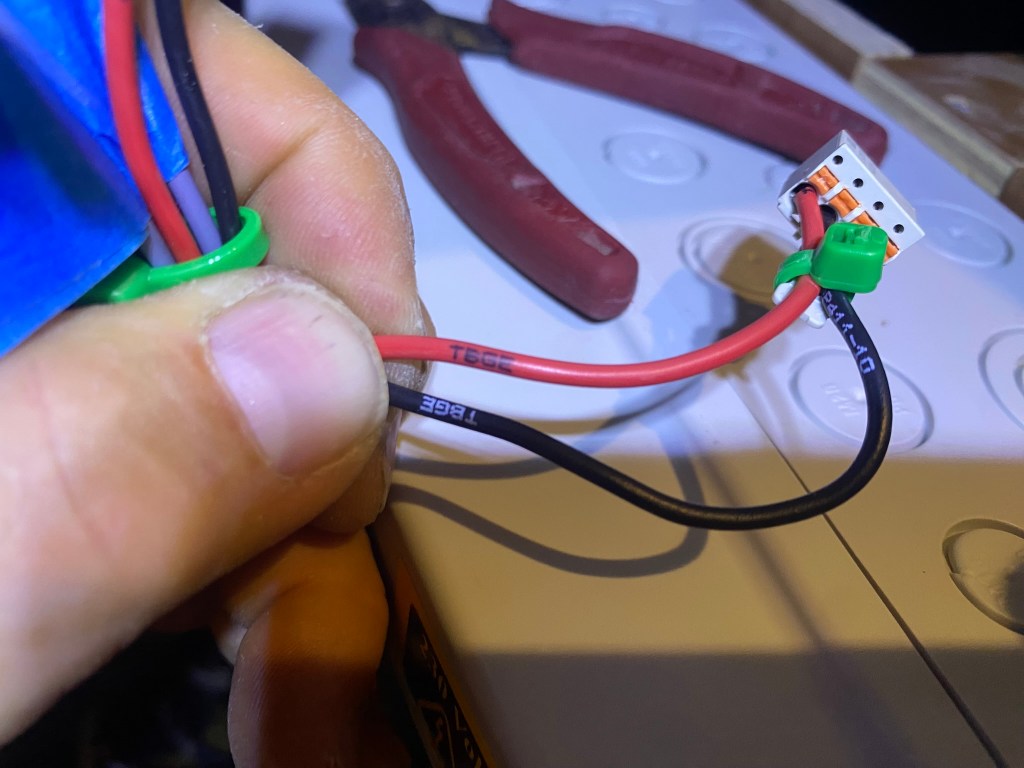
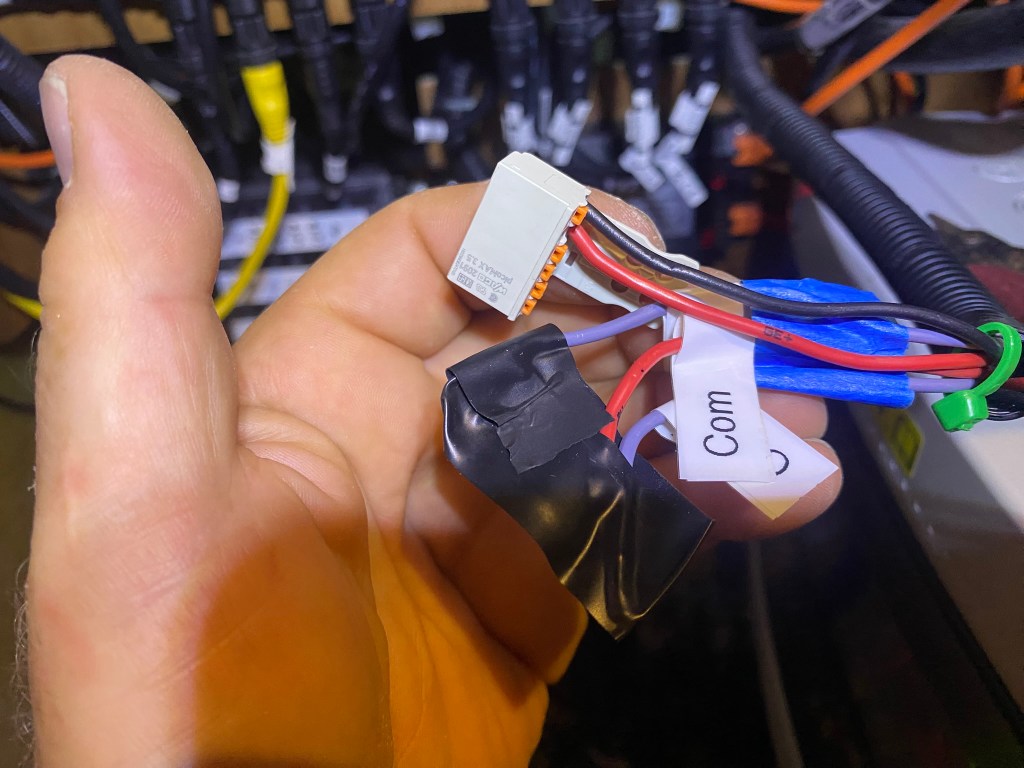
Reroute the sensor wires going to the Block7 to the Cerbo-GX tank input. Use watertight/heatshrink-covered splices and some small-diameter plastic tubing to keep things tidy.
(Boat Porn Critics: the picture shows the temporary configuration until spring 2026, when I finish removing the Sheiber system and finish installing the Victron Quatro Inverter.) When I left in November, I hadn’t yet received the sensor connectors, so you’ll notice some heatshrink covering, holding the sensors to the pins.)
Referring to the manual, reconfiguring the sensors on the Cerbo-GX was quite intuitive. The device’s menu provides for renaming and configuration.
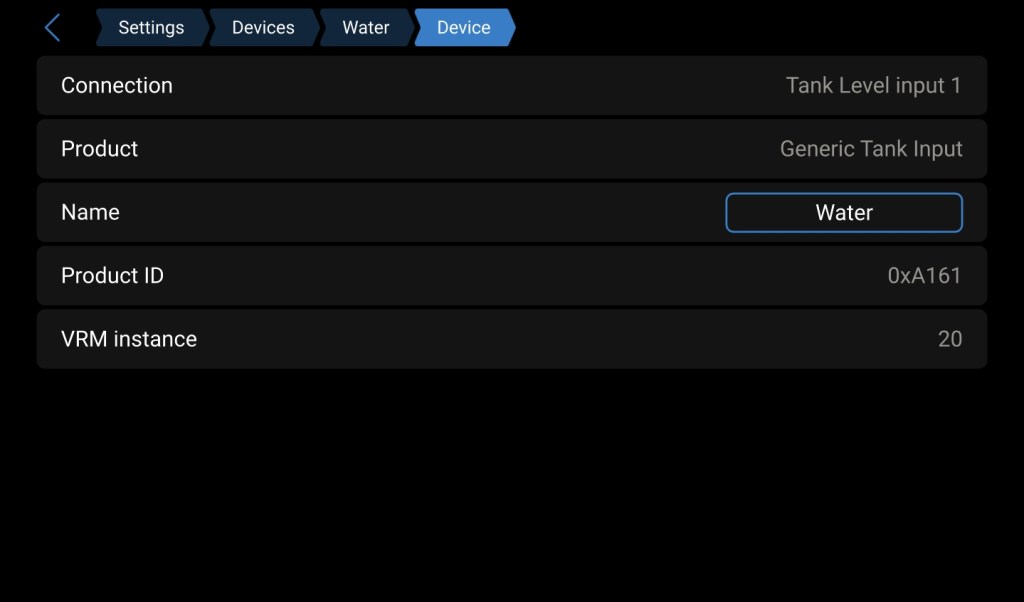
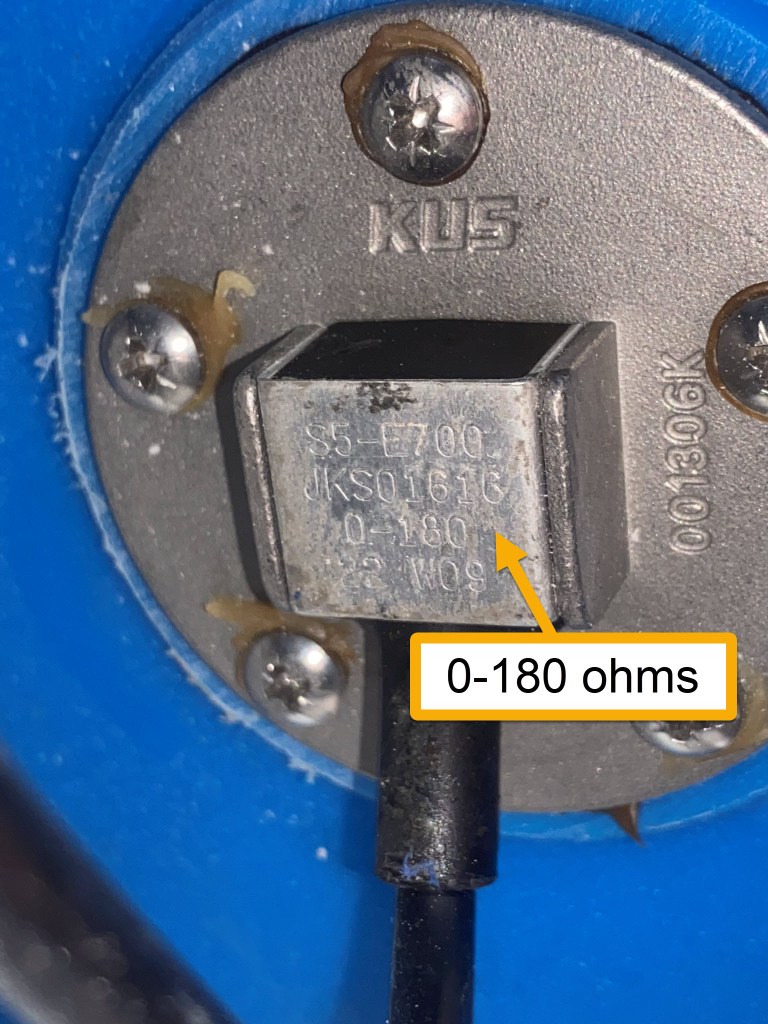
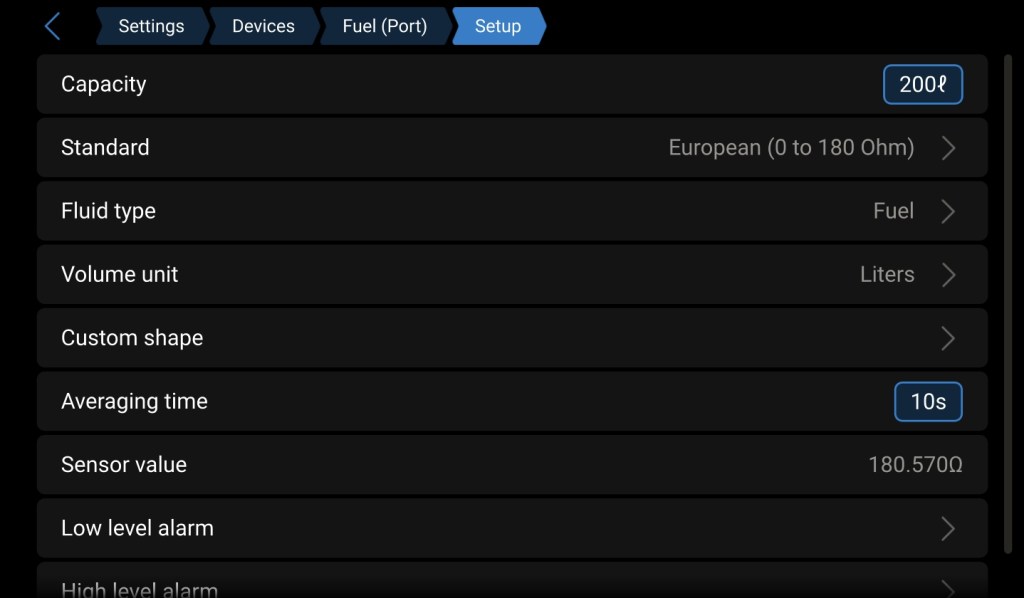
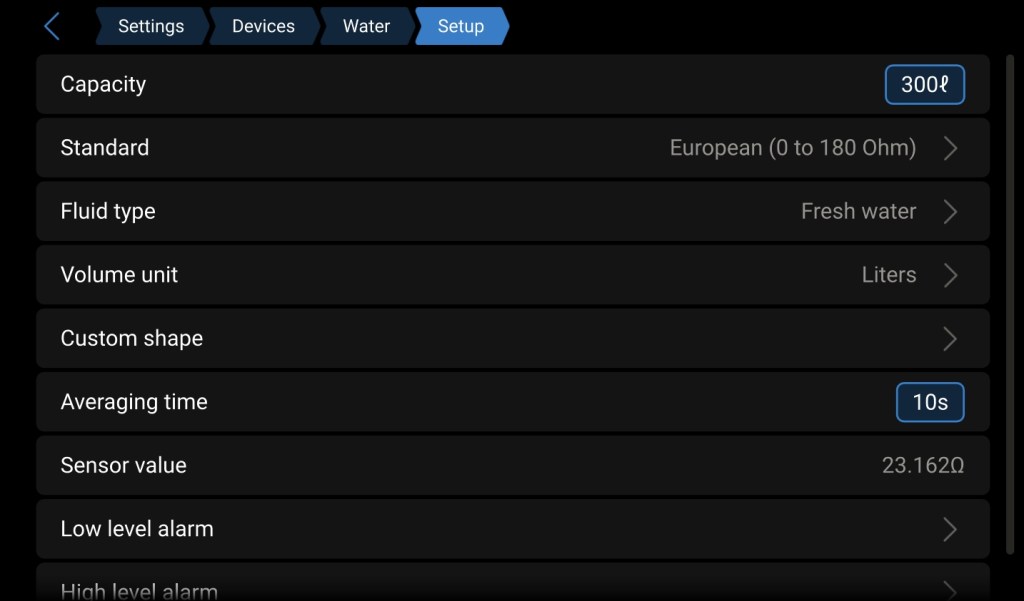
When configuring the Cerbo-GX sensors, use the European sensor configuration, and the panel should light up with the details. Setting the values is quite easy, once you know which options to choose.
I wish I had had this article before I had to perform boat yoga on all the sensors.
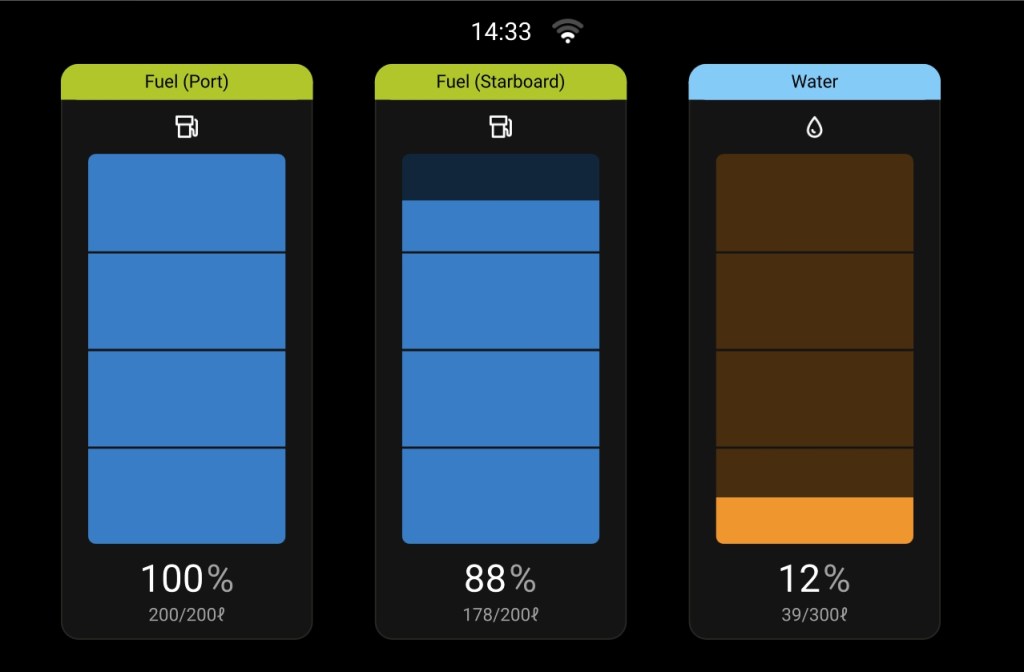
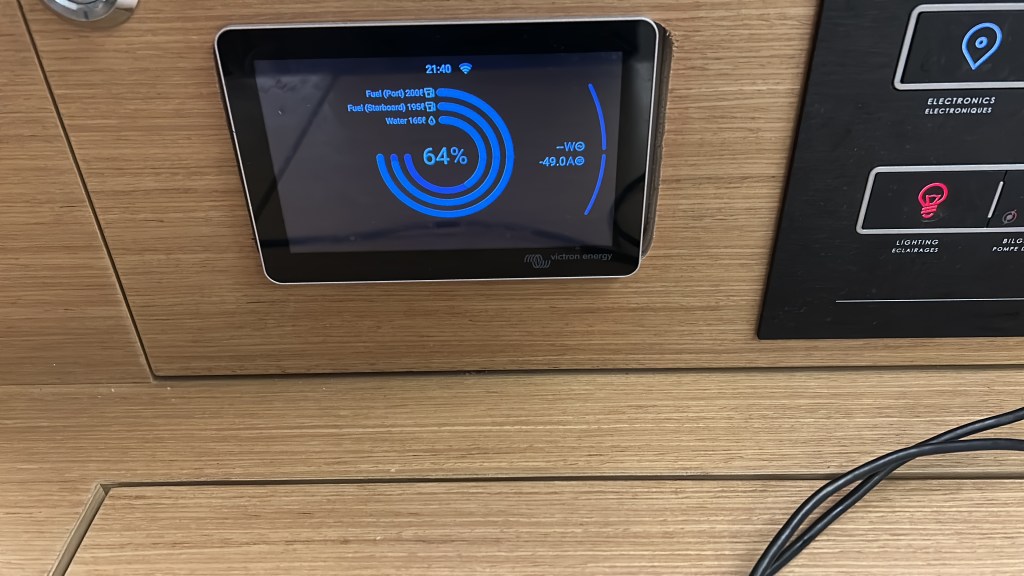
The images below show the water tank sensor and the Victron configuration for water and fuel. The fuel tanks are 200 liters each, and the single water tank configuration is 300 liters.
Note: If you have a dual-tank setup, I don’t know whether it’s two sensors or a single 600-liter tank. Please let me know in the comments below (or DM) how it’s configured, and I’ll update the article.
I’ve found the Victron system provides more accurate information at the specific level, rather than just a percentage, including the levels in the summary display.
Battery Monitoring
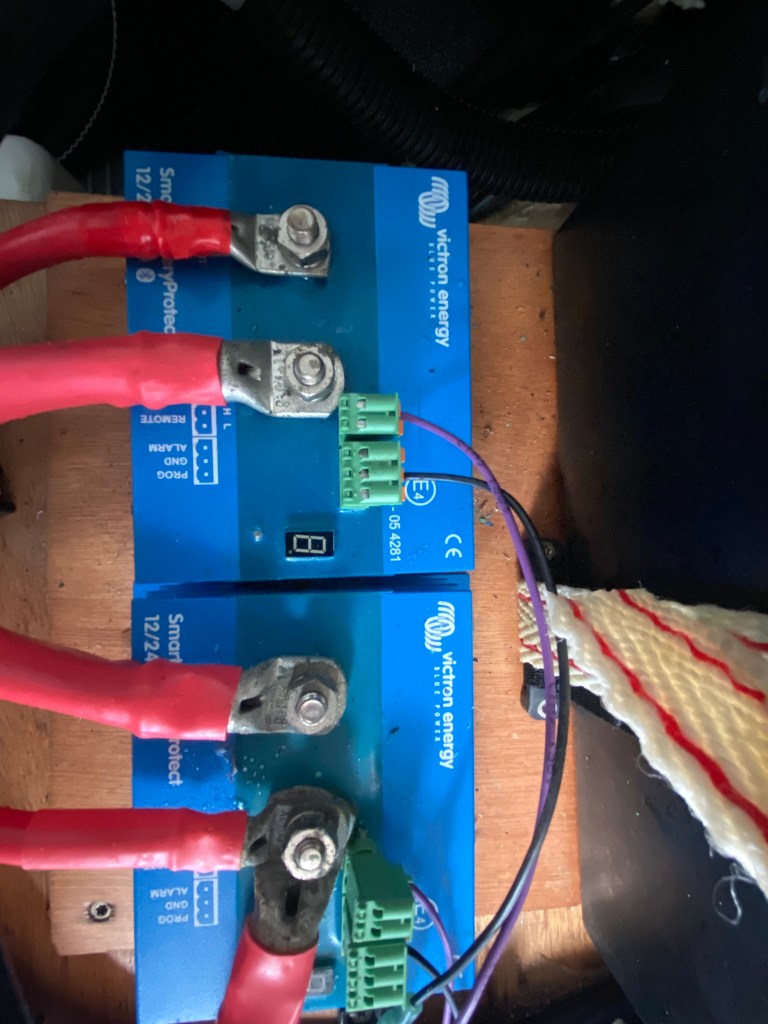
The heart of the Victron system is the Battery Management System, which surfaces through the Cerbo-GX. This includes the house batteries, but doesn’t directly cover any engine or GenSet batteries. One advantage of the Scheiber configuration is the inclusion of the engine and GenSet batteries.
Engine battery monitoring can be achieved using the Yanmar displays at the helm station. Of course, this doesn’t enable any local or remote management. GenSet batteries are yet another issue, depending on the GenSet configuration. The Scheiber system doesn’t support remote management either, so not having the engine/genset batteries on the CerboGX is an annoyance, but not a blocker.
At the time of this writing, I have not yet figured out how to monitor battery levels with the Cerbo-GX. I currently have the Schieber Navicolor display mounted within the electrical cabinet and the Block7.
I assume it’s possible to include them in the Cerbo-GX, I just haven’t gotten that far down my to-do list. When I return to the boat in the spring of 2026, I’ll complete the removal of the Scheiber system and update this article.
If you have any suggestions, please provide them in the comments, or feel free to contact me directly.
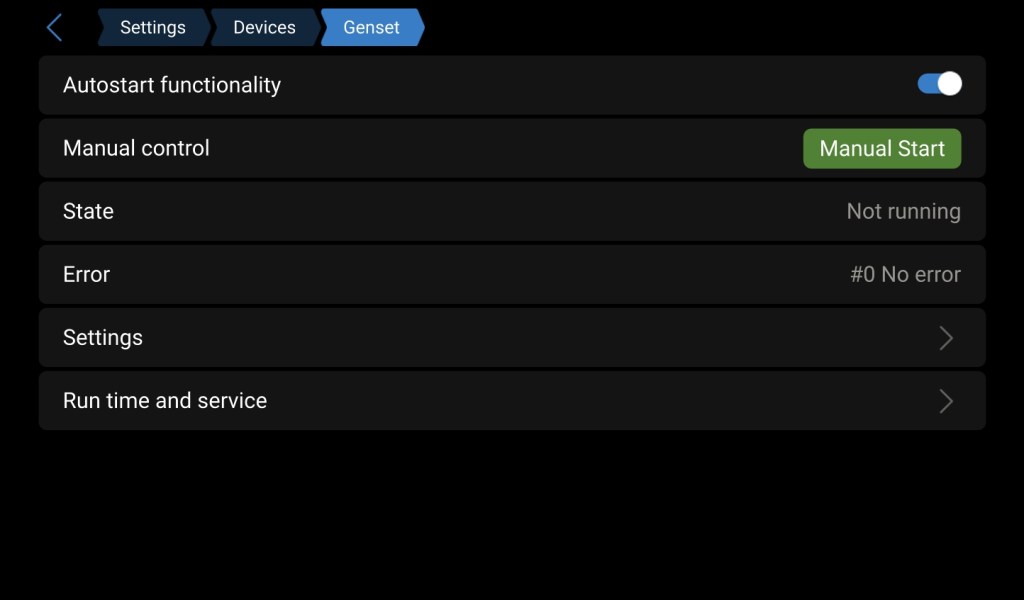
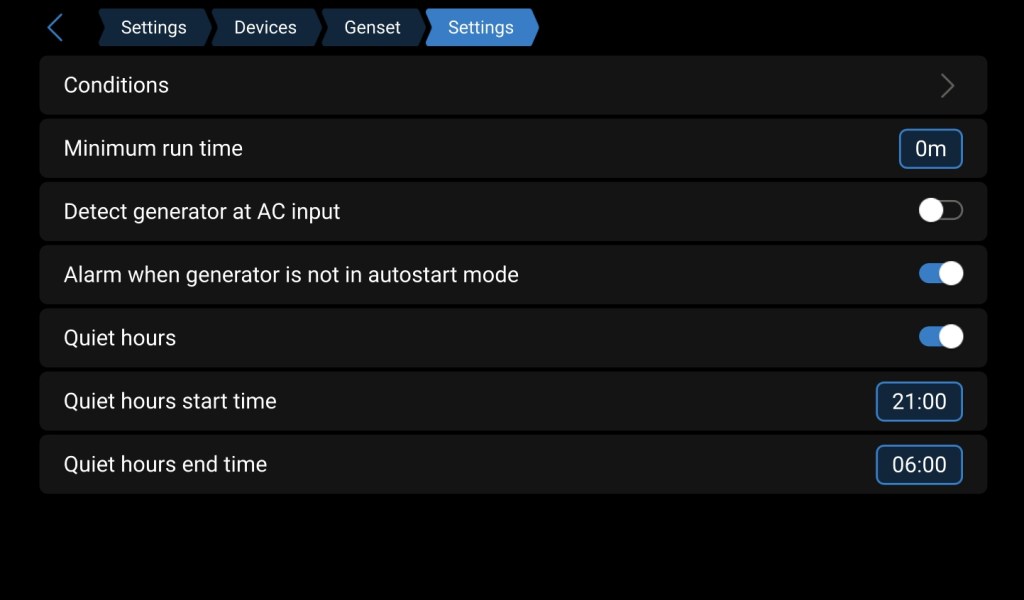
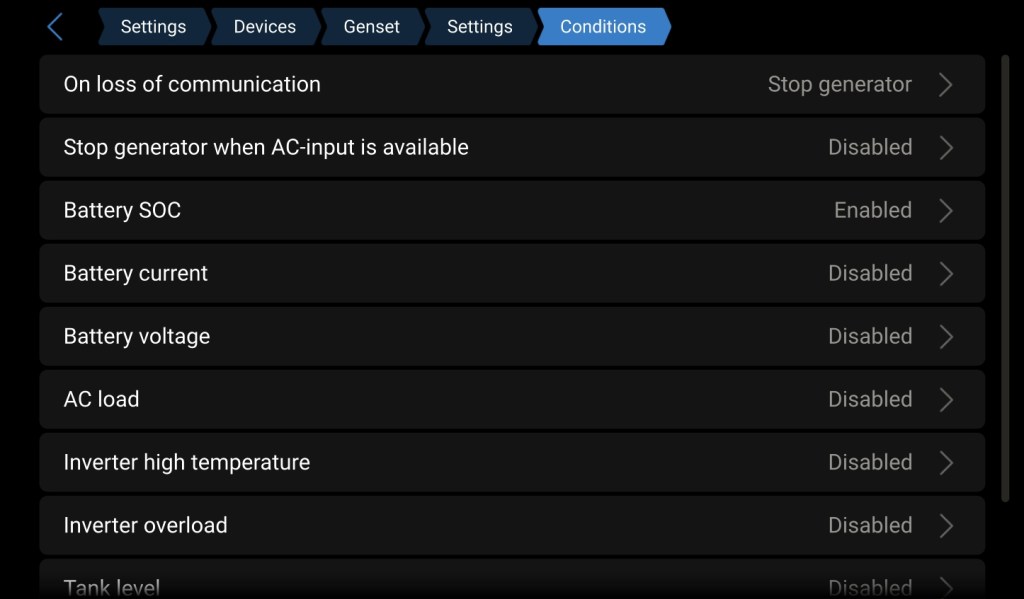
Generator Auto-Start/Shutdown Integration
If you have a generator, the automatic features alone are worth the switch over. When using a Cerbo-GX, the generator can be set to auto-start when the battery state of charge (SOC) drops below a set level, and the shutdown can be set at different SOC levels for day and night. It can also be set not to auto-start if fuel drops below a certain level.
When combined with a Victron Inverter like the Quatro, the switchover is seamless, making the system self-managing.
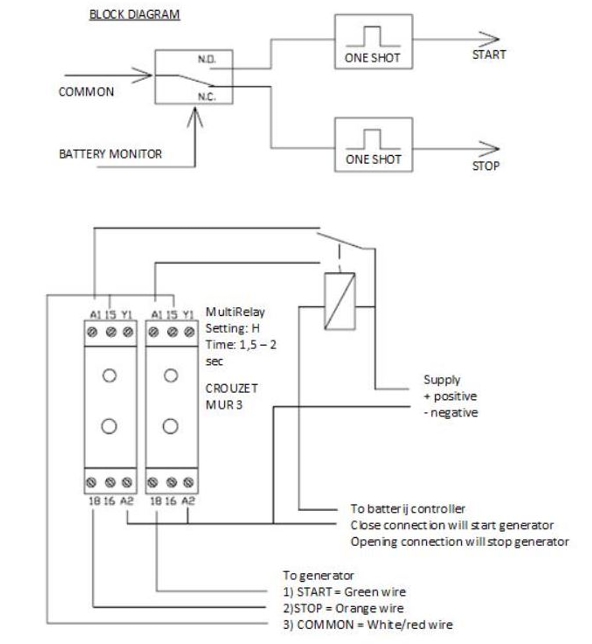
While the Cerbo-GX provides configuration through the Relay 1 connector, you may need additional components to complete the setup. We chose a Cummins/Onan 7 kW MDKDL generator. To start and stop the Onan generator, a “pulse” is required.
The Victron Quatro GenSet Configuration manual (listed with all the other Excess manuals) outlines the timer relays.
The Cerbo-GX Relay 1 provides normally open (N/O) / normally closed (N/C) contacts. To convert the N/O and N/C contacts to a pulse, two additional timer relays are needed.
Apologies, as I forgot to capture the wiring details.
[TODO: Update with schematic details for Excess wire labels to the timer relays when I return in the spring of 2026]
The timer relays can be purchased at your local electrical supply store or on Amazon: GenSet Timer Relays. The Cerbo-GX can also detect if the GenSet is actually running through additional sensors. With excellent sound isolation, or simply under sail, it can be challenging to determine if the generator is actually running, so it’s a real issue, even on the Excess boats.
[TODO: Update GenSet running details when I finish the Quatry Inverter configuration]
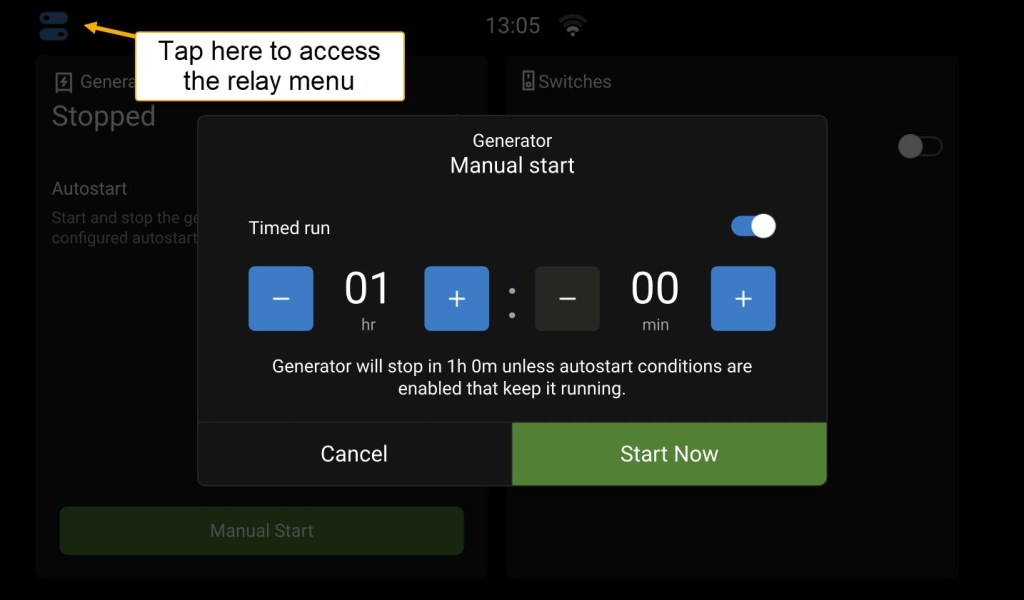
Once the relays are configured, you can manually turn on the GenSet, run it for a specified time, or leave it on an automatic schedule. We ran the automatic configuration for the last few months of the season. Compared to the painful-to-configure, manual on/off Sheiber genset configuration, the Victron system dramatically simplified our power management.
Remote Management
Whether you’re sleeping in the hull and want to check on the battery level or are away from the boat, you can easily view all the stats and remotely manage the Victron system. There are no annoying subscription fees, and when on the boat, you don’t need an internet connection. The connections can also be locked down to read-only.
Connecting Locally
To connect directly to the Cerbo-GX from within the boat, use the Cerbo-GX WiFi access point with the information from the sticker attached to the Cerbo-GX.
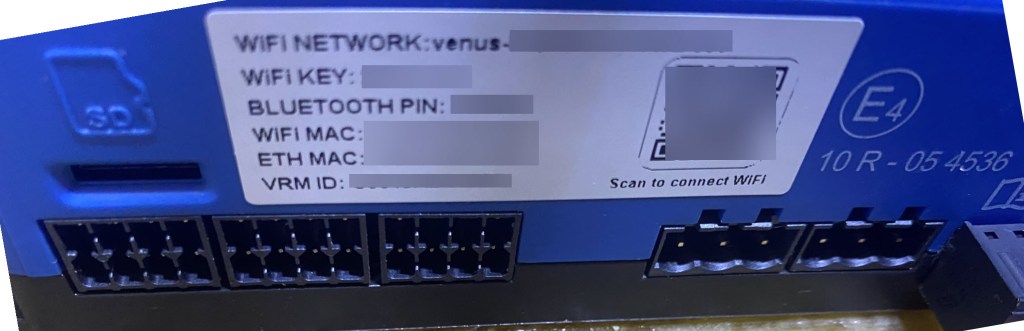
Once connected to the Cerbo-GX WiFi Network, navigate to http://172.24.24.1 to open the Victron interface. A really nice feature is that navigating this remote display has no impact on the GX-Touch display.
There are additional network options with the Ethernet port, enabling a larger local network. This is a good topic for another article, providing remote connectivity to the Cerbo-GX, Predict Wind Data Hub, or the chart plotter for anchor watch while sleeping.
Connecting Remotely
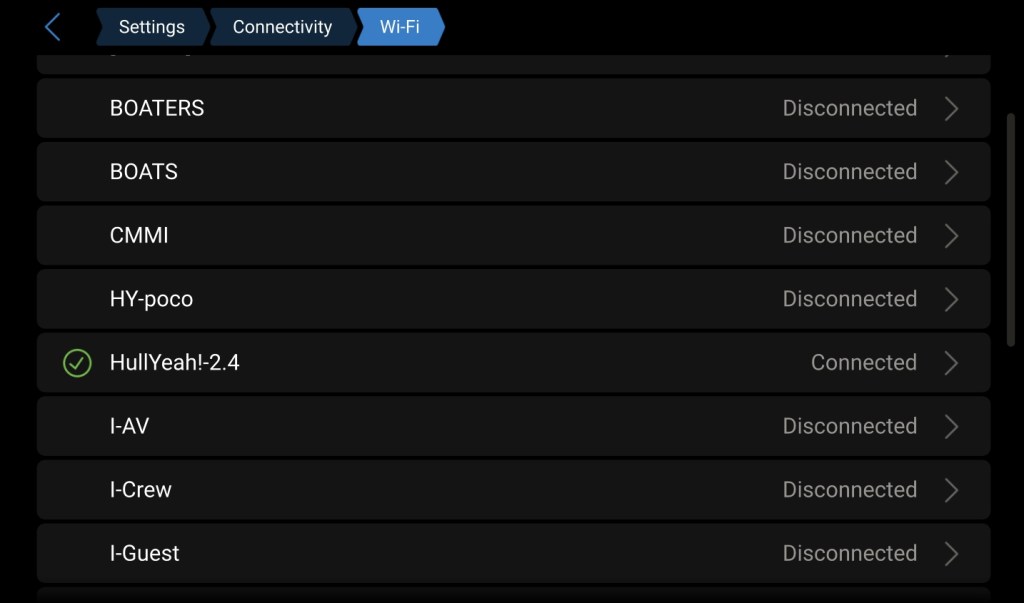
Victron provides a remote proxy to connect to the boat via its VRM (Victron Remote Management) service. The Cerbo-GX will need an internet connection, either through the Ethernet port or another WiFi access point. Assuming the marina WiFi is accessible and reliable, this would suffice. Starlink is, of course, an option, but it could be more expensive than needed for off-season storage. We use Starlink for the sailing season and a cheap Cellular HotSpot for the off-season. This allows us to switch Starlink from a 50-100€ per month subscription to a 5€ per month Starlink subscription. The 5€ subscription holds our capacity spot.
Providing multiple WiFi access points will enable the Cerbo-GX to connect to the one available. Here, I’m using the HotSpot. Notice I’ve enabled the “Reboot device when no contact” option, since the Cerbo-GX can freeze. When you’re at sea and aren’t running a reliable internet connection, it will also reboot. So it’s not a perfect world, and I toggle this setting depending on our needs.
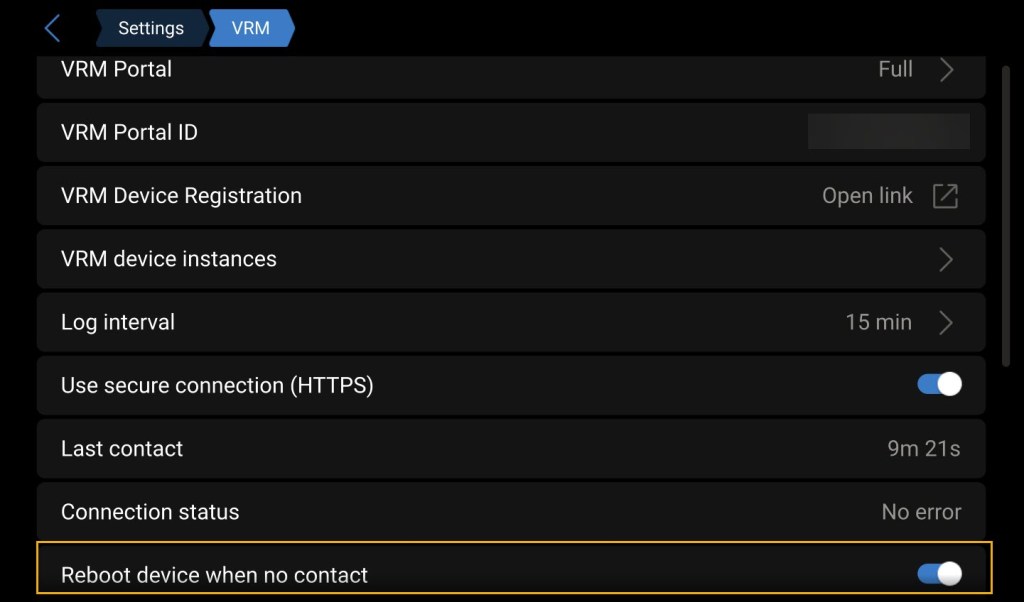
The Victron Cerbo-GX manual provides details for configuring the VRM portal with the VRM ID on the Cerbo-GX sticker.
Impact on the Excess Warranty
This is the sticky point, and there’s no 100% solution here. Remember, it’s a boat. There are always compromises.
Excess provides the boat with various configurations. While you can get some factory enhancements, it’s unlikely they’ll meet all your enhancement needs, and arguably not the best use of funds and expertise. Beneteau and Excess are boat builders; they’re not electrical experts. Having Excess provide the boat with core systems and their expertise is an excellent platform to customize to your sailing plan.
There are many enhancements, including additional batteries, solar and hydro generation, high-capacity alternators, Starlink, and all the other customizations you’ll likely want to add. Anything you change will prompt the question: “Did the thing that failed happen because the factory system was changed?”
See our latest Hull Yeah Energy Updates for examples.
Working with top-notch vendors, including those in Las Sables, will help you manage the warranty expectations. Excess won’t warrant the devices you add, but the manufacturer will, and the vendor that installed them should. This also means that installing yourself makes you the vendor for warranty repairs. But don’t be afraid. If you’re at all technical, you’re likely more passionate about the boat’s systems than most vendors you’ll find. If you have an excellent vendor, do whatever you can to keep them and learn everything you can, because they won’t be available when something fails. And, something will fail; that’s the best guarantee you’ll get.
The more professional and cleaner the installation is, the easier it is to identify rerouted or additional wiring, and the less likely you are to have warranty problems. It will be easier to troubleshoot yourself and harder to finger-point issues at “the other vendor.” It also helps to have a great agent, as all interactions with the Excess/Beneatu warranty and service departments are managed by the agent.
If you’re reading this before you purchase your new boat, or the boat is still under warranty, I would highly recommend using an Excess agent in the area where you’ll be sailing. You’ll want local expertise.
To sum it up, it’s doubtful the boat will remain factory-commissioned. Don’t hesitate to enhance the boat to meet your sailing needs, because you’re concerned about the warranty. The boat will have failures, that’s for sure. Whether the failure is due to a factory-installed component or a post-delivery alteration, it’s essential that the boat meets your needs, troubleshooting issues as they arise.
When making enhancements yourself or through a vendor, be sure you fully understand the changes, including documenting them, specifying where the new components are placed, and identifying all the wiring. If you have a vendor doing the work, make sure you have written documentation of the warranty expectations. Including who’s responsible for shipping to where the boat is, and who will pay for the labor if not at the vendor’s location.
Most importantly, enjoy your adventure, which will include doing repairs. The factory warranty doesn’t mean Excess will teleport to your location with all the parts. And they fully expect enhancements to be made. You will be the first line of troubleshooting. With a great system, you can likely diagnose the problem yourself and have any failed components shipped to your next port.
As for the changes from Scheiber to Victron, we are much happier with the system consolidated into Victron. We have one panel to view and manage. It’s simpler on me as the technical person, and simpler on the crew and others who perform maintenance on the boat.
Steve

Leave a comment