There are two primary reefing configurations, slab and single-line reefing. Slab reefing involves lowering the mainsail until the new tack can be fixed to a point on the mast. In this technique, someone must go to the mast and hook the tack, which can be a challenge when the wind is building, and worse in rough seas. Single-line reefing pulls the new tack and the new clew down, allowing the crew to stay safely in the cockpit, but can be difficult to manage the tension in the reef line.
This article defines a technique I call: Archimedes Single Line Reefing. The approach manages the line tension, avoiding broken reef lines. While this article focuses on reefing an Excess 14, the technique can be applied to any single-line reefing system on catamarans and monohulls.
Big Sails and Reefing Early
The Excess 14 Pulse option has a large 90 m² (968 SQFT) main sail and 45 m² (484 SQFT) genoa headsail. The larger main is fantastic in light wind sailing but can quickly create weather helm above ~12kts upwind. When flying downwind, a full sail will create shadowing on the downwind sail, making it less effective.
An overpowered mainsail may not be obvious when sailing on autopilot. The counter steering required turns the rudders into brakes, slowing progress by 0.5 to a full knot. Having full sails may look good, but not so great when comparing actual speeds. Reef 2 provides a great balance, reducing the shadow of the downwind sail while providing mast support.
The Excess reefing table is more of a safety range, and I’ve found reefing the main earlier when flying upwind on the jib increases overall speed. When flying a Code 0, the larger main is in better balance with the larger headsail; however, the Code 0 typically maxes out at 16-18kts AW,S requiring a switch back to the jib, and reduction of the main.
Whether sailing upwind or downwind, the Excess “auto” reefing system allows the boat to continue its course and headsail choice, while reducing the mainsail power.
Mechanics of the Reef Lines
Click here to skip ahead, following just the steps,
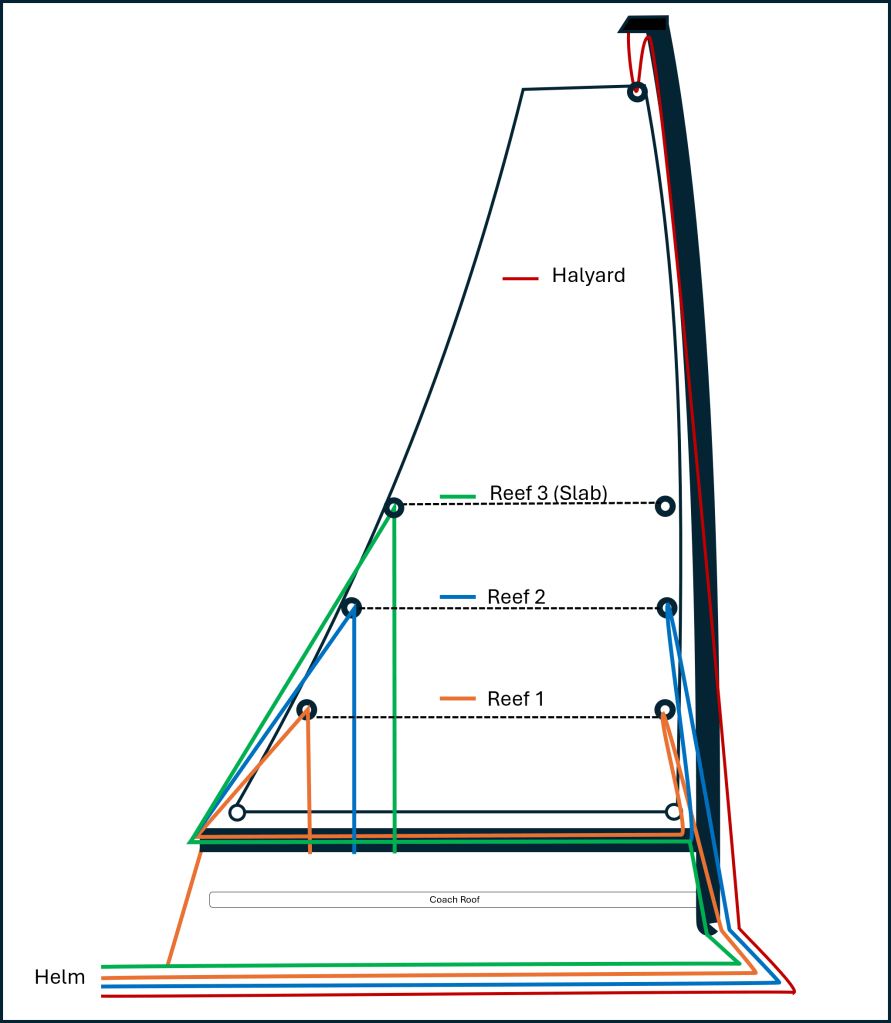
The Excess 14 has three reef points, with reef 1 and 2 using a single-line reefing and reef 3 using the slab approach. The reef lines flow from the helm, through deck organizers, up the base of the mast, into the reef tack point (except reef 3), down into the boom, up to the reefing clew, then back down to the boom. Combining the tack and clew in the reef line makes reefing easier, avoiding the need to head directly into the wind, which would require furling or dousing the headsail or gennaker. Single line reefing enables lowering the halyard and pulling in the reef line to establish the new foot of the sail. While this sounds easy, the mechanics and friction points make it a challenge. However, as Archimedes taught us, leverage can easily reef the main while continuing to fly the headsail.
Friction Points
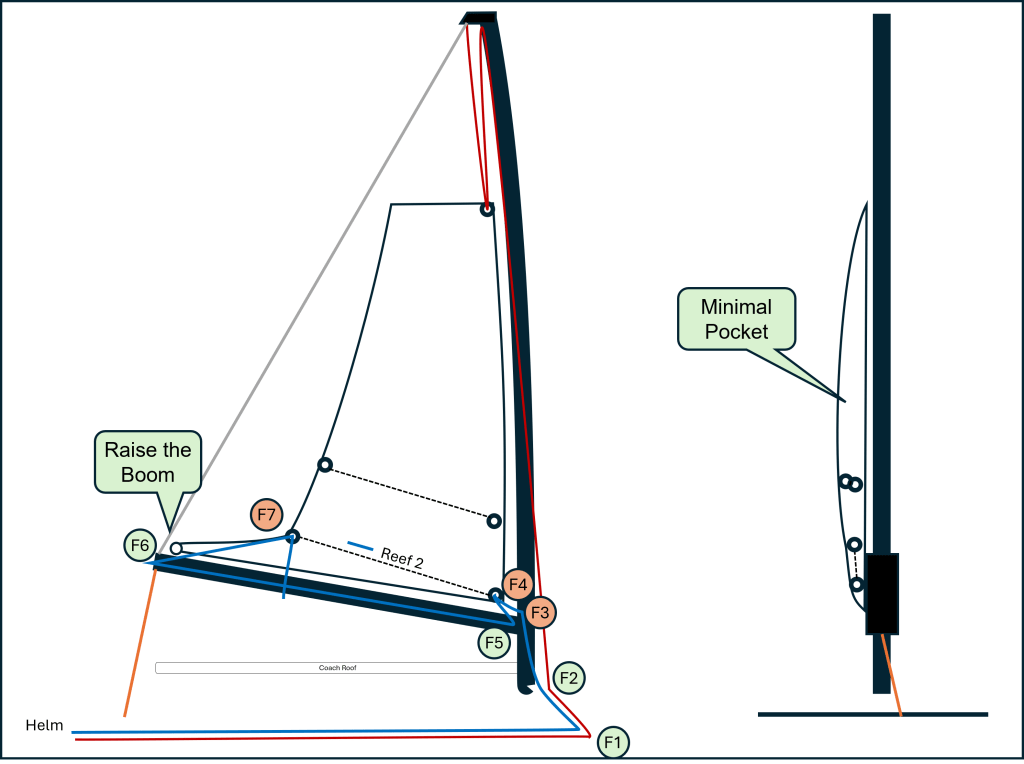
The common complaint with single-line reefing is the friction it creates. Focusing on Reef 2, there are several friction points, indicated in different colors. Below are views of the sail from the starboard and the stern.

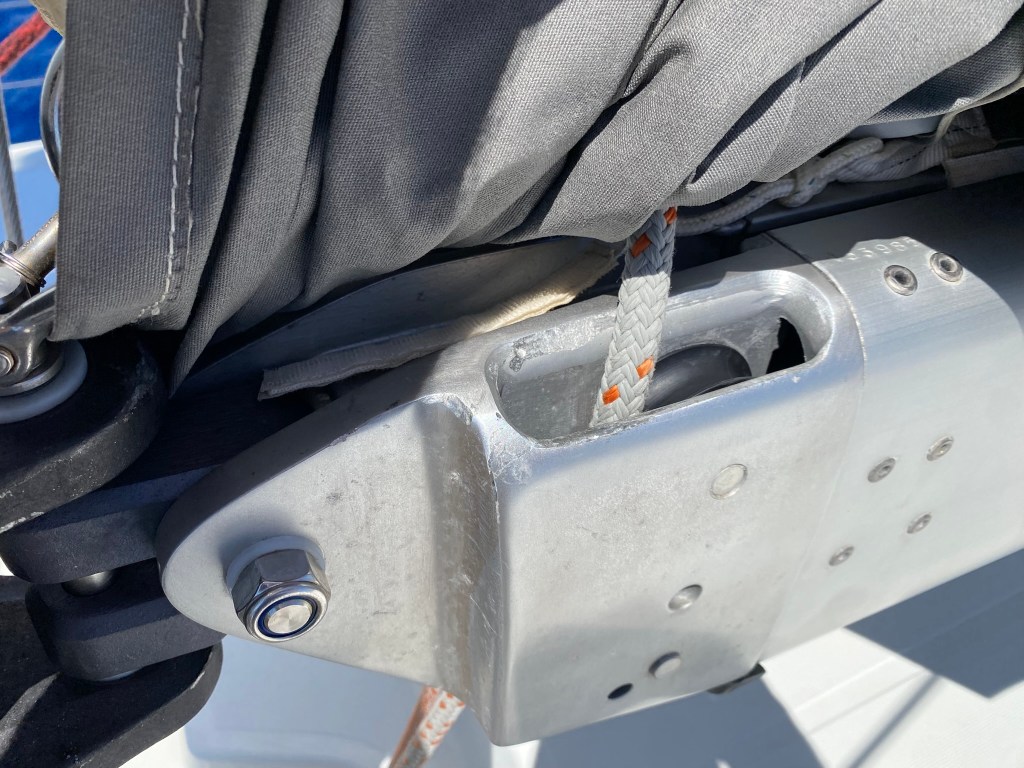
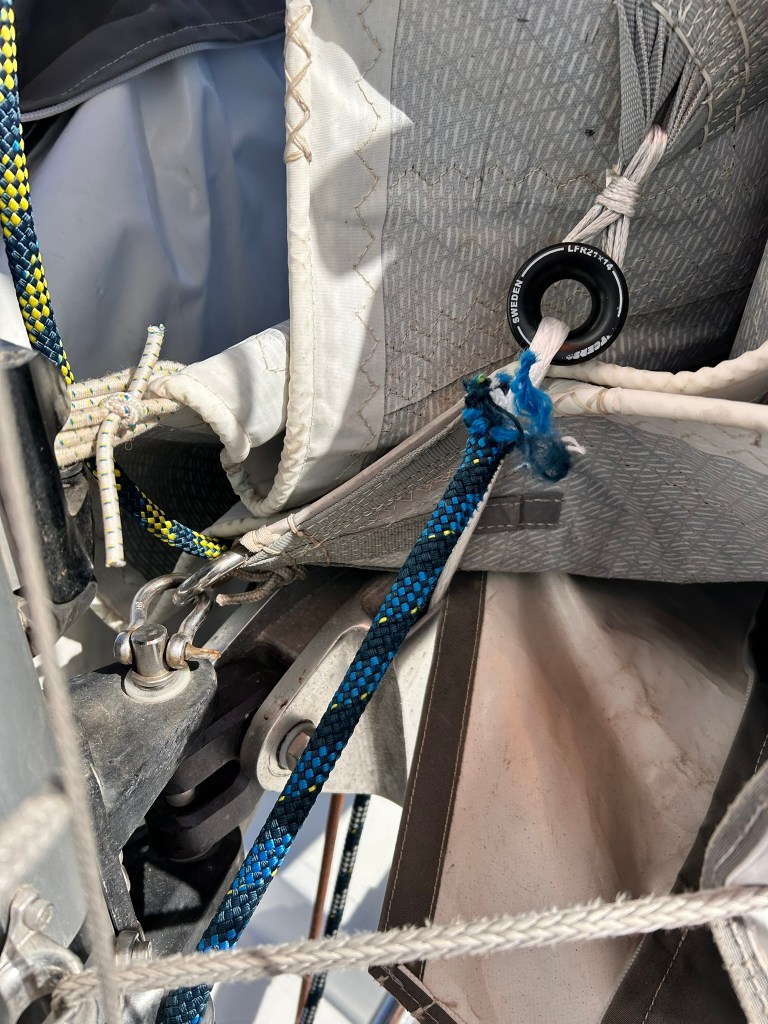
The light green points (F1, F2, F5, F6) use sheaves on the deck organizers and blocks at the base of the mast and within the boom. The guide on the mast (F3) creates an additional friction point as the angle increases when the new foot is established. The orange tack and clew points (F4, F7) use friction rings that allow the lines to flow through them with minimal space. However, these do create more friction than rotating blocks and organizers. The other big friction point is the entrance into the front of the boom, as it can easily chafe the line on the boom, causing the cover and core to blow, resulting in the boom scraping the coach roof. The last friction point is the mast guide (F3). We’ll discuss using chaffing covers later.

The Lower/Tighten Procedure
The most intuitive thing is to simply tighten the reef line as you lower the halyard. The Excess 14 halyard uses a 2:1 halyard, while the reef line is 1:1. You might assume this is the extent of the challenge. Focusing on just the halyard and the reef line, the friction points and the wind will cause the tack to tighten first (F4), as friction builds from the start of a moving point. As the halyard lowers, the luff will fall directly into the new tack, facilitated by the first friction point.
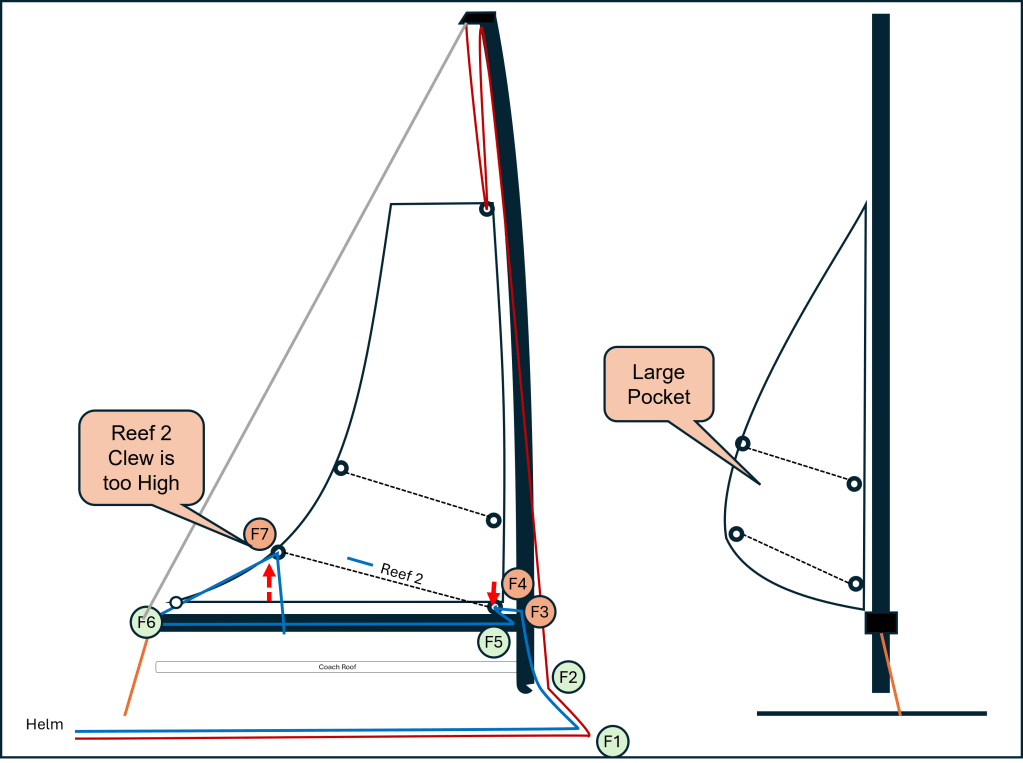
Only after the tack line pressure is maxed will the clew start to tighten (F7). This will result in the new clew being too high, and the tack being too low (indicated by red arrows). Pulling harder on the reef line might set the clew closer, but you’ll more than likely damage the tack friction ring as it gets pulled into the boom entrance. And the reef line guide on the mast (F3) will create so much friction, you’ll eventually blow the reef line. Attempting to finish the reefing procedure here will cause the boom to hit the coach roof as the main sheet is tightened. At best, you’ll cause damage to the gelcoat of the coach roof. At worst, you’ll damage the coach roof solar panels.
Managing Wind Power
Reefing should be done in anticipation of building wind, reducing power before it gets too strong. All too often, the wind builds quickly, requiring a quick and effective procedure. The real danger in the above Lower/Tighten procedure is how loose the clew can become, resulting in a large “power pocket”. If reefing downwind, the pocket will give the main even more power, risking an accidental jibe from a strong stern wave. Even if the main sheet is securely tightened, and you have a preventer on the leeward side, the pocket of the main can jibe independent of the boom. I’ve experienced this, and the power in the pocket drove the force forward causing the cast aluminum gooseneck to fracture, taking the main out completely. When sailing upwind, you’ll have excessive flailing while the tack tightens, and the clew is loose. Another owner once described visualizing a flailing sail as dollar bills being flicked off into the wind. The denomination of the bill being proportionate to the size of the sail. The proverbial “boat units” reference.
The Archimedes Procedure
I call this the Archimedes procedure, as the leverage of the boom balances the pressure on the tack and the clew, reducing the friction and load on the reefing line.
To start the procedure, ease the main sheet and lift the boom with the topping lift an uncomfortable amount higher than normal. If you have a boom vang, you’ll need to release it.
On the Excess 14, easing the main sheet is important as the sheave on the 1:1 topping lift is plastic and quite small. Pulling the topping lift on a tightened mainsheet risks wear in a place not easily inspected. By easing the main sheet, tightening the topping lift, and then trimming the mainsheet, the pressure is reduced on the topping lift sheave.
With the boom raised, and the main sheet trimmed tightly, lower the halyard and tighten the reef line, being sure to keep tension on the reef line.
Lowering the sail is a vulnerable point as the sail is no longer a working trimmed sail and risks an accidental jibe or flicking bills while flailing upwind. Use one winch to open the halyard clutch, then lower the halyard with the other winch for the reef line. If you have one electric and one manual winch, use the manual winch for the halyard, as you just need to release the pressure on the clutch/cam before lowering. Using the fast mode (button 1) of the winch on the reefing line will reduce the vulnerable time and provide more audible feedback when tightening the reef line. The slower mode is also the power mode and hides the sounds as the lines as they get too tight or unexpectedly catch something. You can carefully use the power button (2) to finalize the set.
As the halyard lowers, pull in the reef line, focusing on the clew. Noting the reef line is 1:1, and the halyard is 2:1, the reef will need to be pulled in twice as fast. Don’t stop when the tack is set, and don’t attempt to set the new clew in its eventual place, as it will require more strain on the tack line. With the raised boom, pull the clew close until the winch sounds “it’s done”. In stronger winds, if the winch is complaining before you’re happy with the set, pull reef 3 into a closed clutch, helping flatten the sail. Since reef 3 is a slab system, it can be pulled by hand. Then finish pulling in the reef line with the winch.
As seen above, at this point the new clew will be a bit high, and the new tack will be a bit low. Create a reference point with a piece of tape as the reef line enters the clutch or as the line approaches the closest deck organizer.
After performing this procedure a few times and adjusting the reef points, add some colored whipping line as the reference point, and the procedure will go even quicker. With the reference marks, if the lines seem tight and the reference marks aren’t where they’re expected to be, it’s an indicator that something isn’t right.
With the reef line set, ease the topping lift out to the maximum point. By marking the topping lift maximum extension, you reduce damage to the coach roof when reefing or dousing the main.
To finish the set, use the Archimedes method to trim the mainsheet with the boom as the lever. Remember, pressure builds from the starting point of motion. The leverage of the boom will pull the new clew tighter, as the starting point of motion has been reversed from the tack to the clew. This balances the pressure of the new tack. The tack will go slightly higher, giving some space for the reef line to enter the boom more cleanly (F5), and increase the angle on the mast guide (F3), and the clew will tighten in, giving space for the main sheet to be trimmed without risk of damage to the roof.
Finally, as the tack rises a bit, the halyard tension may need adjusting. With this approach, the main can be lowered, avoiding the “power pocket” or flailing, while not putting so much strain on the reef lines.

Reefing Steps
To recap the steps:
- Ease the mainsheet
- Raise the boom with the topping lift
- Tighten the main sheet, with the boom still at a high angle
- Lower the halyard while pulling in the reef line on the fast mode of the winch
- With an eased sail bag, watch the new clew as reference
- Use reference marks on the halyard and reef lines to know when the lines are set
- Use the fast mode of the winch to reduce the expensive and vulnerable time, providing audible feedback
- If needed, hand pull on reef 3 to help flatten the sail while winching the target reef line
- Ease the topping lift to the max reference mark
- Trim the main sheet, balancing the tack and the clew
- Check luff tension, trimming the halyard if necessary
- Check the reference marks
The same procedure can be used for Reef 1 and Reef 2. The minor difference with Reef 3 is setting the new tack with another line after lowering the halyard to its equivalent reference point. Using the leverage of the boom, the friction and pressure on the reef line is minimized.
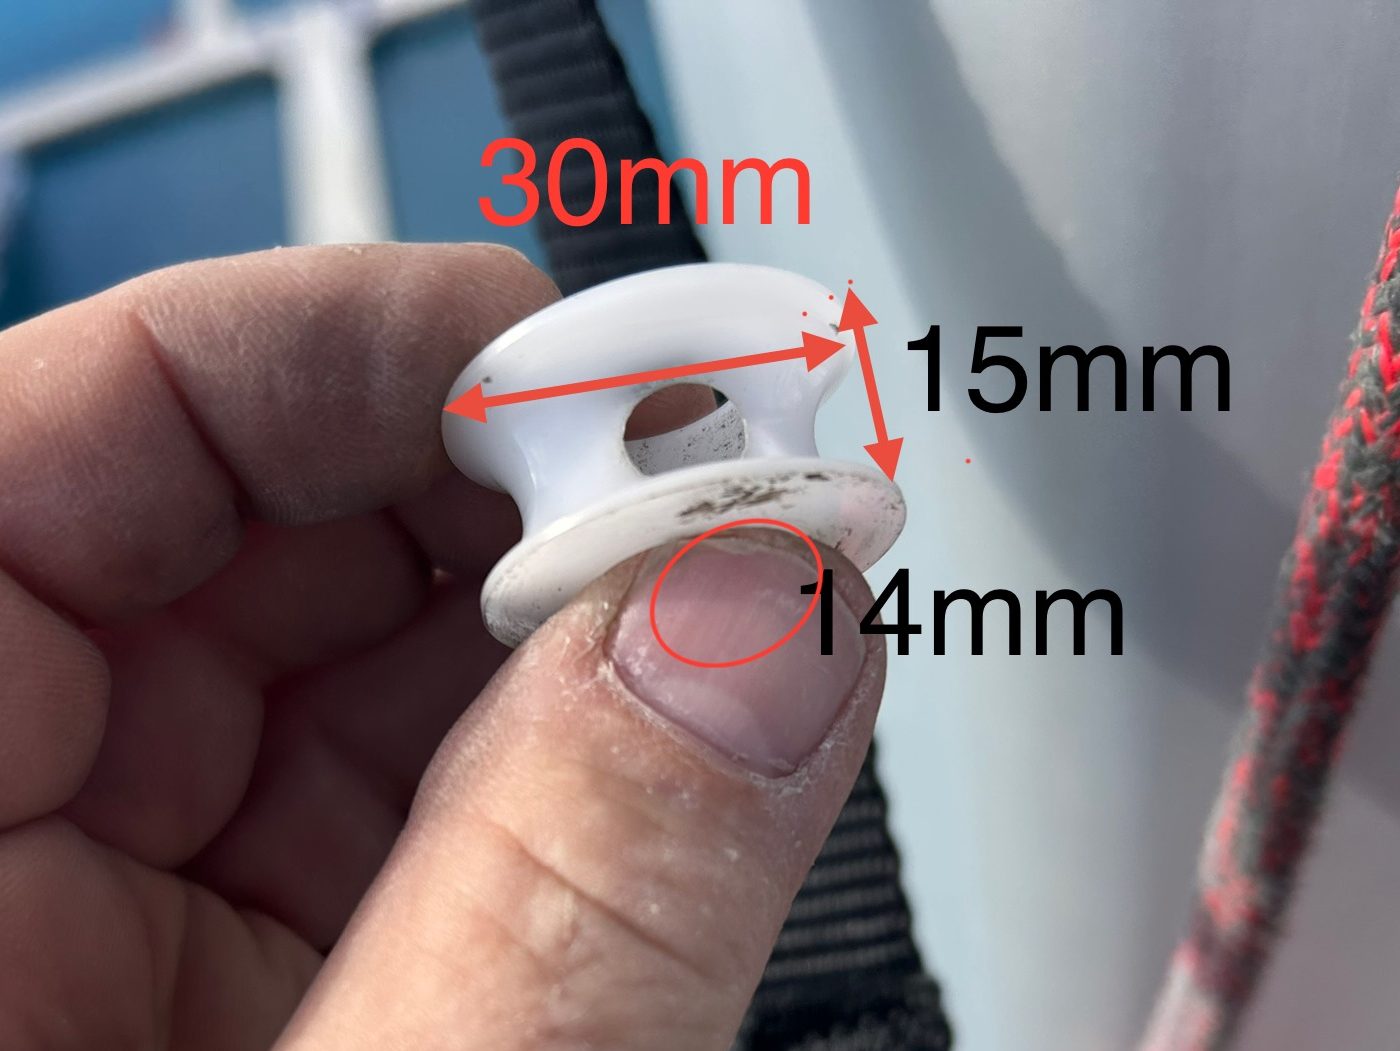
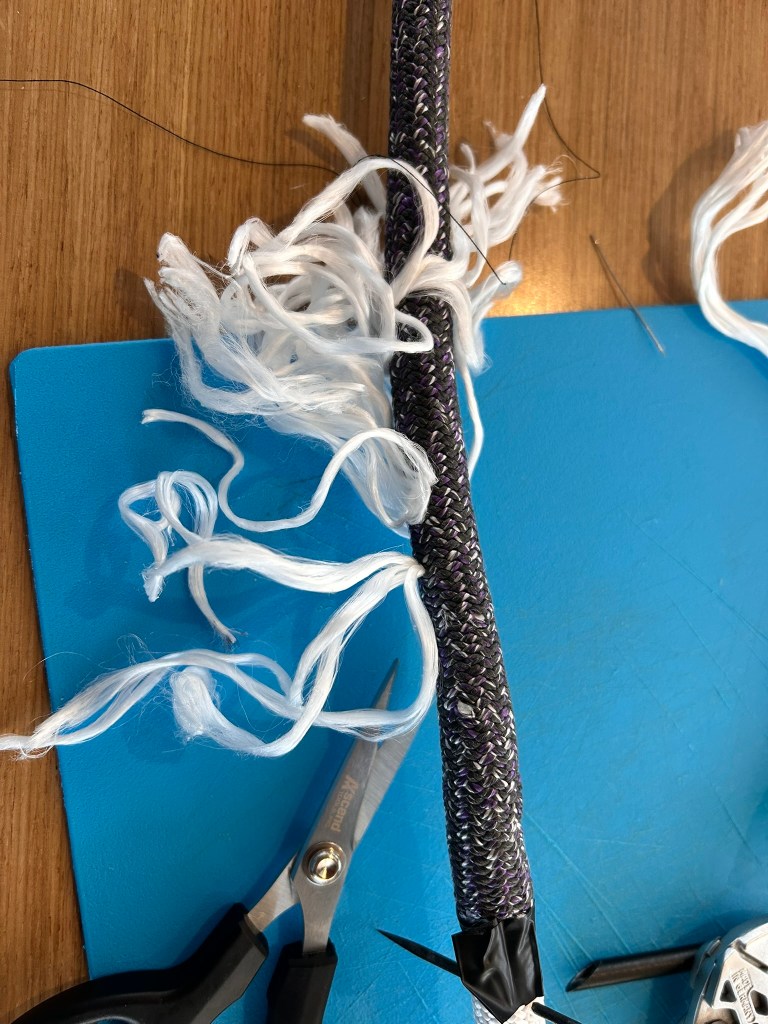
Protecting the Friction Points
Even with this procedure, the high friction points (F3, F4, F7) are a problem to manage. By covering these points with Dyneema chaffing covers, including the entry into the mast end of the boom, you’ll avoid that dreaded popping sound, which you know wasn’t a wave just hitting the hull.

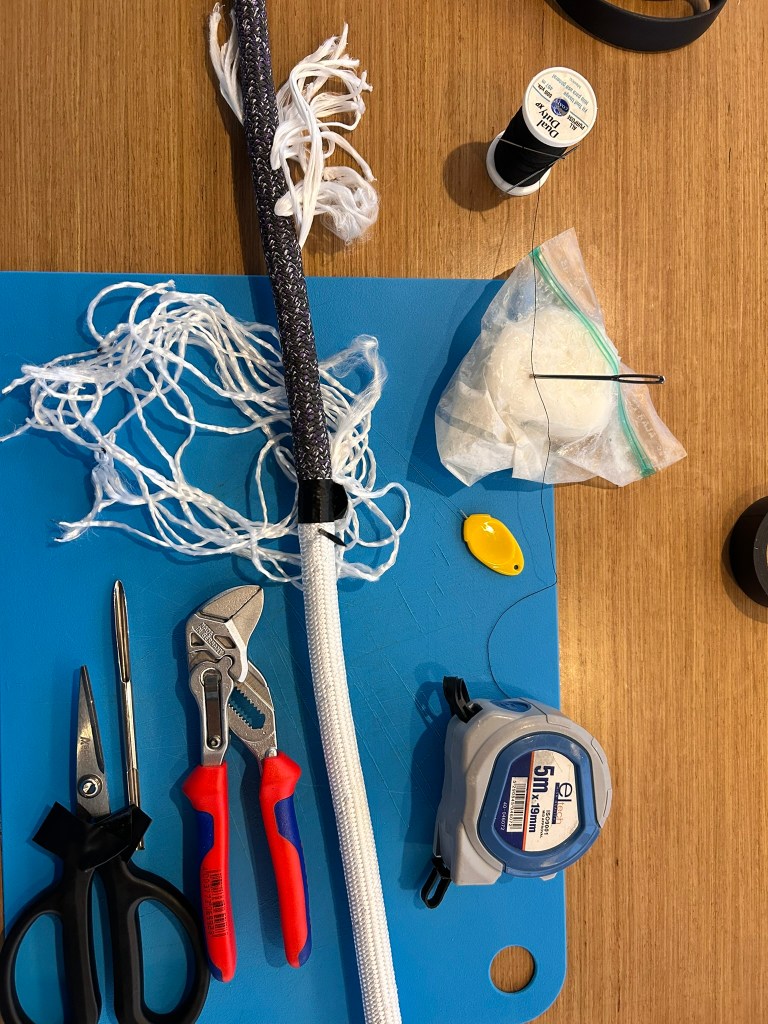

I’ve got an article queued up for this technique, based on this “YouTbue University” video:
Summing Up
There are extra steps with the Archimedes procedure. And a discussion could be made to switch the Excess 14 to a slab reef system, where you lower the sail, hook the new tack, and only pull the reef line onto the new clew. However, like most sailing techniques, the Archimedes technique becomes a quick routine, reducing the pressure on the lines and the sails while keeping the crew in the cockpit. This can all be done single-handedly, without having to go forward to the mast. A spare hand can assist with pulling the reef lines at the mast end of the boom and flaking the sail as it comes down.
When complete, the Archimedes procedure will have assisted in battling gravity, friction, and the wind, providing a well-trimmed and reefed main, reducing the pressure on the reef lines, and reducing the anxiety that likely delays the reef early decision, hoping the higher winds won’t come.

Leave a comment